What is Node-RED?
Node-RED is an open-source flow-based development tool designed for visual programming. It provides a browser-based editor that allows users to wire together hardware devices, APIs, and online services. With a drag-and-drop interface, developers can create applications by connecting pre-built nodes to define the logic of their workflows. Node-RED is particularly popular in the Internet of Things (IoT) domain for its ability to rapidly prototype and deploy IoT solutions. It is built on Node.js, making it easily extensible with a vast ecosystem of Node.js modules. Additionally, it supports integration with various protocols such as MQTT, HTTP, WebSocket, and more, enabling seamless communication between different systems and devices.
Originally developed by IBM, it has been around for many years and it has become stable enough to use it for production use cases as well. When using it in production it is mandatory to be able to control, update and control the fleet of distributed Node-RED nodes in the field. This tutorial gives some insight, ideas and best practices how to achieve this.
The following points are addressed:
- Installing Node-RED
- Control Settings
- Automating Node-RED flow deployment
- Using Github to build an automated CI/CD Node-RED deployment
Installing Node-RED
The easiest and most recommended way to get a working Node-RED installation is to follow the recipe on this from their Getting started page. This gives you Node-RED tutorials for Docker, Beagleboard and many others. We will use the installation for a Raspberry Pi.
If you have an installation from before just delete your .node-red directory as user pi. Then run the command form the web page:
bash <(curl -sL https://raw.githubusercontent.com/node-red/linux-installers/master/deb/update-nodejs-and-nodered)
In larger deployments Node-RED should be part of the master image. But it is possible to deploy this through file distribution in an automated fashion as well. This can also be used for updates.
Control settings
Useful background information about the settings
There are three main files in a typical Node-RED installation. Usually they are in the hidden .node-red directory under the user account that runs Node-RED. The settings.js contains all relevant settings. This file is created the first time Node-RED is run as long as there is no file from before. In the standard settings.js most settings are commented out. So it makes sense to configure this according to your use case. If a standard setting.js is used and a flow is created and deployed that contains credentials two new files are created: The flows.json and flows_cred.json. This is not 100% correct as the standard settings will create a flows_YOUR-HOSTNAME.json and a flows_YOUR-HOSTNAME_cred.json. This can also be controlled through settings. The _cred.json file contains an encrypted version of the credentials (for example your MQTT user name and password). And here it can get a bit confusing: In a standard settings.js file there is no password defined. Therefore Node-RED will create its own and save it in .config.json after the first time a flow with credentials is deployed. This can cause problems if this is not getting deleted properly.
Properly define your credentials
When a credentialSecret is defined in settings.js AND Node-RED was restarted then new credentials can be defined and will be encrypted with the key from settings with the next deploy.
Why are my Node-RED credentials empty?
When no password is defined in settings.js and a flow with credentials is deployed, Node-RED creates a secret key in .config.json. This key allows to decrypt flows_cred.json. But if the settings.js and the flows files are moved it is not possible to decrypt the credentials anymore. If configured correctly with a password in settings.js the .config.json should show an empty user entry at the end of the file. If there is an entry here (and you want to follow the instructions further) please delete the key. Another source of error is the ownership rights of the settings file. It seems that credentials only get decrypted if the settings.js file has the same ownership for group and user as the user running Node-RED. This means that for user pi it needs to look like this
16 -rw-r----- 1 pi pi 13444 Sep 7 15:16 settings.js
To correct this just call (the pi.pi doing the "change owner" both for user and group in one command)
chown pi.pi /home/pi/.node-red/settings.js
Creating a settings.js file that can be distributed to all devices
The first thing you want to do is to adjust your settings file. On Linux the settings.js file is copied from the /usr/lib/node-modules/node-red/ folder to your .node-red folder in your home directory when you start node-red, and there is no previous settings.js file present. This file contains a lot of options. Here we will only look at the ones that are relevant for describing our base use case. There are very good tutorials on the internet how to tweak and adjust additional settings. The settings file itself can also be explored in its latest version on github.
We recommend to base your settings.js file on the one that you get from your version of node-red (the path defined above), but it should be compatible across versions as well.
There is one setting in Node-RED called credentialSecret: "a-secret-key". Once you set this property, do not change it - doing so will prevent node-red from being able to decrypt your existing credentials and they will be lost. We circumvent this problem by playing out a defined settings.js with your password and the according flows_creds.json to all devices.
Let's get started. Please install Node-RED on your local development machine and start Node-RED. This can be done on any platform. Just make sure that you do not have a previously set key in .config.json (see warning above).
This will copy a settings.js file into your .node-red folder. Open this and edit the following items: Remove the trailing "//" to activate this the following. This basically removes the dependency of the device hostname out of the flow name and makes life easier.
//flowFile: 'flows.json',
Do the same with the following and insert your secret key.
//credentialSecret: "a-secret-key",
Thus this line changes into
credentialSecret: "my-personal-secret-key",
Then save this file again and restart Node-RED. Now it is time to fire up Node-RED and create a basic flow.
Automating Node-RED flow deployment
Utilizing a static flow file
Let's build a simple example with MQTT. This is a weather station that outputs the weather as a string and sends it to a debug output and to a MQTT output node. An inject node, a function node and a debug node is needed for each. This is how the flow will look:
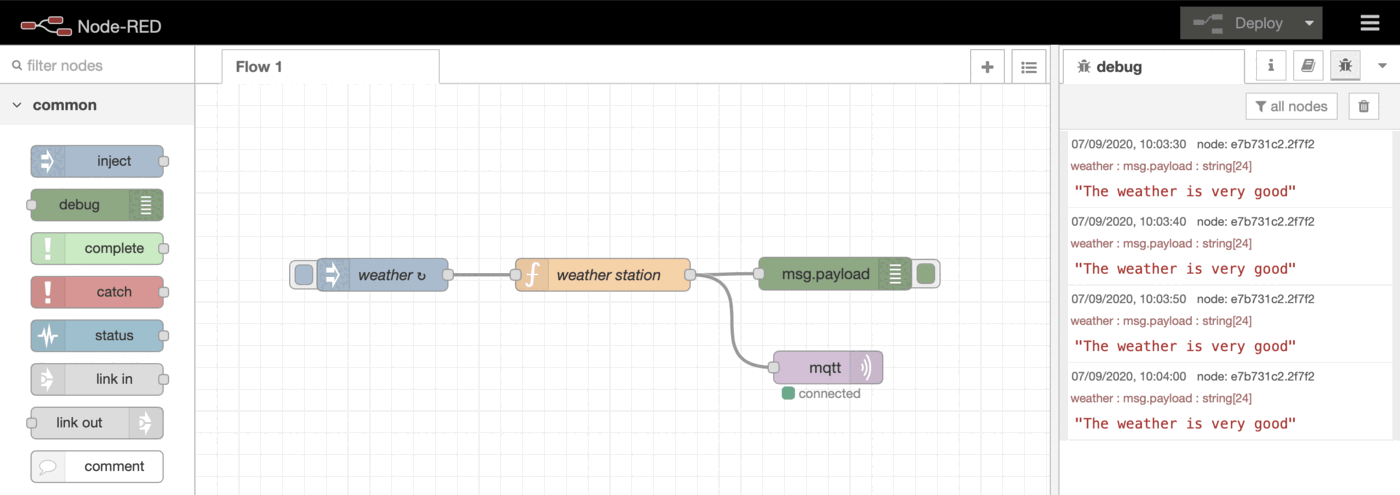
The complete flow can be seen here and be copied into your Node-RED editor:
flows.json
    [
  {
    "id": "117f088e.84eb97",
    "type": "tab",
    "label": "Flow 1",
    "disabled": false,
    "info": ""
  },
  {
    "id": "d75ee7b0.0775c8",
    "type": "inject",
    "z": "117f088e.84eb97",
    "name": "weather",
    "props": [
      {
        "p": "payload"
      },
      {
        "p": "topic",
        "vt": "str"
      }
    ],
    "repeat": "10",
    "crontab": "",
    "once": true,
    "onceDelay": 0.1,
    "topic": "weather",
    "payload": "very good",
    "payloadType": "str",
    "x": 171.5,
    "y": 175,
    "wires": [
      [
        "d1e24e2f.b5a2"
      ]
    ]
  },
  {
    "id": "d1e24e2f.b5a2",
    "type": "function",
    "z": "117f088e.84eb97",
    "name": "weather station",
    "func": "var payload = msg.payload;\n\nmsg.payload=\"The weather is \"+msg.payload;\n\nreturn msg;",
    "outputs": 1,
    "noerr": 0,
    "x": 373.5,
    "y": 175,
    "wires": [
      [
        "e7b731c2.2f7f2",
        "ae91ac8a.7bf89"
      ]
    ]
  },
  {
    "id": "e7b731c2.2f7f2",
    "type": "debug",
    "z": "117f088e.84eb97",
    "name": "",
    "active": true,
    "tosidebar": true,
    "console": false,
    "tostatus": false,
    "complete": "false",
    "x": 586.5,
    "y": 174,
    "wires": []
  },
  {
    "id": "ae91ac8a.7bf89",
    "type": "mqtt out",
    "z": "117f088e.84eb97",
    "name": "",
    "topic": "",
    "qos": "",
    "retain": "",
    "broker": "bcb17249.9cb7c",
    "x": 580,
    "y": 260,
    "wires": []
  },
  {
    "id": "bcb17249.9cb7c",
    "type": "mqtt-broker",
    "z": "",
    "name": "qbee",
    "broker": "your-broker.com",
    "port": "8888",
    "clientid": "",
    "usetls": false,
    "compatmode": false,
    "keepalive": "60",
    "cleansession": true,
    "birthTopic": "",
    "birthQos": "0",
    "birthPayload": "",
    "closeTopic": "",
    "closeQos": "0",
    "closePayload": "",
    "willTopic": "",
    "willQos": "0",
    "willPayload": ""
  }
]
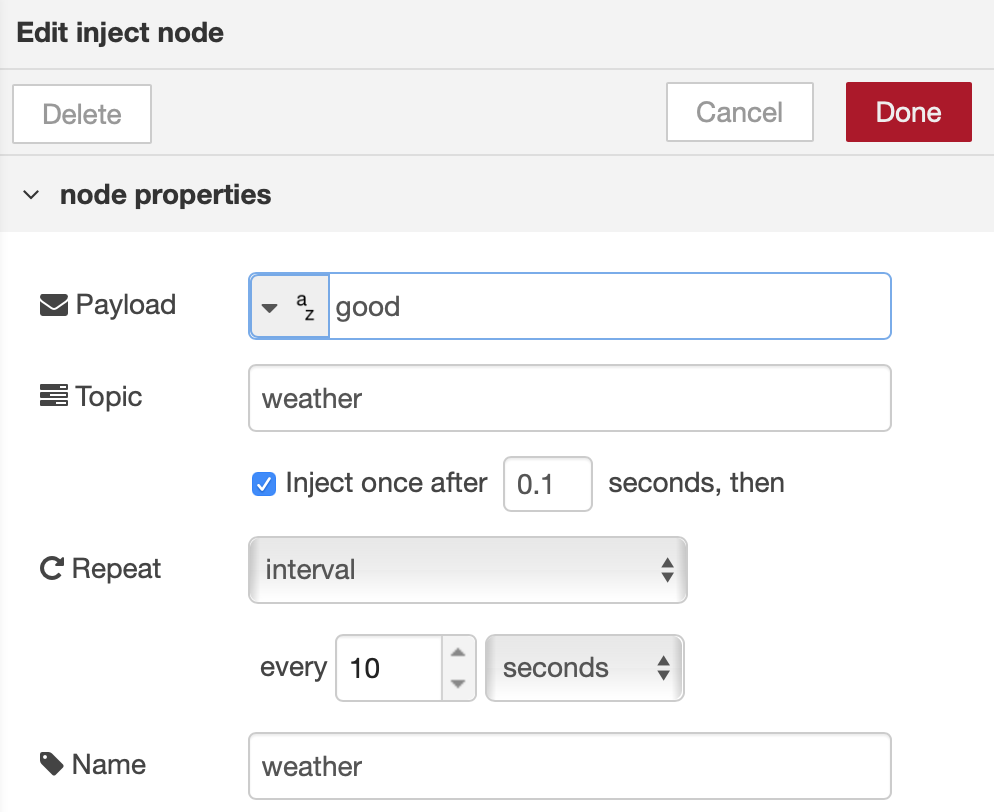
The weather is hard-coded for now. The relevant injectors and functions look as follows:

Please run the flow locally, add your MQTT credentials and you should see the weather message both in the debug output and your MQTT stream. This flow is a static flow and it could be distributed to a large number of devices by including settings.js, flows_cred.json through file distribution.
Using templating for automated parameter adjustments
In real life Node-RED applications changes often need to be introduced between different installations. Typical examples of this are:
- different modbus addresses
- a different string to tag a device
- adjust an update rate dynamically
- point to a different MQTT server
- change the MQTT topic
With templating you can do all this on a device, group or tag level with the templating engine.
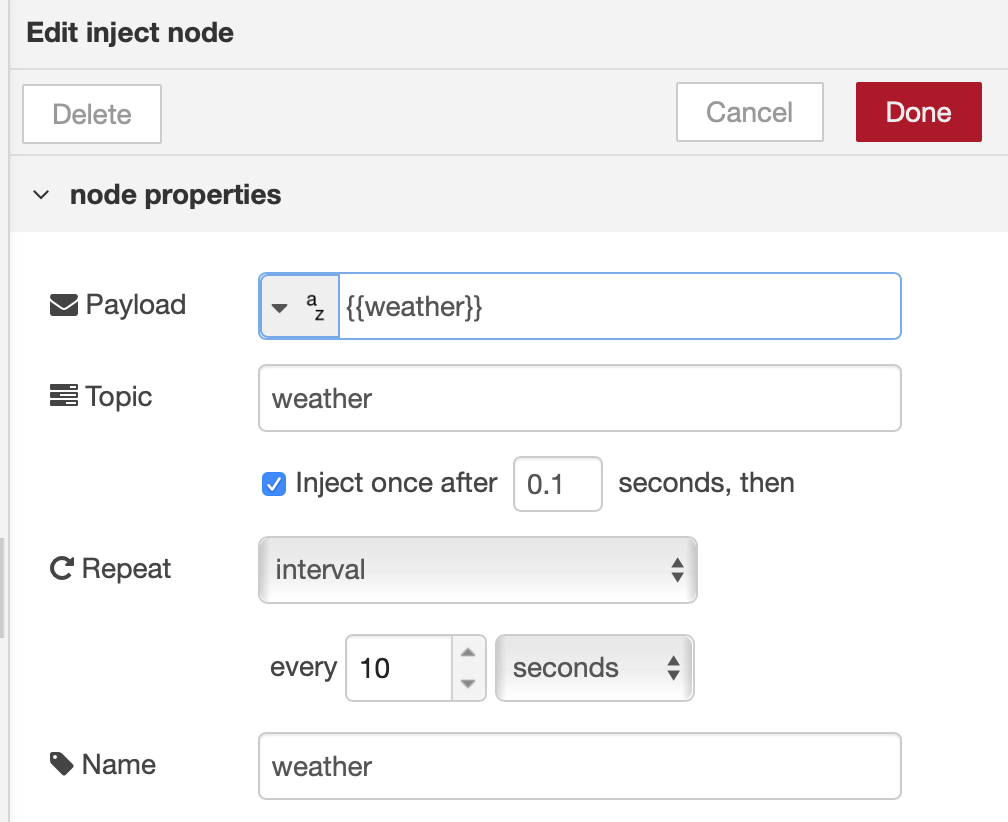
Let's revisit the flow and change it into qbee's templating format by using a so-called Mustache notation. This basically means that the exposed key-value variable will be made accessible by qbee. So instead of having the value "very good" we define the payload as {{weather}} introducing "weather" as key and defining the value through templating. This can be done in the Node-RED editor or just in the json text file. If done in the editor please deploy to write the json.
Ignore editor warnings when defining numbers as string
If you have defined a payload as number and then you introduce a {{my-number}} string an error message is issued. This can be ignored. Just make sure that the value you insert later is a number.
Instead of using the flows.json we copy and rename the new flow into
flows.tmpl
This file is used by the agent to create the real flows.json on the device after the automated key-value extraction.
Now you upload the settings.js and the flows.tmpl and the according flows_cred.json to the qbee file manager. Since file manager does not work with hidden files yet these need to be copied to a non-hidden location first.
Now everything is prepared to play out files and configuration to real target machines. We are assuming that we run Node-RED as user pi from the /home/pi user directory.
Distributing unique setting files with templating
In the devices tab of the web app we create a tree structure with one or more devices to experiment. In this case we can later select a whole group, a sub-group or a single device to execute the file distribution upon. For a reference about the qbee tree concept, please follow the link.
It is also possible to play out the same flows to all devices in production and then configure them differently for a specific group such as "group_A". If a device is moved from one group to another or if new devices will be moved into a group they will automatically receive the correct Node-RED files and templating variables. For a proper Node-RED file distribution we need to play out the settings.js, the flows.tmpl (if no templating is used use flows.json) and the flows_cred.json.
Now we can start defining the configuration to achieve the templating. Go into the "Configure" menu of qbee and navigate to the group or device that is supposed to receive the configuration. Select the function "file distribution". In our case we select the group "group_A", as can be seen in the selector box.
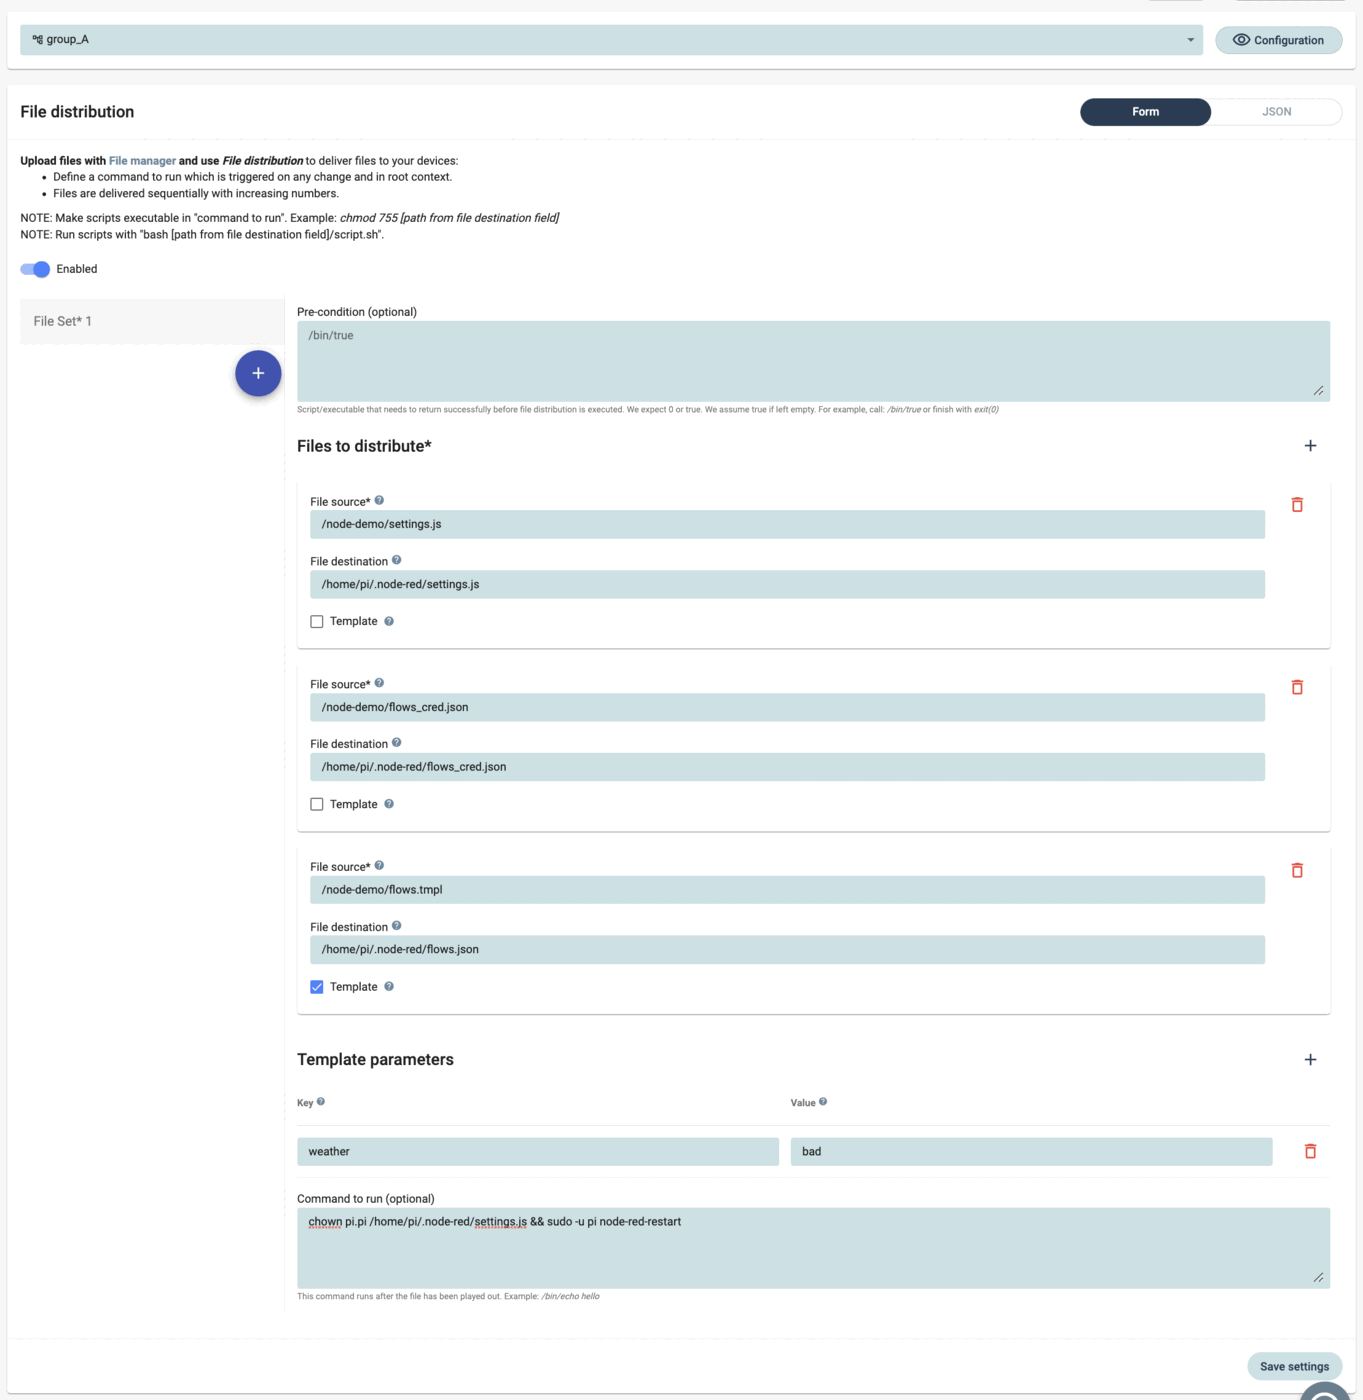
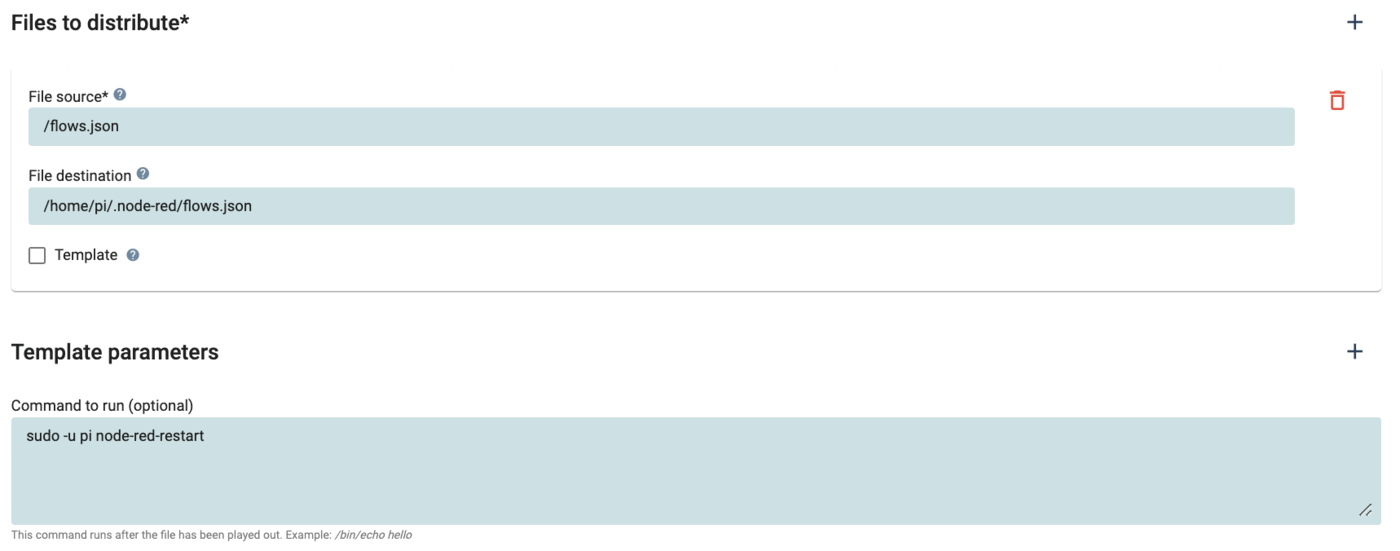
In file distribution please enable this for this group level, and then we define the files we want to distribute. In our case all files reside in the /node-demo/ folder in the file manager.
So first we distribute
/node-demo/settings.js
to
/home/pi/.node-red/settings.js
and then we do the same with the credential file:
/node-demo/flows_cred.json
to
/home/pi/.node-red/flows_cred.json
The third file is slightly different. If you only have static content you would play out the flows.json. But since we demo templating we distribute the file with the templating variable in Mustache notation that we called flows.tmpl. In addition, we need to check the "templating" box that allows to define one or more key-value pairs:
/node-demo/flows.tmpl
to
/home/pi/.node-red/flows.json
Any time there is a change in the value for the key "weather" the agent will expand the flows.tmpl into a new flows.json on the device. This will then trigger the "command to run" and restart Node-RED. From there the flow runs with the new variable.
Now we can define what the weather should be this time. We define it as "bad"
weather : bad
In order to make this all active we need to do one more thing. We need to issue a "command to run" that will be triggered each time something changes or the first time a device is moved into that group. Commands in this box can be chained using &&. There are two things to do here. First we need to change the ownership of the settings.js file to the local user "pi" and also to group pi (usually qbee does this automatically. The command chown pi.pi file changes both user and group for "file". This is needed in order to allow Node-RED to function properly. And then we need to restart Node-RED as user "pi":
chown pi.pi /home/pi/.node-red/settings.js && sudo -u pi node-red-restart
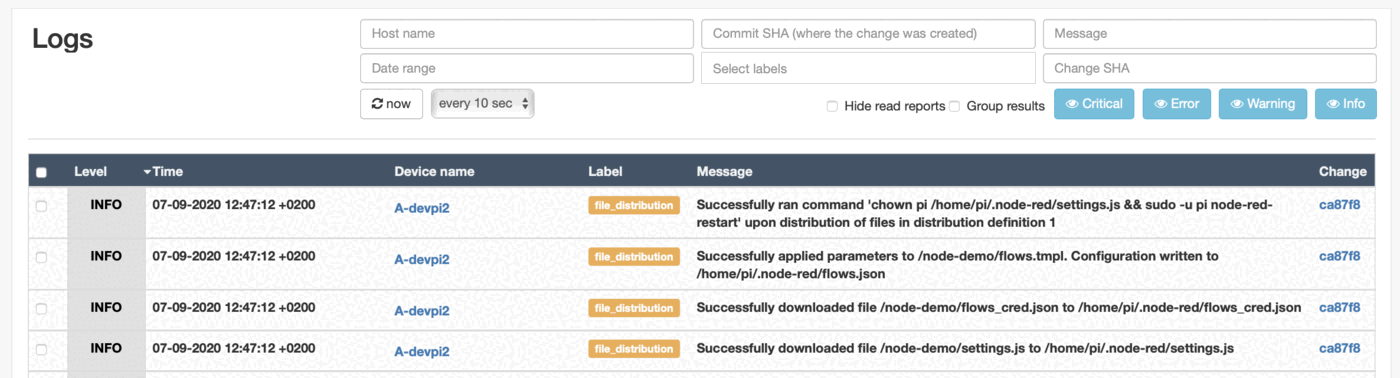
Please save and commit these changes and wait one run interval of the qbee agent. In the log files you will see that both the flows.tmpl file was transformed into the flows.json with the appropriate value and that the settings.js and flows_cred.json files were played out. It also displays that Node-RED was restarted automatically.
Investigating the result of the automated Node-RED deployment
Has it worked? Well, let's see by going to the remote device and press on the debug pane. Now there should be a weather state defined as bad. J
Ok, then let's check how it could look like for different weather settings in an MQTT client like CloudMQTT:

qbee.io has an audit function that tracks any change to the system. Your changes will appear there.
This part of the tutorial has shown how to handle Node-RED and gave some insights into the pitfalls and problems associated with moving the flow, credential and setting files around between different installations and devices as often done in production environments. In addition, it is possible to work with templating which allows to re-use flows by exposing certain key-value variables into the qbee UI making them accessible from the tool (or through the API). Thus the templating allows to apply certain conditions to a group, a sub-group or a single device.
Using Github to build an automated CI-CD Node-RED deployment
For full automation these flows can also be developed and handled through Github or any other similar tool. Together with the API this allows to create CI/CD (continuous integration, contionuous deployment) pipelines. Let's reuse the flows.json example from above and deploy it to a fleet.
Creating the logic to connect Node-RED with qbee through GitHub
This is the automatic workflow:
- use git for version control management
- setup a GitHub runner (using GitHub actions) to build our code once a push is triggered
- copy the new
flows.jsonto the file manager via API calls - use the system's file distribution to upload the new file to a list of devices and to restart Node-RED
Once a repository is set up, we specify the GitHub secrets as shown in the following screenshot. We define the qbee login mail address as USERNAME_KEY and the password as PASSWORD_KEY.
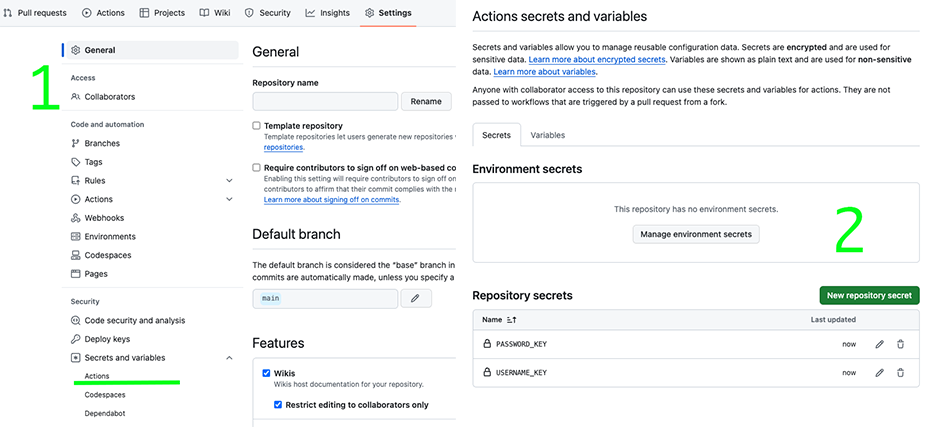
There we specify the username and password, as we do not want them to be exposed.
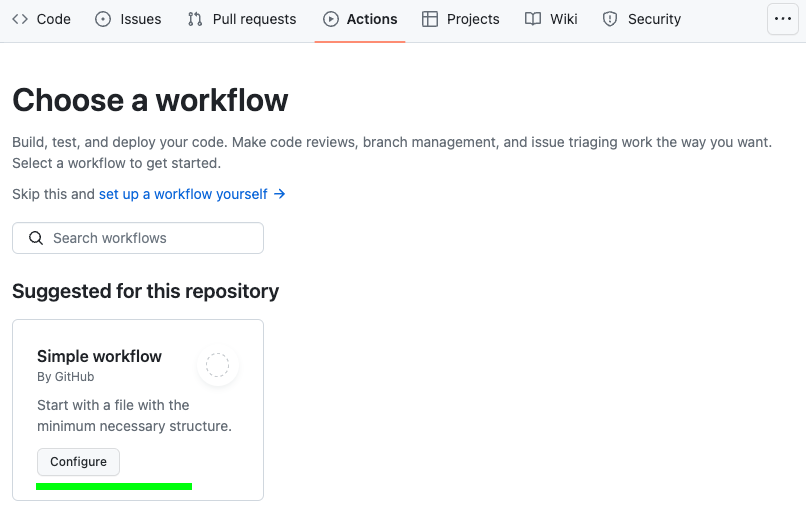
Now GitHub actions need to be configured. These actions execute the script defined in the YAML file on the runners. Runners can be utilized through GitHub (both as a free or paid service) or you can set up runners on your local machine or in any other data center. In order to create a GitHub action please use the "set up a workflow yourself").
The script we used is the following:
node-red-flow-distribution.yml
name: Automated Node-RED flow file distribution

on:
 push:
    branches: [ main ]
 pull_request:
    branches: [ main ]

jobs:


 build:
    runs-on: ubuntu-latest
    env:
        FLOWNAME: flows.json

    steps:
    - uses: actions/checkout@v2

    - name: qbee.io authentication
      uses: qbee-io/authenticate-action@main
      with:
        login: ${{ secrets.USERNAME_KEY }}
        password: ${{ secrets.PASSWORD_KEY }}

    - name: qbee.io file upload
      uses: qbee-io/qbee-io/file-upload-action@main
      with:
        source: flows.json
        destination: '/'
Comments on the yaml file
- this action is triggered on pushes to the
mainbranch - the runner is a virtual machine with an
UbuntuOS as we specifiedubuntu-latest - Now the full code is checked out by this command
actions/checkout@v2 - a custom GitHub action places the output file into the file manager (within the action the REST API is used, c.f. file distribution via API)
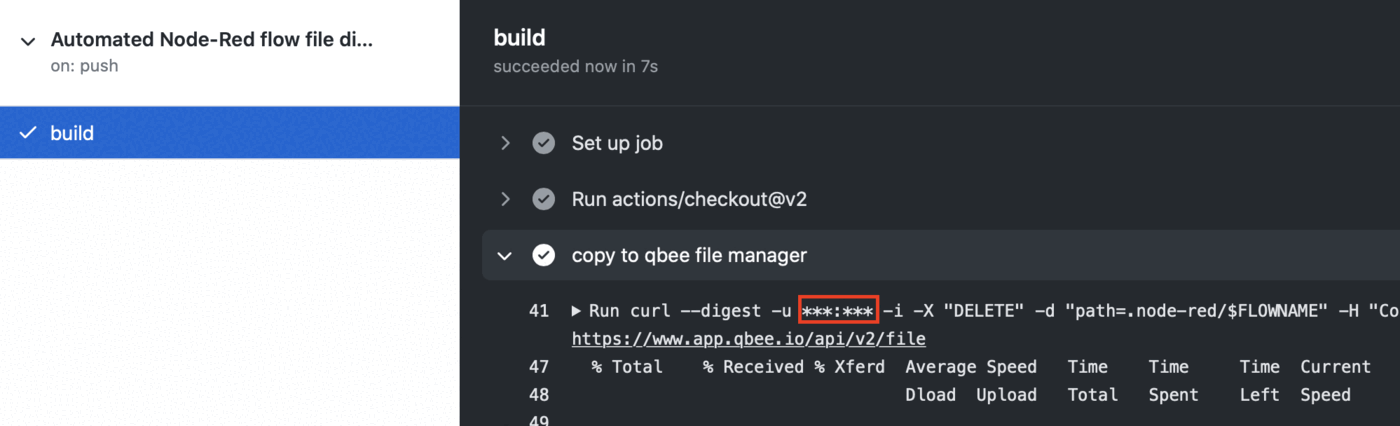
You cannot see any credentials in the action output due to the "secret" function:
Finally, we distribute our files to the remote devices as usual with the internal file distribution.
As a "command to run" we use sudo -u pi node-red-restart or whatever command you use to restart Node-RED.
Summary
Using this workflow, every time you push your Node-RED flow changes to the repository the new flow will be replaced within the file manager. If the flow file differs from the one previously placed in the file manager, then file distribution is triggered along with the run command that you provided. This distributes the flows to all devices in scope and restarts Node-RED.
Hence, all your edge devices are updated by a simple git push :). This is an example of how easy it is to connect Node-RED with Github and automate your workflow.