In short - Access the qbee.io API through custom GitHub actions
We provide several custom GitHub actions such that you can conveniently access our API from your automated GitHub CI without worrying about any details. The provided GitHub actions allow for a simple interaction with the qbee.io API which are accessible when from GitHub runners.
We introduce our custom GitHub actions and provide the corresponding repository links. At the end we provide a complete GitHub workflow example.
Authentication action
All the qbee.io API calls require an authorization token. To obtain that token we created the qbee-io/authenticate-action. Simply add
qbee-io/authenticate-action
name: qbee.io authentication
uses: qbee-io/authenticate-action@main
id: qbee-auth
with:
    login: ${{ secrets.USERNAME_KEY }}
    password: ${{ secrets.PASSWORD_KEY }}
to your workflow file.
Input variables
login: the username you use to log into the qbee.io platformpassword: the corresponding password
This information is sensitive and we recommend storing it in GitHub secrets such that it is encrypted.
File upload action
To upload files to the qbee.io file manager from a GitHub action workflow we created qbee-io/file-upload-action. Simply include the following snipped
qbee-io/file-upload-action
name: qbee.io file upload
uses: qbee-io/qbee-io/file-upload-action@main
with:
    source: '<file-path>'
    destination: '<destination-directory>'
to your yaml file.
Input variables
source: path of the source filedestination: path to File Manager directory in qbee.io
Setting up a complete GitHub action workflow
Here, we show how to set up an entire workflow from scratch where we set up a GitHub runner (using GitHub actions) to copy the desired files to the qbee.io file manager via API calls. With a new upload to the file manager a file distribution can be triggered on your remote device.
How to create a repository on GitHub
Check out the official repo creation documentation on how to create a repository on GitHub.
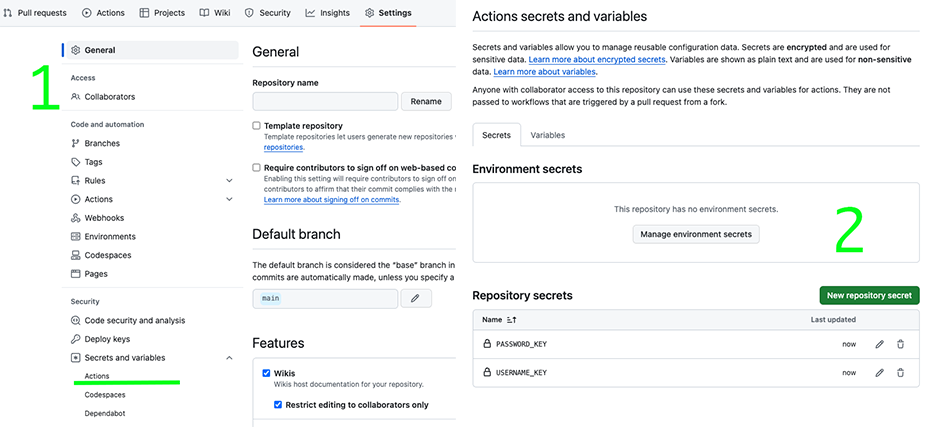
Once a repository is set up, before creating a runner, setup GitHub secrets as shown in the following screenshot to store your qbee.io credentials.
There we specify our qbee.io username USERNAME_KEY and password PASSWORD_KEY, as we do not want them to be exposed.
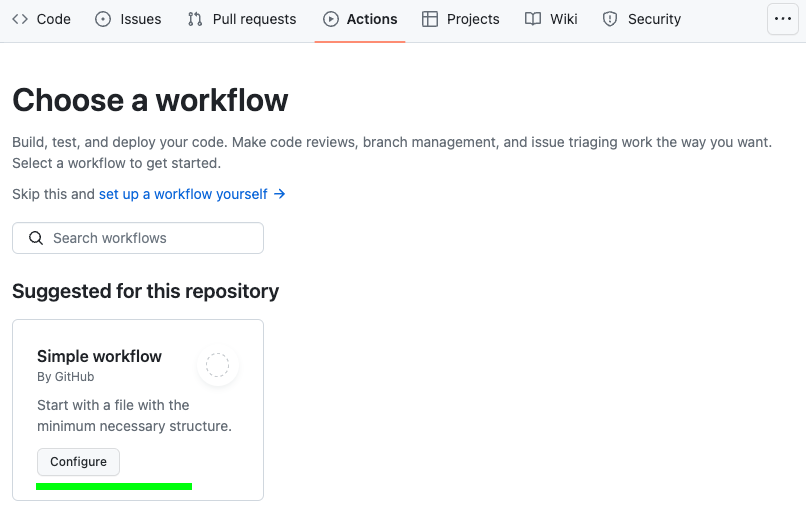
Once that is done, we create a GitHub actions which runs our setup script on the runners provided by GitHub (or you can set up your own runners). GitHub actions can be created as follows (we use "set up a workflow yourself")
We use the following demo script where we simply create a tar file out of the repository and upload it afterwards to the file manager.
main.yml
name: qbee.io upload
on:
  push:
    branches: [ main ]

jobs:
  build:
    runs-on: ubuntu-latest
    steps:
    - uses: actions/checkout@v4

    - name: create tarball
      run: |
        mkdir ./tar
        tar --exclude='./.git' --exclude='./.github' --exclude='./tar' -czvf ./tar/repo.tar .


    - name: qbee.io authentication
      uses: qbee-io/authenticate-action@main
      with:
        login: ${{ secrets.USERNAME_KEY }}
        password: ${{ secrets.PASSWORD_KEY }}

    - name: qbee.io file upload
      uses: qbee-io/qbee-io/file-upload-action@main
      with:
        source: './tar/repo.tar'
        destination: '/github_actions_upload'
File upload repository
The latest version of the example action can be found here
The tar file can for example be extracted on the devices with an appropriate command to run.
Comments on the yaml file
- this action is triggered on pushes to the
mainbranch - the runner is a virtual machine with an
UbuntuOS as we specifiedubuntu-latest - on that virtual machine (freshly created for you on every single run) the code from your repository is checked out using the
actions/checkoutoption - we create a
tararchive in the stepcreate tarballon the virtual machine - authentication to qbee.io is performed via
qbee-io/authenticate-action - the upload to the file manager is performed via
qbee-io/file-upload-action
Note that your credentials aren't revealed as we use GitHub secrets to encrypt them.

