How to setup a Raspberry Pi headless?
When you start working with a fleet of Raspberry Pis it becomes quickly obvious that you need some way of doing a headless Raspberry Pi install and setup. This is especially true if you want to use your edge devices in production and commercial operations. This tutorial gives you some ideas how to solve this task and hopefully you will get additional ideas what you can do. The steps we do here are the following:
- define a group for the installation (different groups can have different settings such as Wi-Fi credentials or localizations or software applications)
- create a bootstrap key for that specific group such that new device will automatically be added to that group and receive all its configuration
- do a secure bootstrap
- define and configure your raspi-config file exactly as needed
- apply the configuration
In the device tree you define one or more groups for your devices. In this case we use "Production".
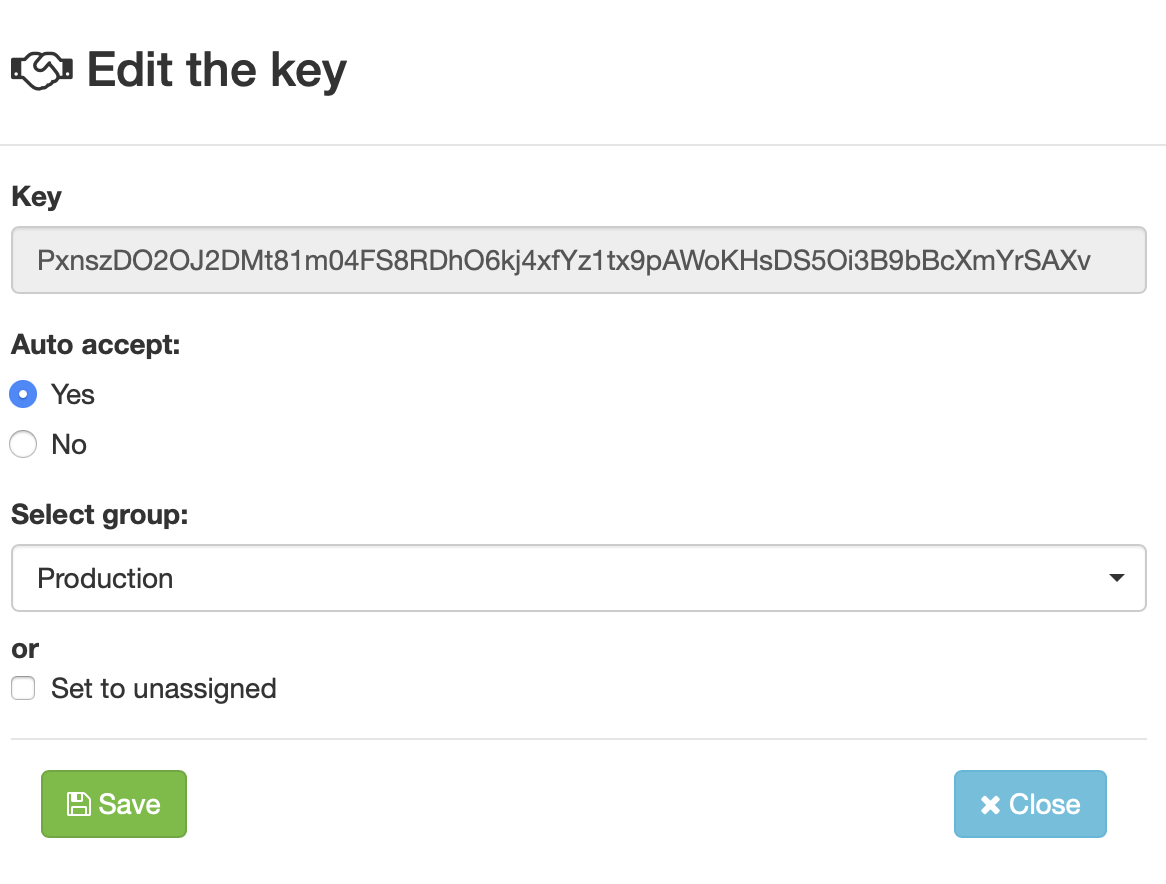
Then, go to the Bootstrap key menu and create a new key. Edit it and select group "Production" and auto accept. Now you can use this key for your Raspberry Pi bootstrapping (the key is obviously revoked again before publishing this). This will look as follows:
Run the bootstrapping command with the specific key on your devices.
There are different ways to distribute bootstrap keys in a Raspberry Pi headless setup:
- Make the qbee agent package part of your image and then use a script to bootstrap it with key included
- Do this manually executing the bootstrap on the device (then it is not 100% headless anymore)
- use a USB key with autorun containing a bootstrap script
Just make sure that the bootstrap key stays safe or revoke it from the qbee interface.
When you start your device this would be the time when you usually run raspi-config. We run this through the qbee configuration engine now. Go to ["Configure -> File distribution" and there you need to define two files and some templating.
The first file is a script called raspi-config-script.sh that uses a special command to run parts of the raspi-config per item. Please note that only the relevant parts are uncommented. It looks like this:
#!/usr/bin/env bash
# Command control strings

# receive configuration from raspi-config.conf

source /usr/local/bin/raspi-config.conf

# sudo raspi-config nonint do_hostname %s $CUSTOM-HOSTNAME

# sudo raspi-config nonint do_boot_wait %d

# sudo raspi-config nonint do_boot_splash %d"

# sudo raspi-config nonint do_overscan %d

# sudo raspi-config nonint do_camera %d

sudo raspi-config nonint do_ssh %d $SSH-ENABLE

# sudo raspi-config nonint do_vnc %d {{vnc_0_yes_1_no}}

# sudo raspi-config nonint do_spi %d

# sudo raspi-config nonint do_i2c %d

# sudo raspi-config nonint do_serial %d

# sudo raspi-config nonint do_onewire %d

# sudo raspi-config nonint do_rgpio %d

# possible overclock options: None|Modest|Medium|High|Turbo
# sudo raspi-config nonint do_overclock %s

# sudo raspi-config nonint do_memory_split %d

# sudo raspi-config nonint do_resolution %d %d

sudo raspi-config nonint do_wifi_country %s $WIFI-COUNTRY

$REBOOT
For more information on [running scripts and templating(qbee-running-scripts.md) please look follow the link. So here we expose the variables $CUSTOM-HOSTNAME, $SSH-ENABLE, $WIFI-COUNTRY and $REBOOT. The variables are defined in the sourced file source /usr/local/bin/raspi-config.conf.
This source /usr/local/bin/raspi-config.conf will be expanded from the raspi-config.tmpl file (again check the link above to understand this better). That raspi-config.tmpl needs to be uploaded with the file manager just as the script raspi-config-script.sh. The .tmpl file looks like this:
# config template file for raspi-config-script.sh
# deploy to /usr/local/bin/raspi-config.conf

# uncomment line and expose parameter through mustache notation {{epoch}}
# please remember: 0 is active/enabled and 1 is disabled
# %d expects a number, %s expects a string

export SSH-ENABLE="{{ssh_0_yes_1_no}}"

export CUSTOM-HOSTNAME="{{hostname}}"

# use two letter country short code, example NO
export WIFI-COUNTRY="{{wifi_country}}"

# define as "shutdown -r now" for reboot
export REBOOT="{{reboot}}"
Now we need to put both files into the same file distribution and check the "template" checkbox for the .tmpl file. That file will be expanded and written with the .conf ending into the correct path.
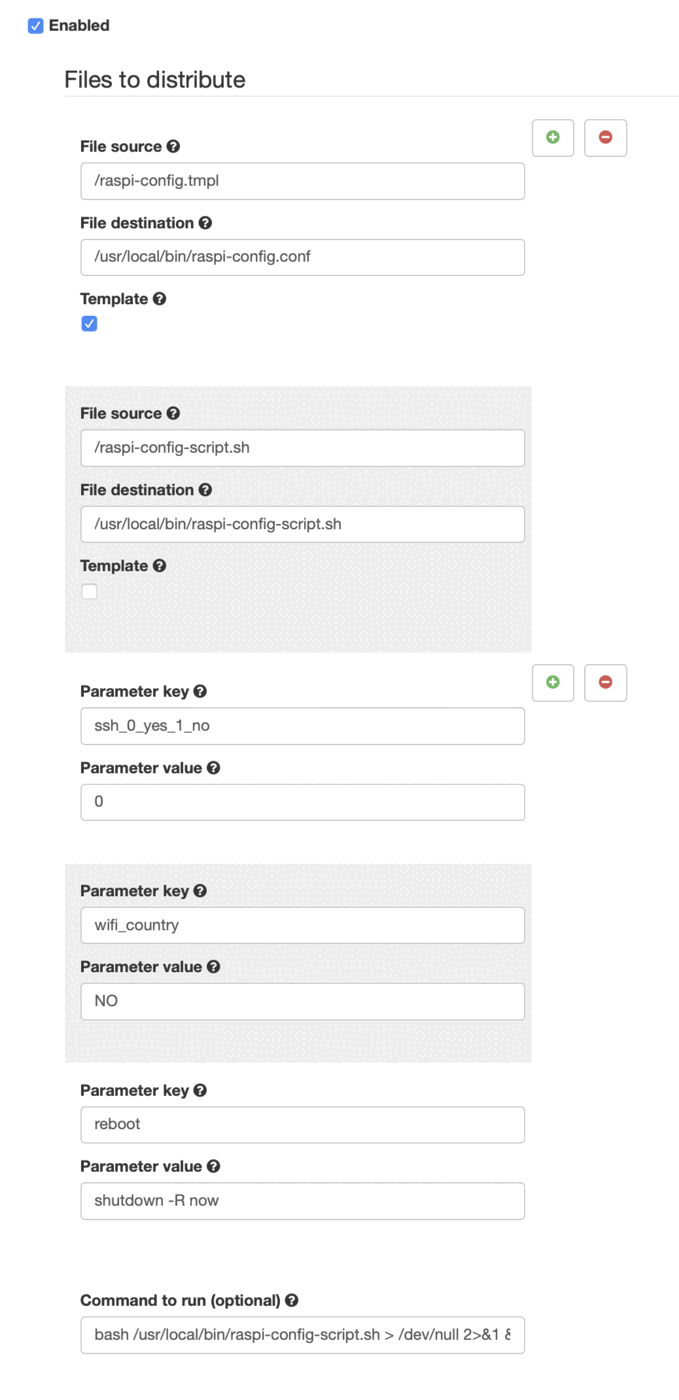
The command to run will get triggered with any change in the configuration. This command is as follows: bash /usr/local/bin/raspi-config-script.sh > /dev/null 2>&1 &
Now you can select if ssh is enabled or not (please note that 0 is active). We also set the Wi-Fi country. In order to make this active we need to reboot the device. By calling shutdown -r now we do that immediately. Here other options can be used as well.
Do not forget to specify for which group this is valid and save and commit!
As soon as this configuration is active all devices that end in this group (and with the correct bootstrap key they end there automatically) will receive the configuration and configure themselves accordingly.
Next steps for future tutorials are:
- set wi-fi password
- configure firewall
- define NTP servers
- set users and passwords
- play out ssh keys
- install software
- OTA update of packages