Fleet Management with qbee.io and Moxa gateways such as the UC-3100 series
In this tutorial we show you how to automate the fleet management of distributed embedded devices. As an example we use a Arm-based Moxa device from the UC-3100 series. But this will work with any Linux based device.

Basic configuration
How to automate fleet management with Moxa gateways
We assume your device is connected with an internet connection. qbee could automate this with scripting and file distribution as well but we want to keep it simple here. You need to do the following steps:
- create a qbee.io user account
- install qbee agent
- bootstrap
- define your device tree (you can run different configuration on different groups or devices)
Now you should see your device in the qbee main view:
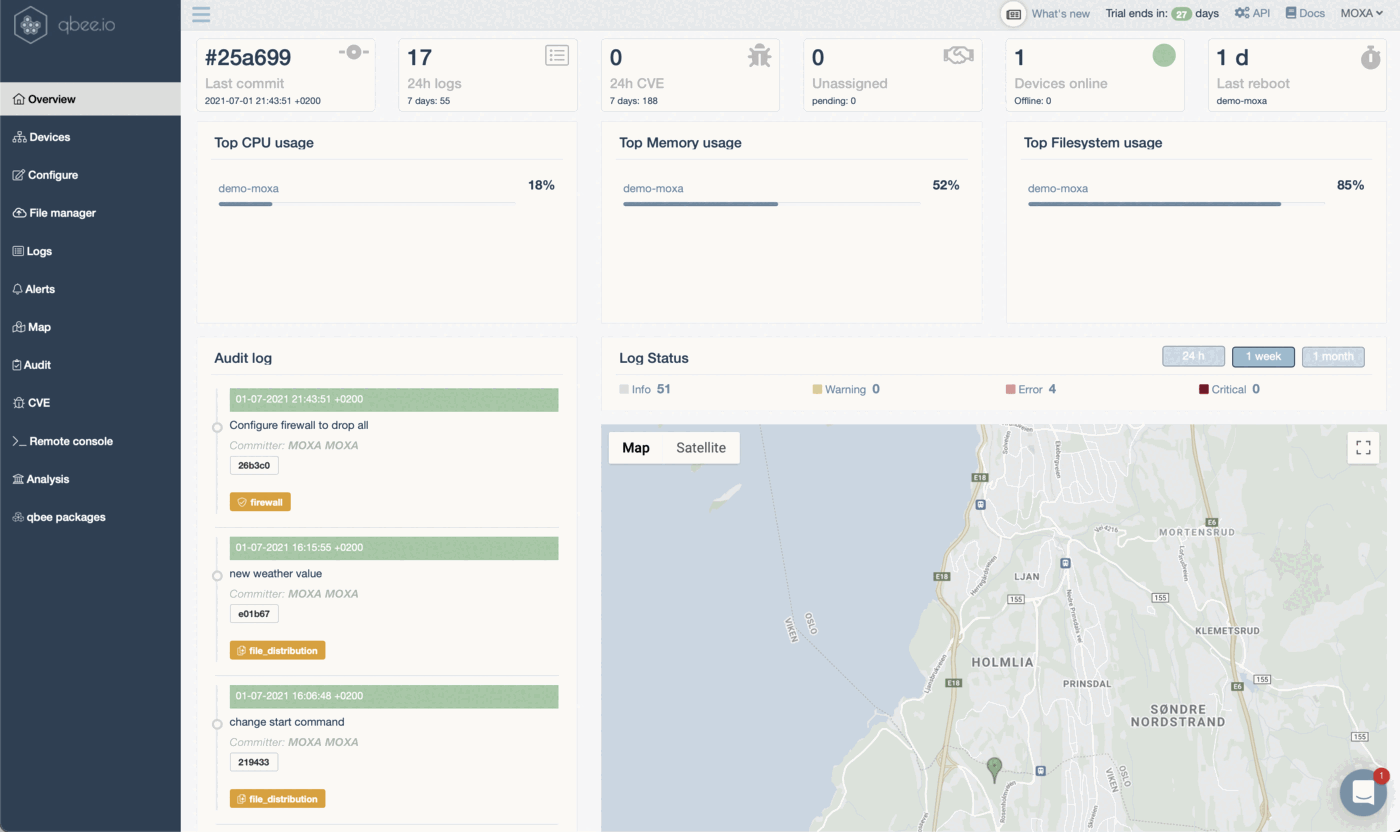
We will do some basic configuration tasks to achieve the following:
- set firewall to drop all connections
- change password for user "moxa" and "root"
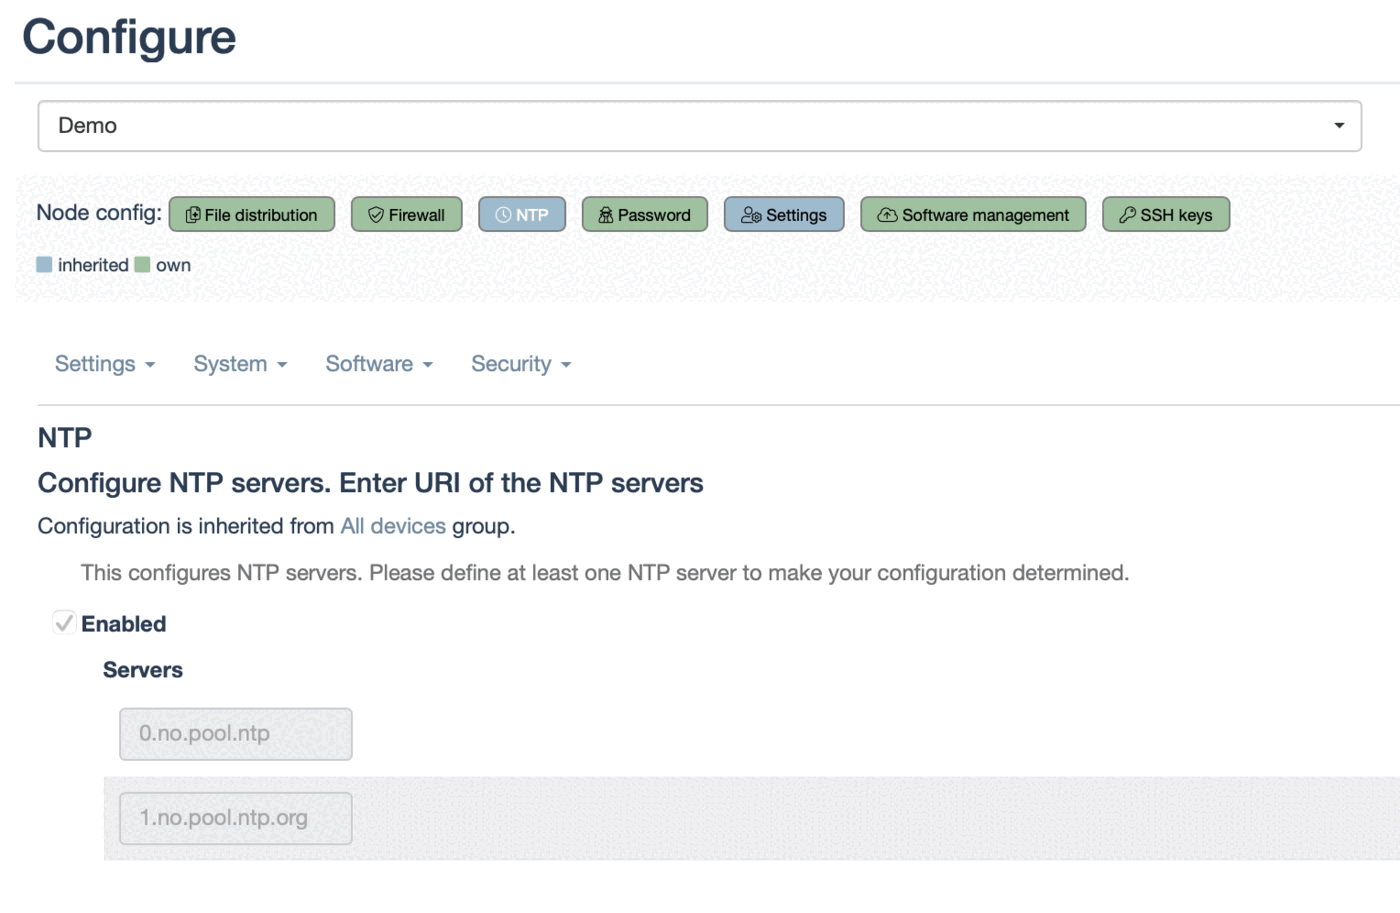
- define NTP server
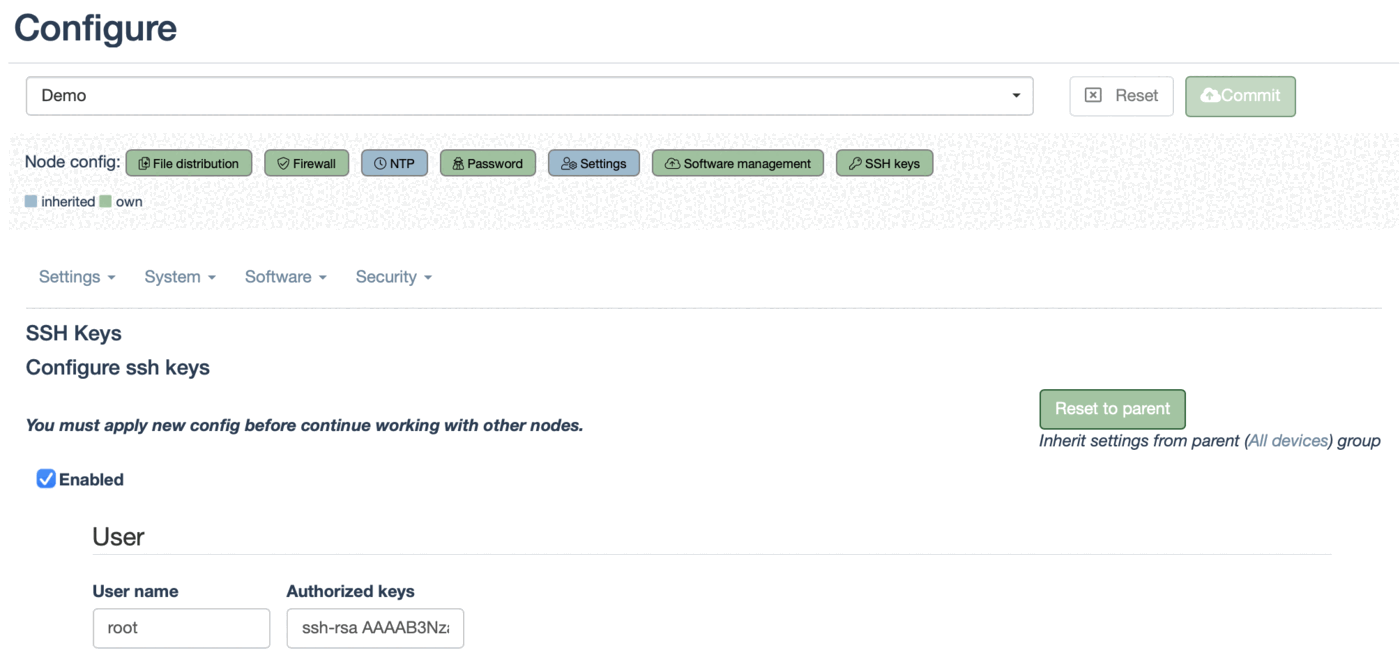
- upload public ssh key for remote access
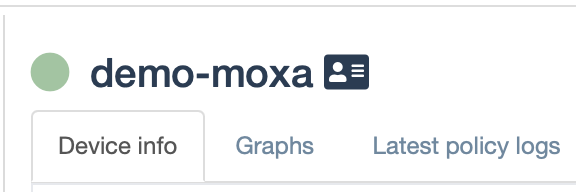
- set a new human-readable device name and location
- setup OTA (over the air) software package updates
- change settings to collect process data
From there we advance to:
- a headless install of Node-RED
- automation and templating of Node-RED flows (including credentials)
- remote access of devices anywhere in the world
- automated service distribution (example http server)
- CI/CD for the server content with GitHub runner
- Convenience functions like 2 way remote file distribution with SFTP
- remote access of other non-qbee devices in the remote network (UI based port forwarding)
Let's start with simple configuration. Most configurations are done on the "demo" group. This means all devices that are in that group or will be in that group in the future will automatically receive this configuration. NTP and settings (colored in blue) are defined on the top level. Therefore, these settings apply to any device in the account.
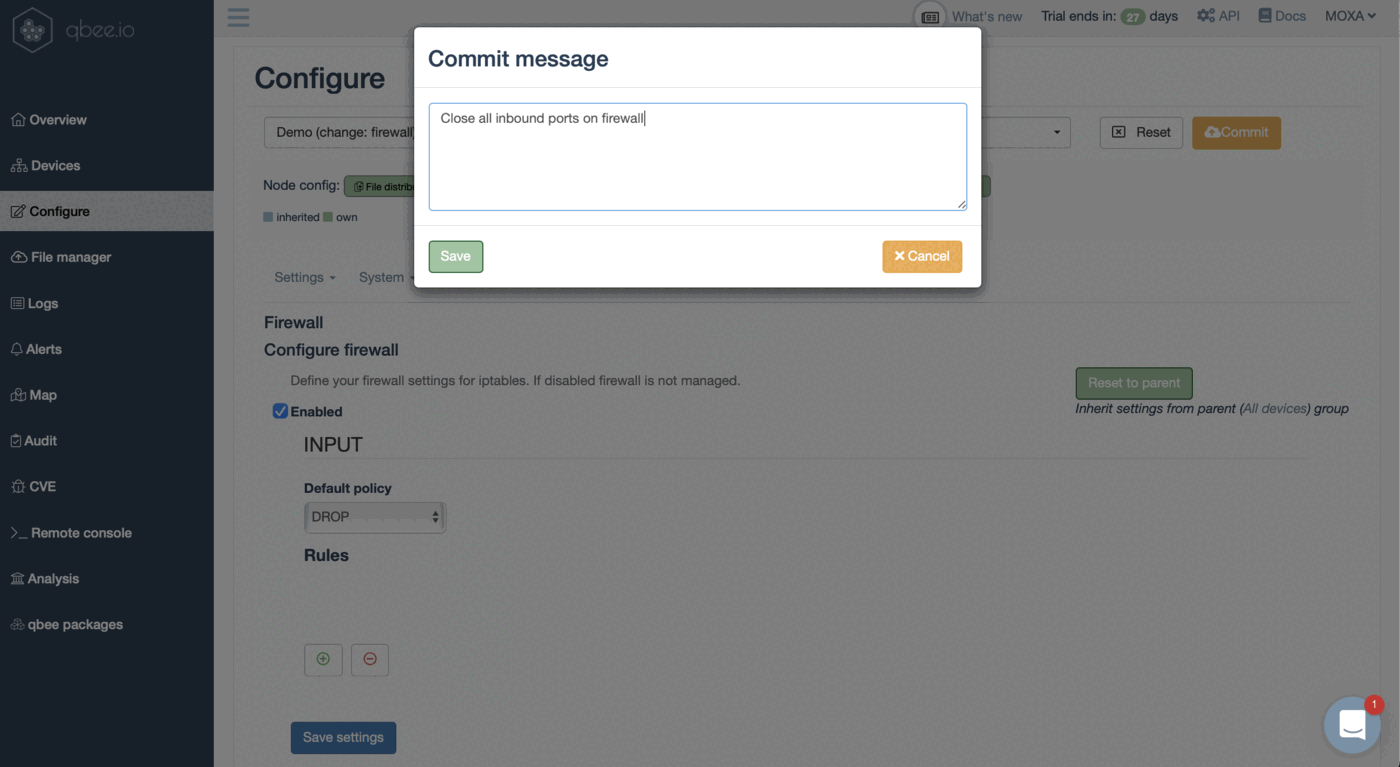
First we will configure the firewall through the configuration and drop all incoming connections on all ports. We don't need any open ports for qbee to access the UC-3100. The qbee integrated VPN will use port 443 with an outbound connection request to establish the remote connectivity.
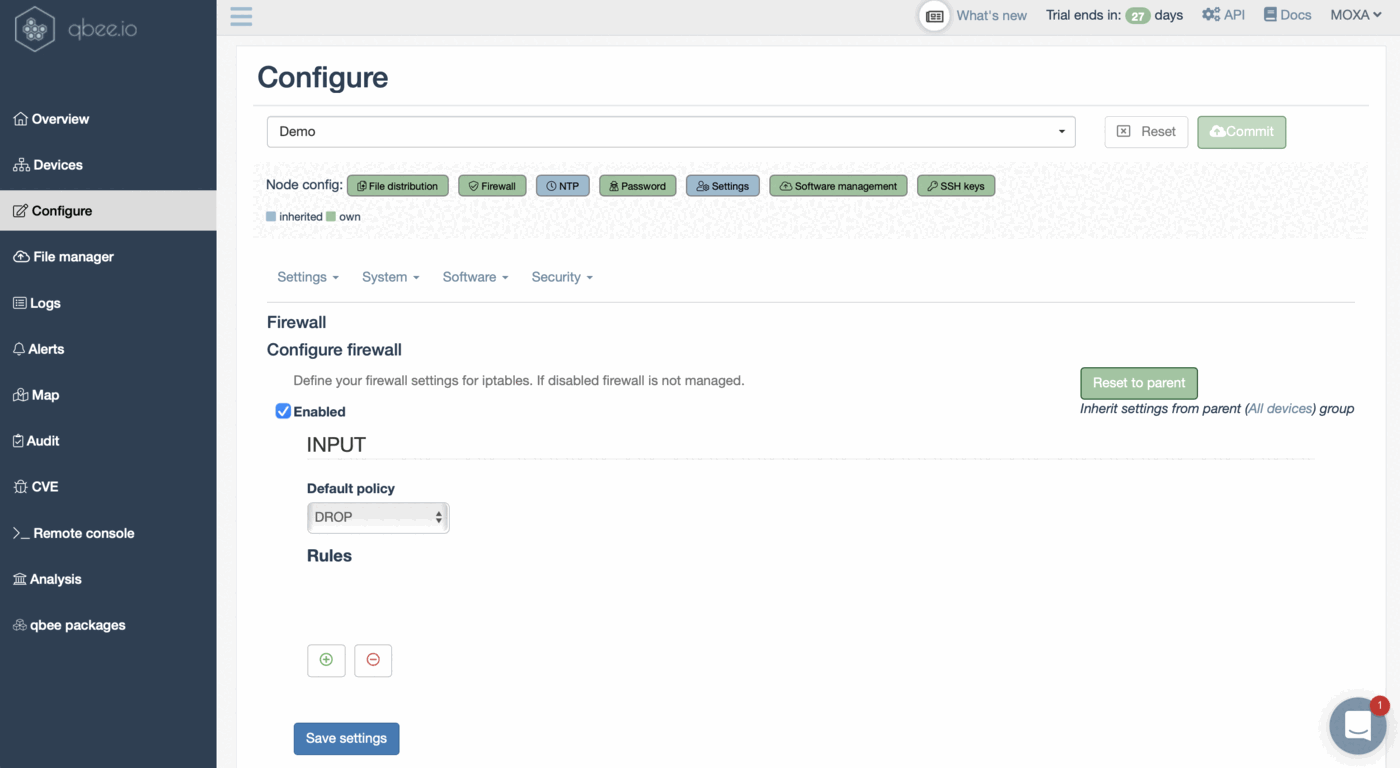
In qbee any configuration needs to be saved. Then the devices in scope are shown. As a second step this needs to be committed with a message. Then this is part of our audit trail and all devices in scope will eventually pull the new configuration and converge towards that.
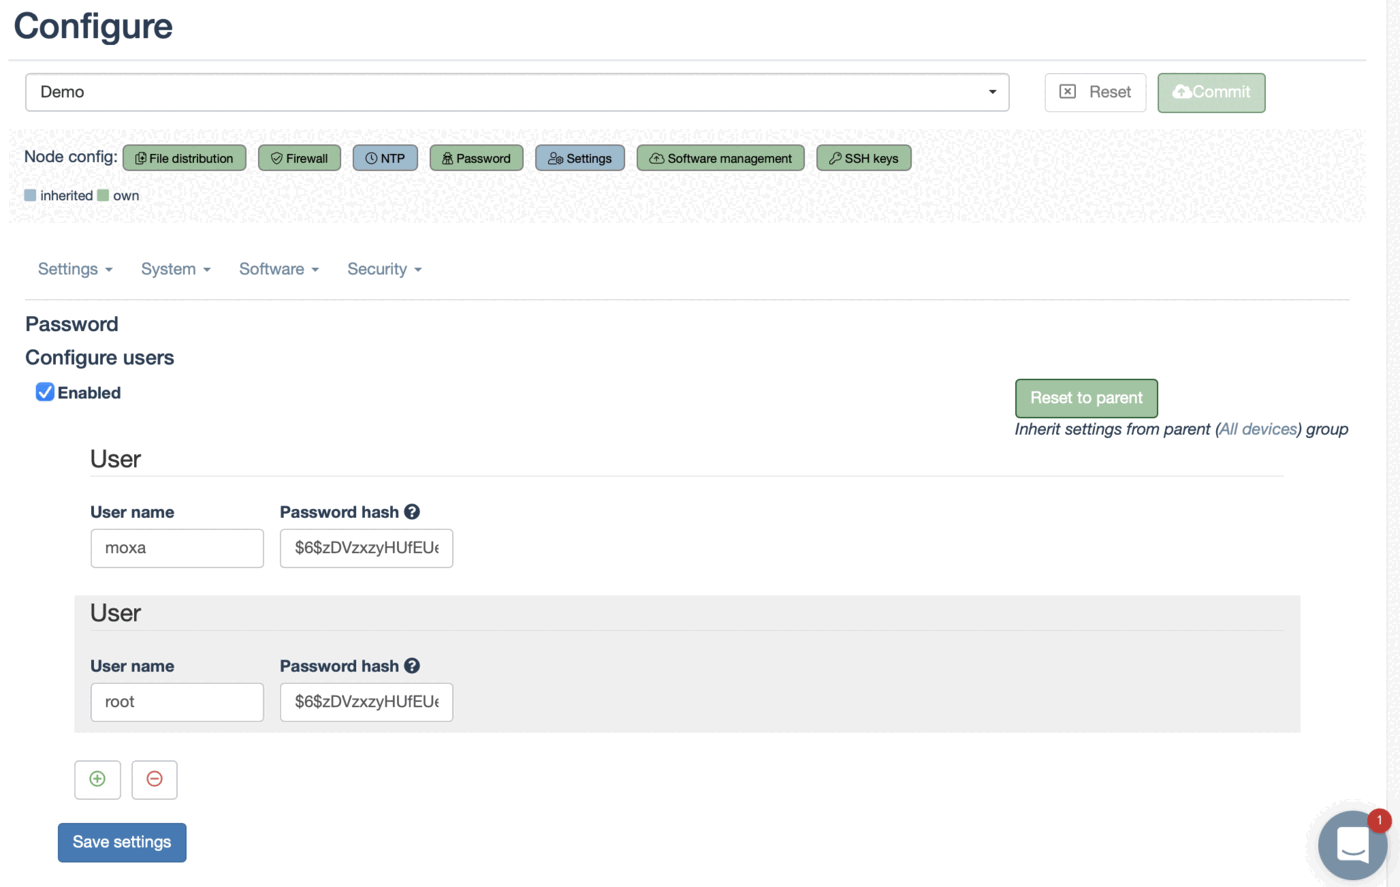
In order to change the password it needs to be created. qbee will never save clear text passwords. Therefore, you need to hash your passwords and then use the configuration engine of qbee as displayed below.
How to create sha-512 password hashes?
Please refer to your Linux distribution how to create password hashes. On many system mkpasswd will produce a SHA-512 hash: mkpasswd -m sha-512 -s If you do not have mkpasswd installed you can also use this Python3 one-liner to create a valid SHA-512 hashed password. This will also work on a Raspberry Pi or UC-3100 out of the box since it does not have mkpasswd installed as default, but Python3 is available:
python3 -c "import crypt;print(crypt.crypt(input('clear-text pw: '), crypt.mksalt(crypt.METHOD_SHA512)))"
As mentioned, NTP servers were defined on the top level:
In the next step we distribute the public ssh keys for the users that want remote access through qbee without password login (if that is enabled on the device). The public ssh key is not sensitive so we can just copy this in here in clear text.
In the device tab there is a small card besides the device name. Click on this and set your human-readable device name as well as the location. It is either through reverse IP geolocation or you can set coordinates:

It is important to keep the devices up-to-date with patched and updated libraries. qbee offers the possibility to update all packages, update specific packages and also define the version of these packages. This can be done in package management. New software packages can be installed in software management.
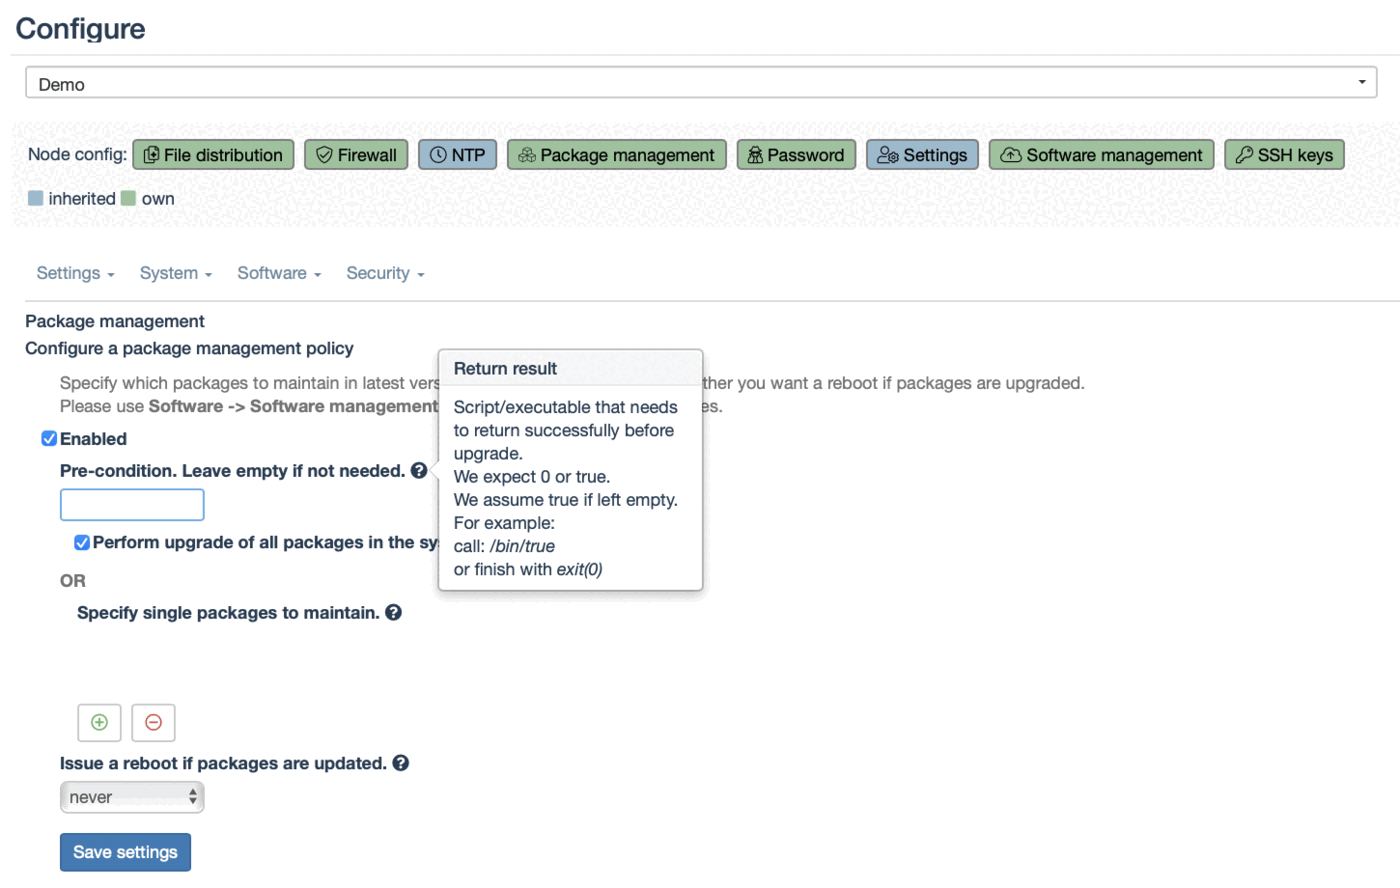
For most Industry 4.0 applications it is important to have full control over the time of the update. Therefore, we feature a precondition. This precondition can be a script that is distributed through file distribution and triggered here. This allows to define a time period, a day or date or even complex logic checking an external server a or a physical device input pin for an update condition that is set there (even through a separate system). Here you can find information and examples for the precondition.
| packages before update | packages after update |
|---|---|
 |  |
Then we define settings for all devices and enable to collect process information as well.

These examples are just very basic configuration and automation examples. A lot more can be achieved with file distribution.
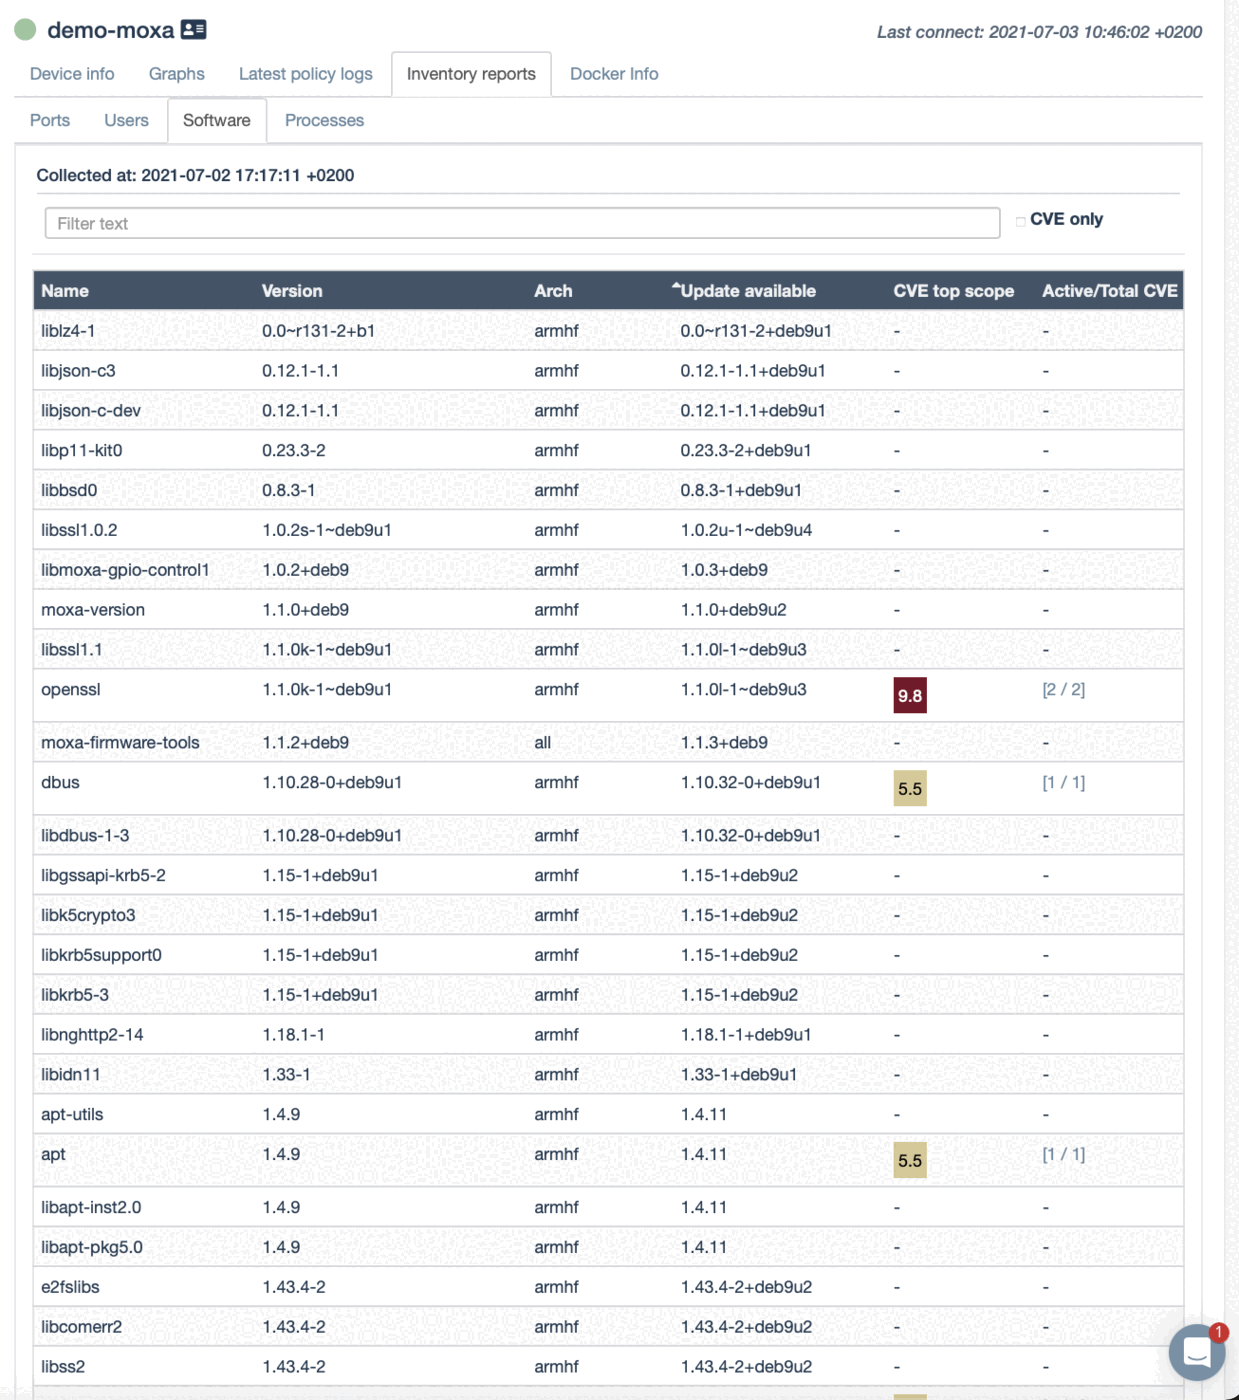
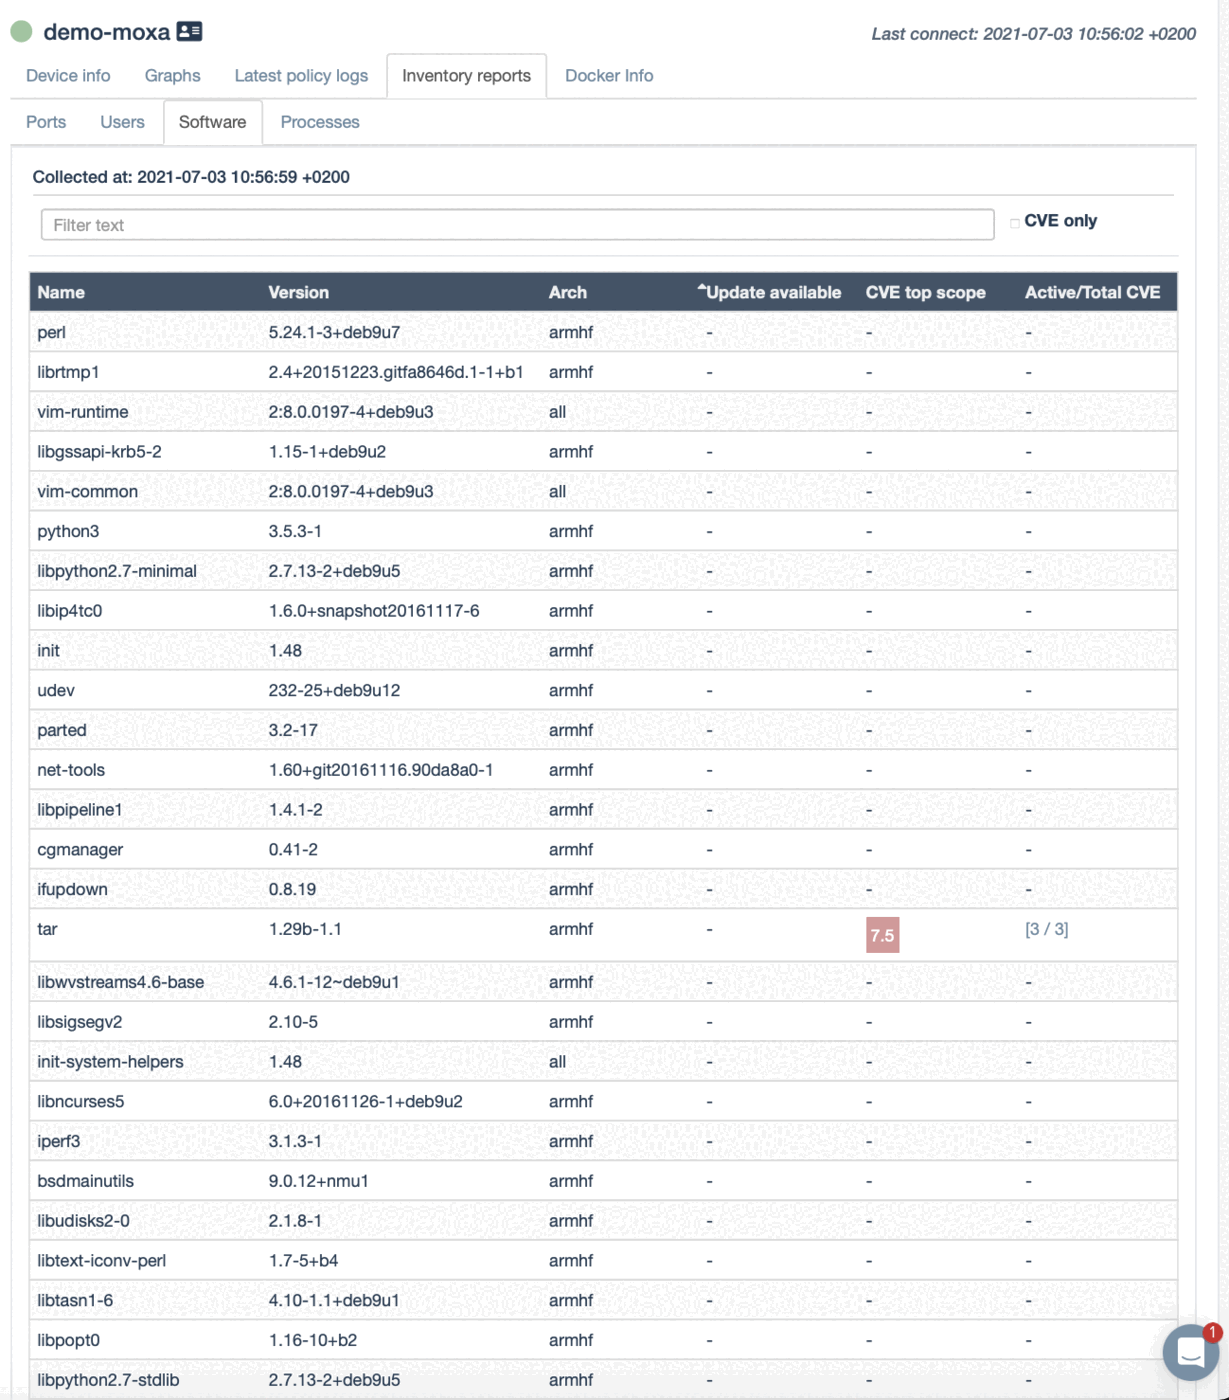
Information collected:
qbee collects both metrics, software libraries, device data, processes and much more. Below you see some windows that show examples of this. qbee has much more information available:
| device view | graphs view |
|---|---|
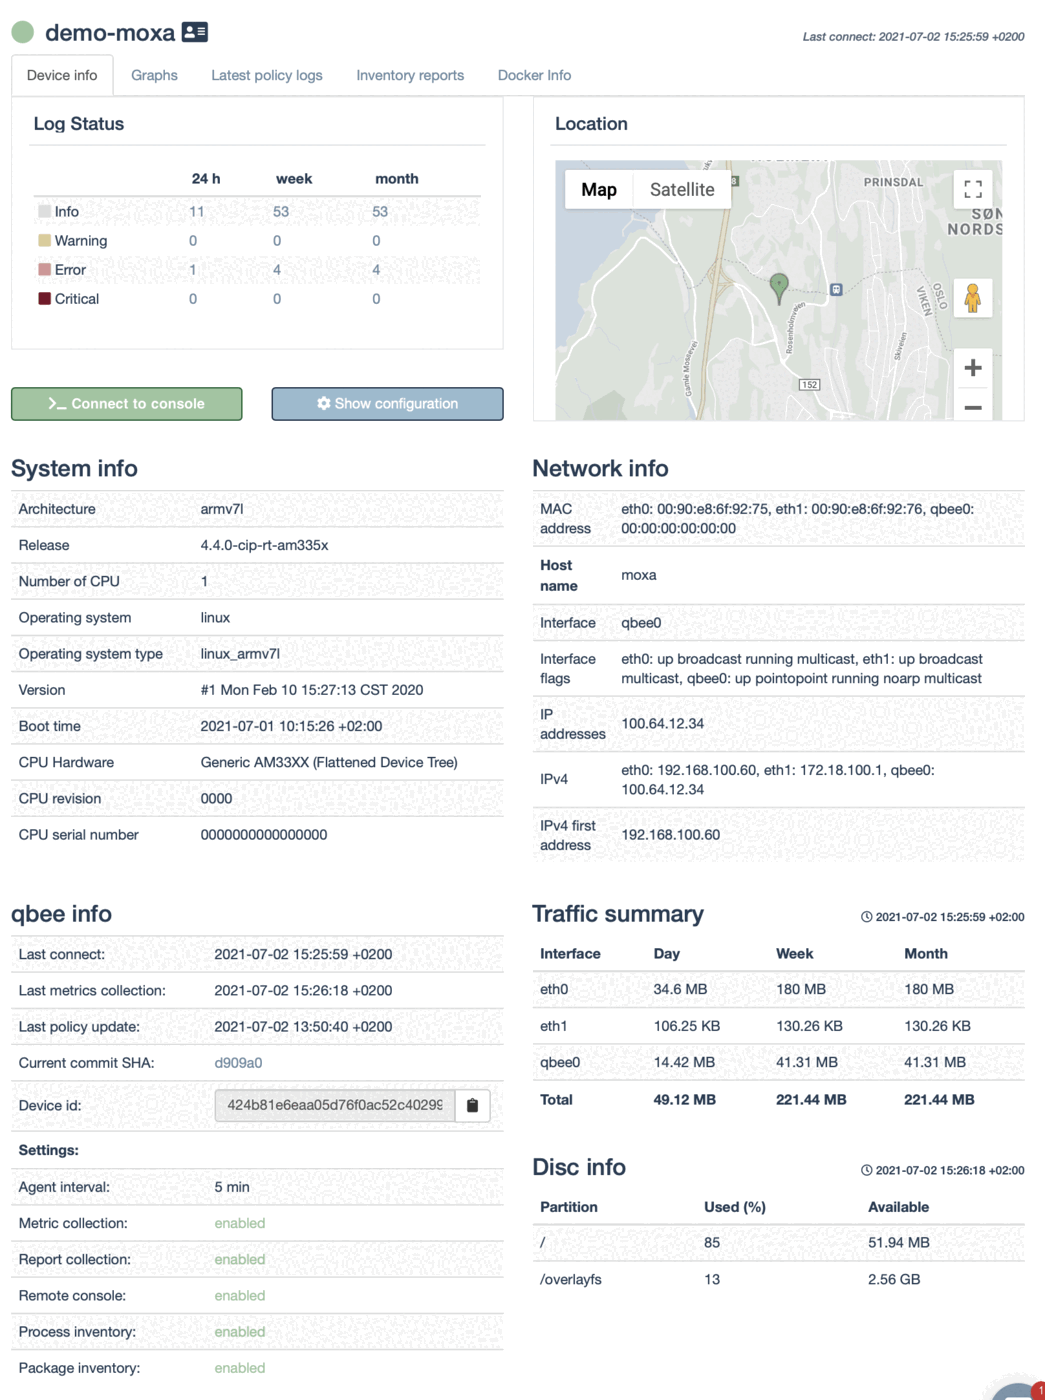 | 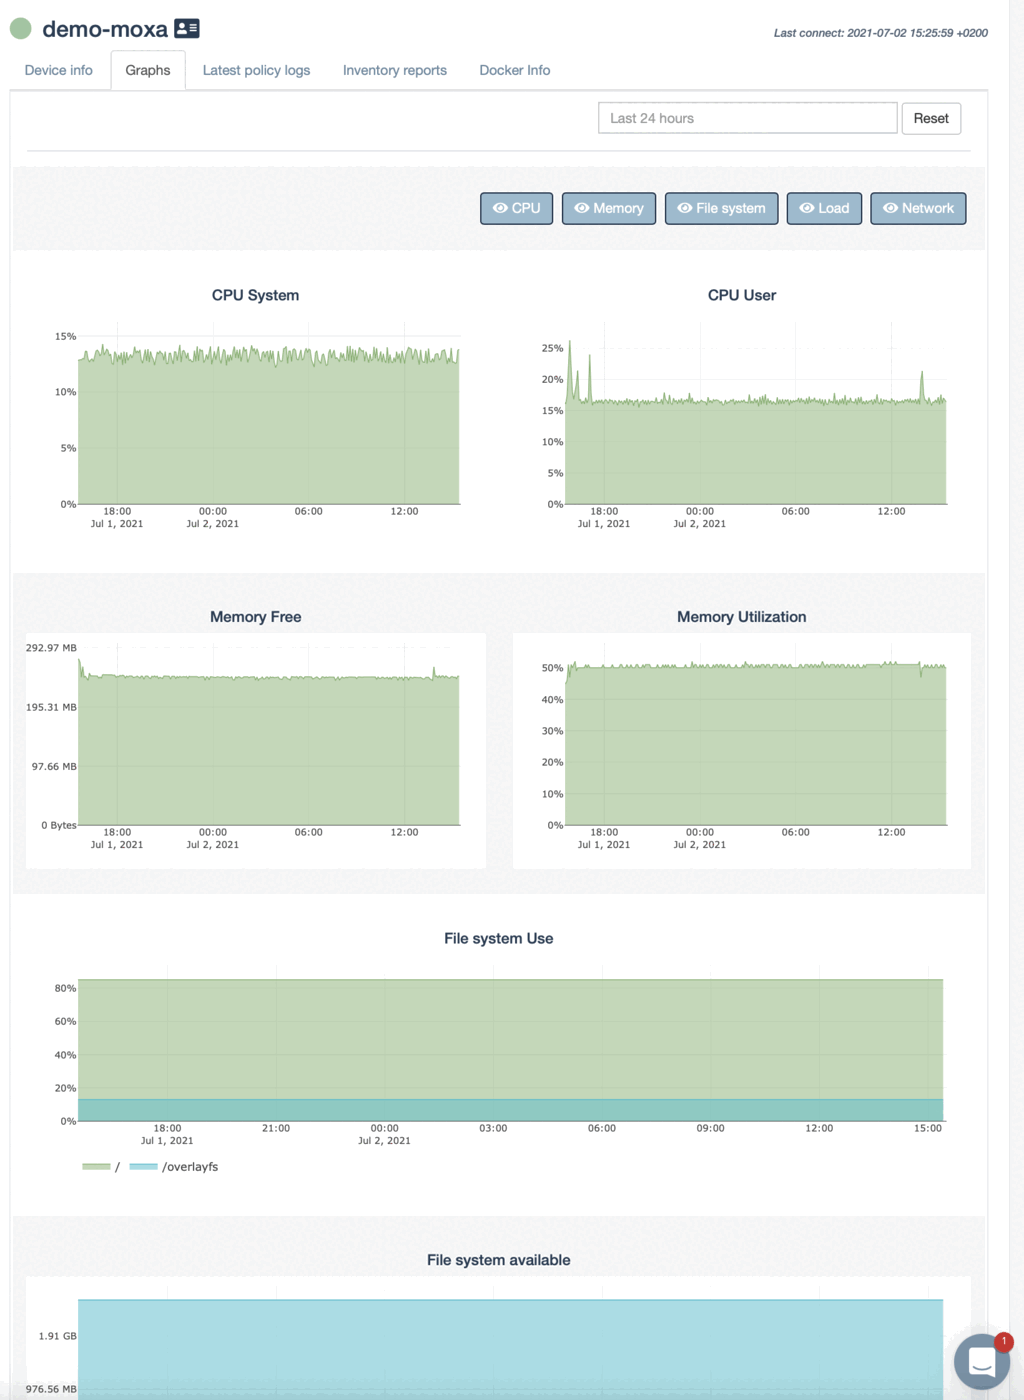 |
| software libraries | running processes |
|---|---|
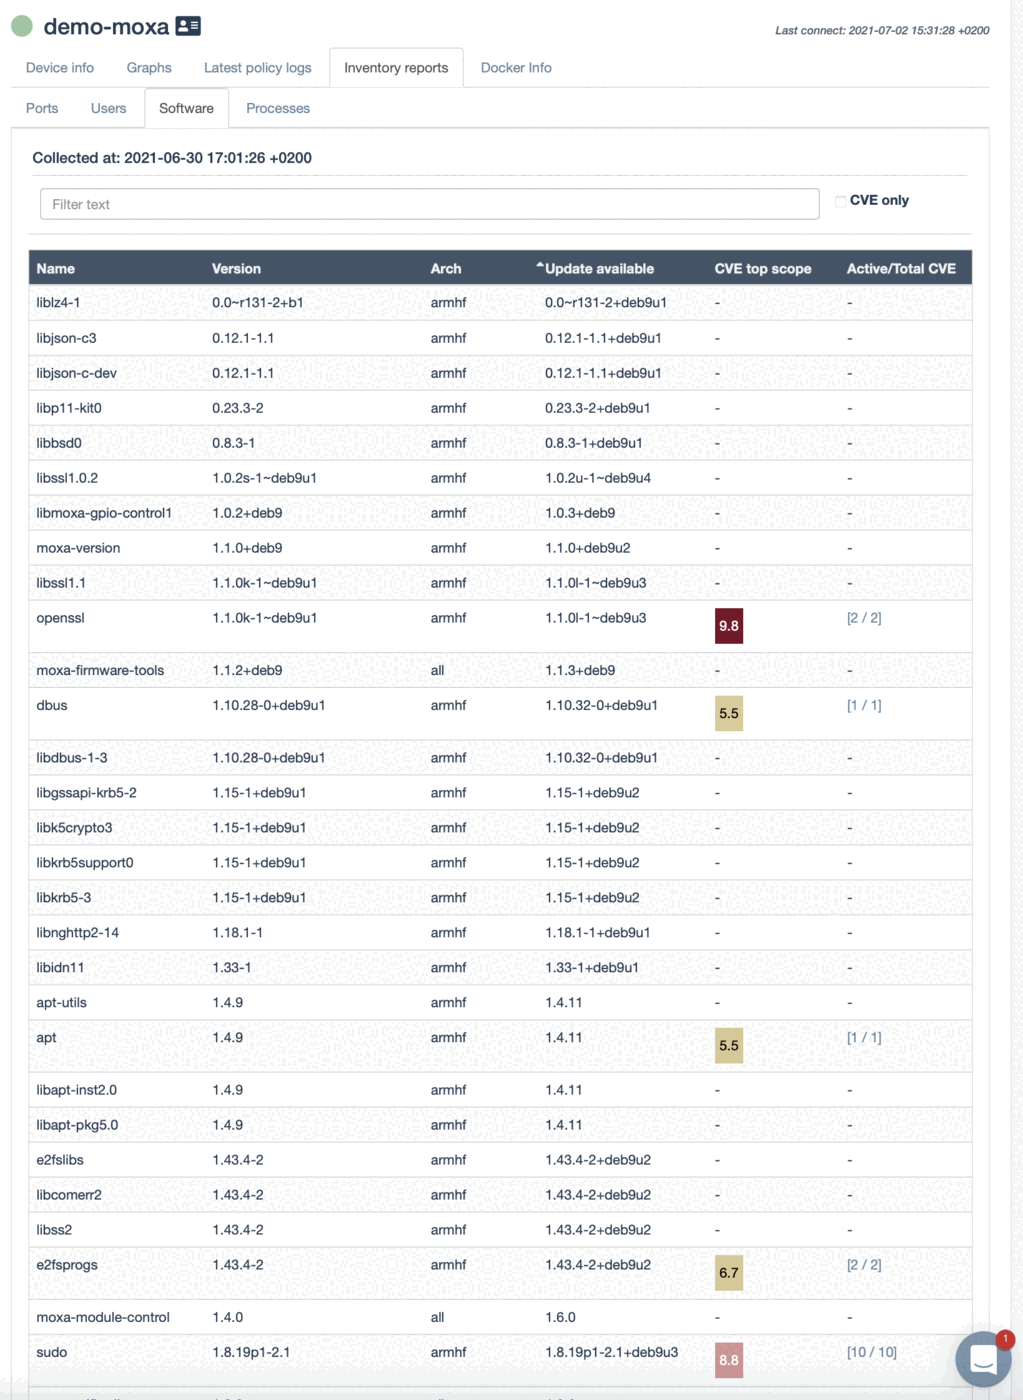 | 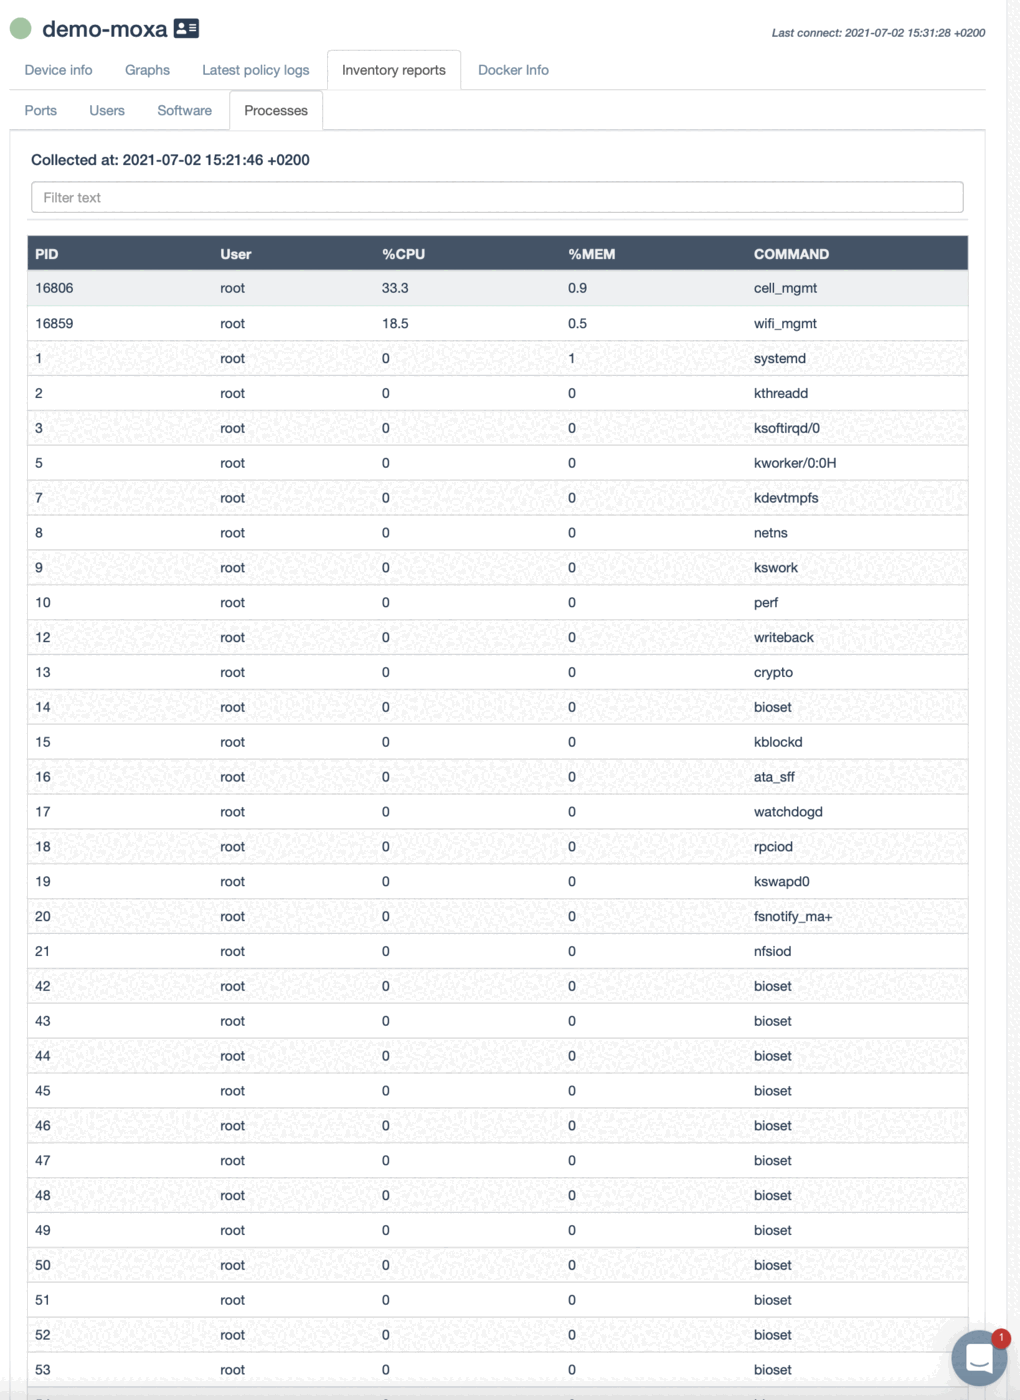 |
Headless install of a demo application (Node-RED)
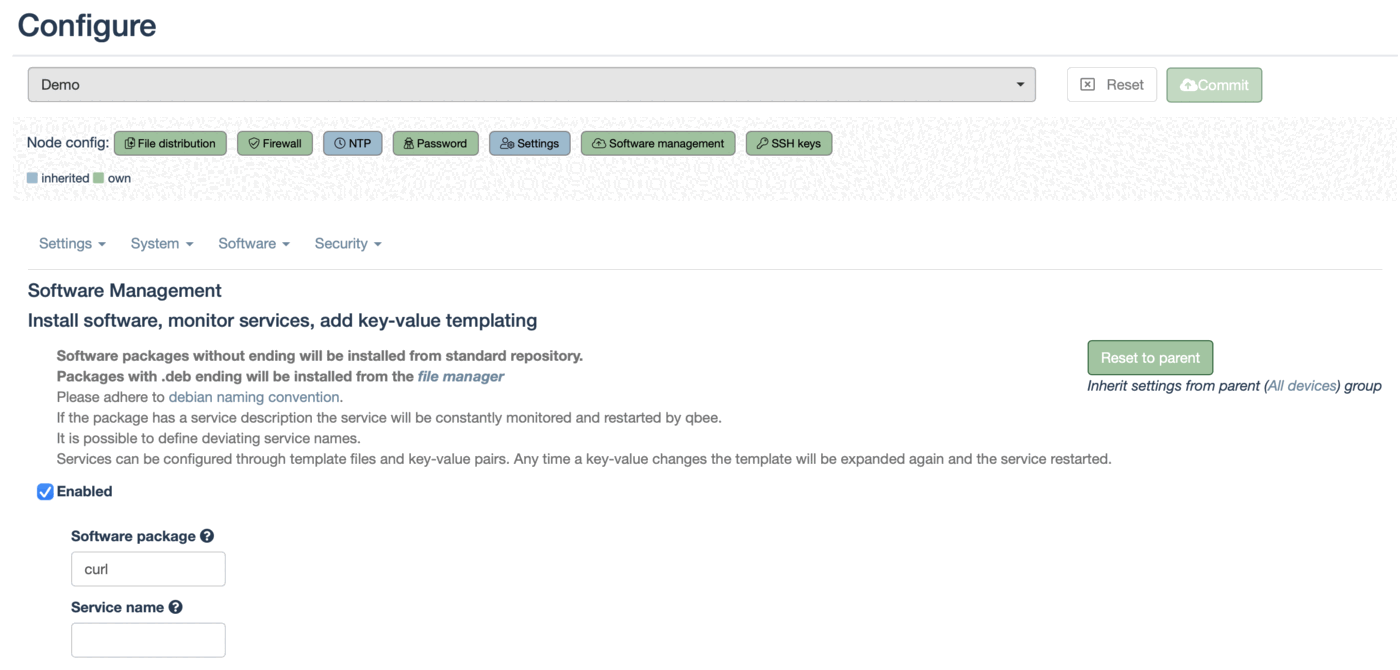
A next typical step is to deploy some software. In this case we want to setup a Node-RED system and install through a script (recommended method). As a first step we use the configuration software management to install curl.
Now we need to create the installation script. We use the script and a template file to make it adjustable. For more in-depth information please look in the automated headless installation section.
This is all done through qbee "Configure -> File distribution". We need to create and upload two files. The first is the node-red-install.sh installation script. This is more or less the original script for a RPI without interaction and the modules to install are exposed to qbee. It can be stripped of many parts for the Moxa devices. The modules are defined by sourcing variables from the node-red-install.conf source /home/pi/node-red-install-config.conf and later introducing the variable in line 126 as EXTRANODES="$EXTRANODES".
node-red-install.sh
#!/bin/bash
    #
    # Copyright 2016,2020 JS Foundation and other contributors, https://js.foundation/
    # Copyright 2015,2016 IBM Corp.
    #
    # Licensed under the Apache License, Version 2.0 (the "License");
    # you may not use this file except in compliance with the License.
    # You may obtain a copy of the License at
    #
    # http://www.apache.org/licenses/LICENSE-2.0
    #
    # Unless required by applicable law or agreed to in writing, software
    # distributed under the License is distributed on an "AS IS" BASIS,
    # WITHOUT WARRANTIES OR CONDITIONS OF ANY KIND, either express or implied.
    # See the License for the specific language governing permissions and
    # limitations under the License.

    # Node-RED Installer for DEB based systems


    source /home/moxa/node-red-install-config.conf
    HOME=/home/moxa
    USER=moxa

    umask 0022
    tgta=12.18.3   # need arm6l latest from https://unofficial-builds.nodejs.org/download/release/
    tgtl=12.16.3   # need x86 latest from https://unofficial-builds.nodejs.org/download/release/

    usage() {
      cat << EOL
    Usage: $0 [options]

    Options:
      --help            display this help and exits
      --confirm-root    install as root without asking confirmation
      --confirm-install confirm installation without asking confirmation
      --confirm-pi      confirm installation of PI specific nodes without asking confirmation
    EOL
    }

    if [ $# -gt 0 ]; then
      # Parsing parameters
      while (( "$#" )); do
        case "$1" in
          --help)
            usage && exit 0
            shift
            ;;
          --confirm-root)
            CONFIRM_ROOT="y"
            shift
            ;;
          --confirm-install)
            CONFIRM_INSTALL="y"
            shift
            ;;
          --confirm-pi)
            CONFIRM_PI="y"
            shift
            ;;
          --) # end argument parsing
            shift
            break
            ;;
          -*|--*=) # unsupported flags
            echo "Error: Unsupported flag $1" >&2
            exit 1
            ;;
        esac
      done
    fi

    echo -ne "\033[2 q"
    if [[ -e /mnt/dietpi_userdata ]]; then
        echo -ne "\n\033[1;32mDiet-Pi\033[0m detected - only going to add the  \033[0;36mnode-red-start, -stop, -log\033[0m  commands.\n"
        echo -ne "Flow files and other things worth backing up can be found in the \033[0;36m/mnt/dietpi_userdata/node-red\033[0m directory.\n\n"
        echo -ne "Use the  \033[0;36mdietpi-software\033[0m  command to un-install and re-install \033[38;5;88mNode-RED\033[0m.\n"
        echo "journalctl -f -n 25 -u node-red -o cat" > /usr/bin/node-red-log
        chmod +x /usr/bin/node-red-log
        echo "dietpi-services stop node-red" > /usr/bin/node-red-stop
        chmod +x /usr/bin/node-red-stop
        echo "dietpi-services start node-red" > /usr/bin/node-red-start
        echo "journalctl -f -n 0 -u node-red -o cat" >> /usr/bin/node-red-start
        chmod +x /usr/bin/node-red-start
    else


    if [[ "$(uname)" != "Darwin" ]]; then
    # if curl -f https://www.npmjs.com/package/node-red  >/dev/null 2>&1; then
    if curl -I https://registry.npmjs.org/@node-red/util  >/dev/null 2>&1; then
    echo -e '\033]2;'Node-RED update'\007'
    echo " "
    echo "This script will remove versions of Node.js prior to version 7.x, and Node-RED and"
    echo "if necessary replace them with Node.js 12.x LTS (erbium) and the latest Node-RED from Npm."
    echo " "
    echo "It also moves any Node-RED nodes that are globally installed into your user"
    echo "~/.node-red/node_modules directory, and adds them to your package.json, so that"
    echo "you can manage them with the palette manager."
    echo " "
    echo "It also tries to run 'npm rebuild' to refresh any extra nodes you have installed"
    echo "that may have a native binary component. While this normally works ok, you need"
    echo "to check that it succeeds for your combination of installed nodes."
    echo " "
    echo "To do all this it runs commands as root - please satisfy yourself that this will"
    echo "not damage your Pi, or otherwise compromise your configuration."
    echo "If in doubt please backup your SD card first."
    echo " "
    if [[ -e $HOME/.nvm ]]; then
        echo -ne '\033[1mNOTE:\033[0m We notice you are using \033[38;5;88mnvm\033[0m. Please ensure it is running the current LTS version.\n'
        echo -ne 'Using nvm is NOT RECOMMENDED. Node-RED will not run as a service under nvm.\r\n\n'
    fi

    yn="y"
    [ ! "${yn}" ] && read -p "Are you really sure you want to do this ? [y/N] ? " yn
    case $yn in
        [Yy]* )

    # Here qbee.io allows to set extra nodes with a space in between
    echo ""

    # Here qbee.io allows to set extra nodes with a space in between them.
    response="y"
    [ ! "${response}" ] && read -r -t 15 -p "Would you like to install the Pi-specific nodes ? [y/N] ? " response
    if [[ "$response" =~ ^([yY])+$ ]]; then
        EXTRANODES="$EXTRANODES"
        EXTRAW="install"
    fi

    # this script assumes that $HOME is the folder of the user that runs node-red
    # that $USER is the user name and the group name to use when running is the
    # primary group of that user
    # if this is not correct then edit the lines below
    MYOS=$(cat /etc/*release | grep "^ID=" | cut -d = -f 2)
    NODERED_HOME=$HOME
    NODERED_USER=$USER
    NODERED_GROUP=`id $USER -gn`
    GLOBAL="true"
    TICK='\033[1;32m\u2714\033[0m'
    CROSS='\033[1;31m\u2718\033[0m'
    cd "$NODERED_HOME" || exit 1
    clear
    echo -e "\nRunning Node-RED $EXTRAW for user $USER at $HOME on $MYOS\n"
    time1=$(date)
    echo "" | sudo tee -a /var/log/nodered-install.log >>/dev/null
    echo "***************************************" | sudo tee -a /var/log/nodered-install.log >>/dev/null
    echo "" | sudo tee -a /var/log/nodered-install.log >>/dev/null
    echo "Started : "$time1 | sudo tee -a /var/log/nodered-install.log >>/dev/null
    echo "Running for user $USER at $HOME" | sudo tee -a /var/log/nodered-install.log >>/dev/null
    echo -ne '\r\nThis can take 20-30 minutes on the slower Pi versions - please wait.\r\n\n'
    echo -ne '  Stop Node-RED                       \r\n'
    echo -ne '  Remove old version of Node-RED      \r\n'
    echo -ne '  Remove old version of Node.js       \r\n'
    echo -ne '  Install Node.js                     \r\n'
    echo -ne '  Clean npm cache                     \r\n'
    echo -ne '  Install Node-RED core               \r\n'
    echo -ne '  Move global nodes to local          \r\n'
    echo -ne '  Install extra Pi nodes              \r\n'
    echo -ne '  Npm rebuild existing nodes          \r\n'
    echo -ne '  Add shortcut commands               \r\n'
    echo -ne '  Update systemd script               \r\n'
    echo -ne '                                      \r\n'
    echo -ne '\r\nAny errors will be logged to   /var/log/nodered-install.log\r\n'
    echo -ne '\033[14A'

    # stop any running node-red service
    if sudo service nodered stop 2>&1 | sudo tee -a /var/log/nodered-install.log >>/dev/null ; then CHAR=$TICK; else CHAR=$CROSS; fi
    echo -ne "  Stop Node-RED                       $CHAR\r\n"

    # save any global nodes
    GLOBALNODES=$(find /usr/local/lib/node_modules/node-red-* -maxdepth 0 -type d -printf '%f\n' 2>/dev/null)
    GLOBALNODES="$GLOBALNODES $(find /usr/lib/node_modules/node-red-* -maxdepth 0 -type d -printf '%f\n' 2>/dev/null)"
    echo "Found global nodes: $GLOBALNODES :" | sudo tee -a /var/log/nodered-install.log >>/dev/null

    # remove any old node-red installs or files
    sudo apt remove -y nodered 2>&1 | sudo tee -a /var/log/nodered-install.log >>/dev/null
    # sudo apt remove -y node-red-update 2>&1 | sudo tee -a /var/log/nodered-install.log >>/dev/null
    sudo rm -rf /usr/local/lib/node_modules/node-red* /usr/local/lib/node_modules/npm /usr/local/bin/node-red* /usr/local/bin/node /usr/local/bin/npm 2>&1 | sudo tee -a /var/log/nodered-install.log >>/dev/null
    sudo rm -rf /usr/lib/node_modules/node-red* /usr/bin/node-red* 2>&1 | sudo tee -a /var/log/nodered-install.log >>/dev/null
    echo -ne '  Remove old version of Node-RED      \033[1;32m\u2714\033[0m\r\n'

    nv="v0"
    nv2=""
    ndeb=$(apt-cache policy nodejs | grep Installed | awk '{print $2}')
    if [[ -x "$(command -v node)" ]]; then
        nv=`node -v | cut -d "." -f1`
        nv2=`node -v`
        # nv2=`apt list nodejs 2>/dev/null | grep dfsg | cut -d ' ' -f 2 | cut -d '-' -f 1`
        echo "Already have nodejs $nv2" | sudo tee -a /var/log/nodered-install.log >>/dev/null
    fi
    # ensure ~/.config dir is owned by the user
    echo "Now install nodejs" | sudo tee -a /var/log/nodered-install.log >>/dev/null
    sudo chown -Rf $NODERED_USER:$NODERED_GROUP $NODERED_HOME/.config/
    # maybe remove Node.js - or upgrade if nodesoure.list exists
    if [[ "$(uname -m)" =~ "i686" ]]; then
        echo "Using i686" | sudo tee -a /var/log/nodered-install.log >>/dev/null
        curl -sL -o /tmp/node.tgz https://unofficial-builds.nodejs.org/download/release/v$tgtl/node-v$tgtl-linux-x86.tar.gz 2>&1 | sudo tee -a /var/log/nodered-install.log >>/dev/null
        # unpack it into the correct places
        hd=$(head -c 9 /tmp/node.tgz)
        if [ "$hd" == "<!DOCTYPE" ]; then
            CHAR="$CROSS File $f not downloaded";
        else
            if sudo tar -zxf /tmp/node.tgz --strip-components=1 -C /usr 2>&1 | sudo tee -a /var/log/nodered-install.log >>/dev/null; then CHAR=$TICK; else CHAR=$CROSS; fi
        fi
        rm /tmp/node.tgz 2>&1 | sudo tee -a /var/log/nodered-install.log >>/dev/null
        echo -ne "  Install Node.js for i686            $CHAR"
    elif uname -m | grep -q armv6l ; then
        sudo apt remove -y nodejs nodejs-legacy npm 2>&1 | sudo tee -a /var/log/nodered-install.log >>/dev/null
        sudo rm -rf /etc/apt/sources.d/nodesource.list /usr/lib/node_modules/npm*
        echo -ne "  Remove old version of Node.js       $TICK\r\n"
        echo -ne "  Install Node.js for Armv6           \r"
        # f=$(curl -sL https://nodejs.org/download/release/latest-dubnium/ | grep "armv6l.tar.gz" | cut -d '"' -f 2)
        # curl -sL -o node.tgz https://nodejs.org/download/release/latest-dubnium/$f 2>&1 | sudo tee -a /var/log/nodered-install.log >>/dev/null
        curl -sL -o /tmp/node.tgz https://unofficial-builds.nodejs.org/download/release/v$tgta/node-v$tgta-linux-armv6l.tar.gz 2>&1 | sudo tee -a /var/log/nodered-install.log >>/dev/null
        # unpack it into the correct places
        hd=$(head -c 9 /tmp/node.tgz)
        if [ "$hd" == "<!DOCTYPE" ]; then
            CHAR="$CROSS File $f not downloaded";
        else
            if sudo tar -zxf /tmp/node.tgz --strip-components=1 -C /usr 2>&1 | sudo tee -a /var/log/nodered-install.log >>/dev/null; then CHAR=$TICK; else CHAR=$CROSS; fi
        fi
        # remove the tgz file to save space
        rm /tmp/node.tgz 2>&1 | sudo tee -a /var/log/nodered-install.log >>/dev/null
        echo -ne "  Install Node.js for Armv6           $CHAR"
    elif [[ -e $HOME/.nvm ]]; then
        echo -ne '  Using NVM to manage Node.js         +   please run   \033[0;36mnvm use lts\033[0m   before running Node-RED\r\n'
        echo -ne '  NOTE: Using nvm is NOT RECOMMENDED.     Node-RED will not run as a service under nvm.\r\n'
        export NVM_DIR=$HOME/.nvm
        [ -s "$NVM_DIR/nvm.sh" ] && \. "$NVM_DIR/nvm.sh"  # This loads nvm
        echo "Using NVM !!! $(nvm current)" 2>&1 | sudo tee -a /var/log/nodered-install.log >>/dev/null
        nvm install --lts --no-progress --latest-npm >/dev/null 2>&1
        nvm use lts >/dev/null 2>&1
        nvm alias default lts >/dev/null 2>&1
        echo "Now using --- $(nvm current)" 2>&1 | sudo tee -a /var/log/nodered-install.log >>/dev/null
        GLOBAL="false"
        ln -f -s $HOME/.nvm/versions/node/$(nvm current)/lib/node_modules/node-red/red.js  $NODERED_HOME/node-red
        echo -ne "  Update Node.js LTS                  $CHAR"
    elif [[ $(which n) ]]; then
        echo "Using n" | sudo tee -a /var/log/nodered-install.log >>/dev/null
        echo -ne "  Using N to manage Node.js           +\r\n"
        if sudo n lts 2>&1 | sudo tee -a /var/log/nodered-install.log >>/dev/null; then CHAR=$TICK; else CHAR=$CROSS; fi
        echo -ne "  Update Node.js LTS                  $CHAR"
    elif [ "$nv" = "v0" ] || [ "$nv" = "v1" ] || [ "$nv" = "v3" ] || [ "$nv" = "v4" ] || [ "$nv" = "v5" ] || [ "$nv" = "v6" ] || [ "$nv" = "v7" ] || [ "$nv" = "v9" ] || [ "$nv" = "v11" ] || [[ "$ndeb" =~ "dfsg" ]]; then
        echo "Updating nodejs $nv2" | sudo tee -a /var/log/nodered-install.log >>/dev/null
        if [[ -f /etc/apt/sources.list.d/nodesource.list ]]; then
            echo "Using nodesource.list" | sudo tee -a /var/log/nodered-install.log >>/dev/null
            if [ "$nv" = "v0" ] || [ "$nv" = "v1" ] || [ "$nv" = "v3" ] || [ "$nv" = "v4" ] || [ "$nv" = "v5" ] || [ "$nv" = "v6" ] || [ "$nv" = "v7" ] || [ "$nv" = "v9" ] || [ "$nv" = "v11" ] || [[ "$ndeb" =~ "dfsg" ]]; then
                echo "Removing nodejs "$nv | sudo tee -a /var/log/nodered-install.log >>/dev/null
                sudo apt remove -y nodejs nodejs-legacy npm 2>&1 | sudo tee -a /var/log/nodered-install.log >>/dev/null
                sudo rm -rf /etc/apt/sources.d/nodesource.list /usr/lib/node_modules/npm*
                OV=`cat /etc/os-release | grep VERSION_ID | cut -d '"' -f 2`
                if [[ "$OV" = "8" ]]; then
                    if curl -sL https://deb.nodesource.com/setup_10.x | sudo -E bash - 2>&1 | sudo tee -a /var/log/nodered-install.log >>/dev/null; then CHAR=$TICK; else CHAR=$CROSS; fi
                else
                    if curl -sL https://deb.nodesource.com/setup_12.x | sudo -E bash - 2>&1 | sudo tee -a /var/log/nodered-install.log >>/dev/null; then CHAR=$TICK; else CHAR=$CROSS; fi
                fi
            else
                CHAR="-"
            fi
            echo -ne "  Remove old version of Node.js       $CHAR  $nv\r\n"
            echo -ne "  Update Node.js LTS                  \r"
            if sudo apt install -y nodejs 2>&1 | sudo tee -a /var/log/nodered-install.log >>/dev/null; then CHAR=$TICK; else CHAR=$CROSS; fi
            echo -ne "  Update Node.js LTS                  $CHAR"
        else
            # clean out old nodejs stuff
            echo "Not using nodesource.list" | sudo tee -a /var/log/nodered-install.log >>/dev/null
            npv=$(npm -v 2>/dev/null | head -n 1 | cut -d "." -f1)
            sudo apt remove -y nodejs nodejs-legacy npm 2>&1 | sudo tee -a /var/log/nodered-install.log >>/dev/null
            sudo dpkg -r nodejs 2>&1 | sudo tee -a /var/log/nodered-install.log >>/dev/null
            sudo dpkg -r node 2>&1 | sudo tee -a /var/log/nodered-install.log >>/dev/null
            sudo rm -rf /opt/nodejs 2>&1 | sudo tee -a /var/log/nodered-install.log >>/dev/null
            sudo rm -f /usr/local/bin/node* 2>&1 | sudo tee -a /var/log/nodered-install.log >>/dev/null
            sudo rm -rf /usr/local/bin/npm* /usr/local/bin/npx* /usr/lib/node_modules/npm* 2>&1 | sudo tee -a /var/log/nodered-install.log >>/dev/null
            if [ "$npv" = "1" ]; then
                sudo rm -rf /usr/local/lib/node_modules/node-red* /usr/lib/node_modules/node-red* 2>&1 | sudo tee -a /var/log/nodered-install.log >>/dev/null
            fi
            sudo apt -y autoremove 2>&1 | sudo tee -a /var/log/nodered-install.log >>/dev/null
            echo -ne "  Remove old version of Node.js       \033[1;32m\u2714\033[0m\r\n"
            echo "Grab the LTS bundle" | sudo tee -a /var/log/nodered-install.log >>/dev/null
            # sudo apt update -y 2>&1 | sudo tee -a /var/log/nodered-install.log >>/dev/null
            if [[ $(lsb_release -d) == *"18.10"* ]]; then
                echo -ne "  Apt install Node.js                 \r"
                if sudo apt install -y nodejs npm curl 2>&1 | sudo tee -a /var/log/nodered-install.log >>/dev/null; then CHAR=$TICK; else CHAR=$CROSS; fi
                echo -ne "  Apt install Node.js                 $CHAR"
            else
                echo -ne "  Install Node.js LTS                 \r"
                # use the official script to install for other debian platforms
                sudo apt install -y curl 2>&1 | sudo tee -a /var/log/nodered-install.log >>/dev/null
                OV=`cat /etc/os-release | grep VERSION_ID | cut -d '"' -f 2`
                if [[ "$OV" = "8" ]]; then
                    curl -sL https://deb.nodesource.com/setup_10.x | sudo -E bash - 2>&1 | sudo tee -a /var/log/nodered-install.log >>/dev/null
                else
                    curl -sL https://deb.nodesource.com/setup_12.x | sudo -E bash - 2>&1 | sudo tee -a /var/log/nodered-install.log >>/dev/null
                fi
                if sudo apt install -y nodejs 2>&1 | sudo tee -a /var/log/nodered-install.log >>/dev/null; then CHAR=$TICK; else CHAR=$CROSS; fi
                echo -ne "  Install Node.js LTS                 $CHAR"
            fi
            sudo npm i -g --no-progress --no-update-notifier --no-audit --no-fund npm 2>&1 | sudo tee -a /var/log/nodered-install.log >>/dev/null;
        fi
    else
        CHAR="-"
        echo -ne "  Remove old version of Node.js       $CHAR\n"
        echo -ne "  Leave existing Node.js              $CHAR"
    fi
    NUPG=$CHAR
    hash -r
    rc=""
    if nov=$(node -v 2>/dev/null); then :; else rc="ERR"; fi
    if npv=$(npm -v 2>/dev/null); then :; else rc="ERR"; fi
    echo "Versions: node:$nov npm:$npv" | sudo tee -a /var/log/nodered-install.log >>/dev/null
    if [[ $rc == "" ]]; then
        echo -ne "   Node $nov   Npm $npv\r\n"
    else
        echo -ne "\b$CROSS   Failed to install Node.js - Exit\r\n\r\n\r\n\r\n\r\n\r\n\r\n\r\n\r\n\r\n\r\n\r\n"
        exit 2
    fi
    if [ "$EUID" == "0" ]; then npm config set unsafe-perm true &>/dev/null; fi

    # clean up the npm cache and node-gyp
    if [[ $NUPG == $TICK ]]; then
        if [[ $GLOBAL == "true" ]]; then
            sudo npm cache clean --force 2>&1 | sudo tee -a /var/log/nodered-install.log >>/dev/null
        else
            npm cache clean --force 2>&1 | sudo tee -a /var/log/nodered-install.log >>/dev/null
        fi
        if sudo rm -rf "$NODERED_HOME/.node-gyp" "$NODERED_HOME/.npm" /root/.node-gyp /root/.npm; then CHAR=$TICK; else CHAR=$CROSS; fi
    fi
    echo -ne "  Clean npm cache                     $CHAR\r\n"

    # and install Node-RED
    echo "Now install Node-RED" | sudo tee -a /var/log/nodered-install.log >>/dev/null
    if [[ $GLOBAL == "true" ]]; then
        if sudo npm i -g --unsafe-perm --no-progress --no-update-notifier --no-audit --no-fund node-red@latest 2>&1 | sudo tee -a /var/log/nodered-install.log >>/dev/null; then CHAR=$TICK; else CHAR=$CROSS; fi
    else
        if npm i -g --unsafe-perm --no-progress --no-update-notifier --no-audit --no-fund node-red@latest 2>&1 | sudo tee -a /var/log/nodered-install.log >>/dev/null; then CHAR=$TICK; else CHAR=$CROSS; fi
    fi
    nrv=$(npm --no-progress --no-update-notifier --no-audit --no-fund -g ls node-red | grep node-red | cut -d '@' -f 2 | sudo tee -a /var/log/nodered-install.log) >>/dev/null 2>&1
    echo -ne "  Install Node-RED core               $CHAR   $nrv\r\n"

    # install any nodes, that were installed globally, as local instead
    echo "Now create basic package.json for the user and move any global nodes" | sudo tee -a /var/log/nodered-install.log >>/dev/null
    mkdir -p "$NODERED_HOME/.node-red/node_modules"
    sudo chown -Rf $NODERED_USER:$NODERED_GROUP $NODERED_HOME/.node-red/ 2>&1 >>/dev/null
    pushd "$NODERED_HOME/.node-red" 2>&1 >>/dev/null
        npm config set update-notifier false 2>&1 >>/dev/null
        if [ ! -f "package.json" ]; then
            echo '{' > package.json
            echo '  "name": "node-red-project",' >> package.json
            echo '  "description": "A Node-RED Project",' >> package.json
            echo '  "version": "0.0.1",' >> package.json
            echo '  "dependencies": {' >> package.json
            echo '  }' >> package.json
            echo '}' >> package.json
        fi
        CHAR="-"
        if [[ $GLOBALNODES != " " ]]; then
            if npm i --unsafe-perm --save --no-progress --no-update-notifier --no-audit --no-fund $GLOBALNODES 2>&1 | sudo tee -a /var/log/nodered-install.log >>/dev/null; then CHAR=$TICK; else CHAR=$CROSS; fi
        fi
        echo -ne "  Move global nodes to local          $CHAR\r\n"

        CHAR="-"
        if [[ ! -z $EXTRANODES ]]; then
            echo "Installing extra nodes: $EXTRANODES :" | sudo tee -a /var/log/nodered-install.log >>/dev/null
            if npm i --unsafe-perm --save --no-progress --no-update-notifier --no-audit --no-fund $EXTRANODES 2>&1 | sudo tee -a /var/log/nodered-install.log >>/dev/null; then CHAR=$TICK; else CHAR=$CROSS; fi
        fi
        echo -ne "  Install extra Pi nodes              $CHAR\r\n"

        # try to rebuild any already installed nodes
        if [[ $NUPG == $TICK ]]; then
            if npm rebuild --unsafe-perm 2>&1 | sudo tee -a /var/log/nodered-install.log >>/dev/null; then CHAR=$TICK; else CHAR=$CROSS; fi
            echo -ne "  Npm rebuild existing nodes          $CHAR\r\n"
        else
            echo -ne "  Npm rebuild existing nodes          -\r\n"
        fi
    popd 2>&1 >>/dev/null
    sudo chown -Rf $NODERED_USER:$NODERED_GROUP $NODERED_HOME/.npm 2>&1 >>/dev/null

    # add the shortcut and start/stop/log scripts to the menu
    echo "Now add the shortcut and start/stop/log scripts to the menu" | sudo tee -a /var/log/nodered-install.log >>/dev/null
    sudo mkdir -p /usr/bin
    if curl -f https://raw.githubusercontent.com/node-red/linux-installers/master/resources/node-red-icon.svg >/dev/null 2>&1; then
        sudo curl -sL -o /usr/share/icons/hicolor/scalable/apps/node-red-icon.svg https://raw.githubusercontent.com/node-red/linux-installers/master/resources/node-red-icon.svg 2>&1 | sudo tee -a /var/log/nodered-install.log >>/dev/null
        sudo curl -sL -o /usr/share/applications/Node-RED.desktop https://raw.githubusercontent.com/node-red/linux-installers/master/resources/Node-RED.desktop 2>&1 | sudo tee -a /var/log/nodered-install.log >>/dev/null
        sudo curl -sL -o /usr/bin/node-red-start https://raw.githubusercontent.com/node-red/linux-installers/master/resources/node-red-start 2>&1 | sudo tee -a /var/log/nodered-install.log >>/dev/null
        sudo curl -sL -o /usr/bin/node-red-stop https://raw.githubusercontent.com/node-red/linux-installers/master/resources/node-red-stop 2>&1 | sudo tee -a /var/log/nodered-install.log >>/dev/null
        sudo curl -sL -o /usr/bin/node-red-restart https://raw.githubusercontent.com/node-red/linux-installers/master/resources/node-red-restart 2>&1 | sudo tee -a /var/log/nodered-install.log >>/dev/null
        sudo curl -sL -o /usr/bin/node-red-reload https://raw.githubusercontent.com/node-red/linux-installers/master/resources/node-red-reload 2>&1 | sudo tee -a /var/log/nodered-install.log >>/dev/null
        sudo curl -sL -o /usr/bin/node-red-log https://raw.githubusercontent.com/node-red/linux-installers/master/resources/node-red-log 2>&1 | sudo tee -a /var/log/nodered-install.log >>/dev/null
        sudo curl -sL -o /etc/logrotate.d/nodered https://raw.githubusercontent.com/node-red/linux-installers/master/resources/nodered.rotate 2>&1 | sudo tee -a /var/log/nodered-install.log >>/dev/null
        sudo chmod +x /usr/bin/node-red-start
        sudo chmod +x /usr/bin/node-red-stop
        sudo chmod +x /usr/bin/node-red-restart
        sudo chmod +x /usr/bin/node-red-reload
        sudo chmod +x /usr/bin/node-red-log
        echo -ne "  Add shortcut commands               $TICK\r\n"
    else
        echo -ne "  Add shortcut commands               $CROSS\r\n"
    fi

    # add systemd script and configure it for $USER
    echo "Now add systemd script and configure it for $USER" | sudo tee -a /var/log/nodered-install.log >>/dev/null
    if sudo curl -sL -o /lib/systemd/system/nodered.service https://raw.githubusercontent.com/node-red/linux-installers/master/resources/nodered.service 2>&1 | sudo tee -a /var/log/nodered-install.log >>/dev/null; then CHAR=$TICK; else CHAR=$CROSS; fi
    # set the memory, User Group and WorkingDirectory in nodered.service
    if [ $(cat /proc/meminfo | grep MemTotal | cut -d ":" -f 2 | cut -d "k" -f 1 | xargs) -lt 895000 ]; then mem="256"; else mem="512"; fi
    sudo sed -i 's#=512#='$mem'#;' /lib/systemd/system/nodered.service
    sudo sed -i 's#^User=pi#User='$NODERED_USER'#;s#^Group=pi#Group='$NODERED_GROUP'#;s#^WorkingDirectory=/home/pi#WorkingDirectory='$NODERED_HOME'#;' /lib/systemd/system/nodered.service
    sudo systemctl daemon-reload 2>&1 | sudo tee -a /var/log/nodered-install.log >>/dev/null
    echo -ne "  Update systemd script               $CHAR\r\n"

    # remove unneeded large sentiment library to save space and load time
    sudo rm -f /usr/lib/node_modules/node-red/node_modules/multilang-sentiment/build/output/build-all.json 2>&1 | sudo tee -a /var/log/nodered-install.log >>/dev/null
    # on LXDE add launcher to top bar, refresh desktop menu
    file=/home/$NODERED_USER/.config/lxpanel/LXDE-pi/panels/panel
    if [ -e $file ]; then
        if ! grep -q "Node-RED" $file; then
            mat="lxterminal.desktop"
            ins="lxterminal.desktop\n    }\n    Button {\n      id=Node-RED.desktop"
            sudo sed -i "s|$mat|$ins|" $file 2>&1 | sudo tee -a /var/log/nodered-install.log >>/dev/null
            if xhost >& /dev/null ; then
                export DISPLAY=:0 && lxpanelctl restart 2>&1 | sudo tee -a /var/log/nodered-install.log >>/dev/null
            fi
        fi
    fi

    # on Pi, add launcher to top bar, add cpu temp example, make sure ping works
    echo "Now add launcher to top bar, add cpu temp example, make sure ping works" | sudo tee -a /var/log/nodered-install.log >>/dev/null
    if sudo grep -q BCM2 /proc/cpuinfo; then
        sudo setcap cap_net_raw+eip $(eval readlink -f `which node`) 2>&1 | sudo tee -a /var/log/nodered-install.log >>/dev/null
        sudo setcap cap_net_raw=ep /bin/ping 2>&1 | sudo tee -a /var/log/nodered-install.log >>/dev/null
        sudo adduser $NODERED_USER gpio 2>&1 | sudo tee -a /var/log/nodered-install.log >>/dev/null
    fi

    echo -ne "\r\n\r\n\r\n"
    echo -ne "All done.\r\n"
    if [[ $GLOBAL == "true" ]]; then
        echo -ne "  You can now start Node-RED with the command  \033[0;36mnode-red-start\033[0m\r\n"
        echo -ne "  or using the icon under   Menu / Programming / Node-RED\r\n"
    else
        echo -ne "  You can now start Node-RED with the command  \033[0;36m./node-red\033[0m\r\n"
    fi
    echo -ne "  Then point your browser to \033[0;36mlocalhost:1880\033[0m or \033[0;36mhttp://{your_pi_ip-address}:1880\033[0m\r\n"
    echo -ne "\r\nStarted  $time1  -  Finished  $(date)\r\n\r\n"
    echo "Memory : $(free -h -t | grep Total | awk '{print $2}' | cut -d i -f 1)" | sudo tee -a /var/log/nodered-install.log >>/dev/null
    echo "Finished : "$time1 | sudo tee -a /var/log/nodered-install.log >>/dev/null
    systemctl enable nodered.service
    node-red-start
;;
* )
    echo " "
    exit 1
;;
esac
else
echo " "
echo "Sorry - cannot connect to internet - not going to touch anything."
echo "https://www.npmjs.com/package/node-red   is not reachable."
echo "Please ensure you have a working internet connection."
echo "Return code from curl is "$?
echo " "
exit 1
fi
else
echo " "
echo "Sorry - I'm not supposed to be run on a Mac."
echo "Please see the documentation at http://nodered.org/docs/getting-started/upgrading."
echo " "
exit 1
fi
fi
As a next step we need to create a template file that is the basis for the node-red-install-config.conf file that qbee creates through the UI with key-value templating. We call it node-red-install-config.tmpl and it looks like this:
node-red-install-config.tmpl
# template file for Node-RED install

# run again trigger for qbee.io {{epoch}}

export EXTRANODES="{{Extranodes}}"
There are two key-value mustache place holder. The first is {{Extranodes}}. This allows to define all nodes that should be installed. Here you can also install UC-3100 specific nodes. They all need to be on one line with a space in between such as here: node-red-contrib-modbus@latest node-red-contrib-influxdb@latest. You can add as many nodes as necessary. In the comment we have {{epoch}}. This allows to change the epoch number in the UI and thus force to expand a new file from the .tmpl file into the .conf file. Any change will cause the script to run again thus re-installing, updating or installing new nodes. Just paste the current epoch time, save, commit and all devices in scope will install, update and add the nodes specified.
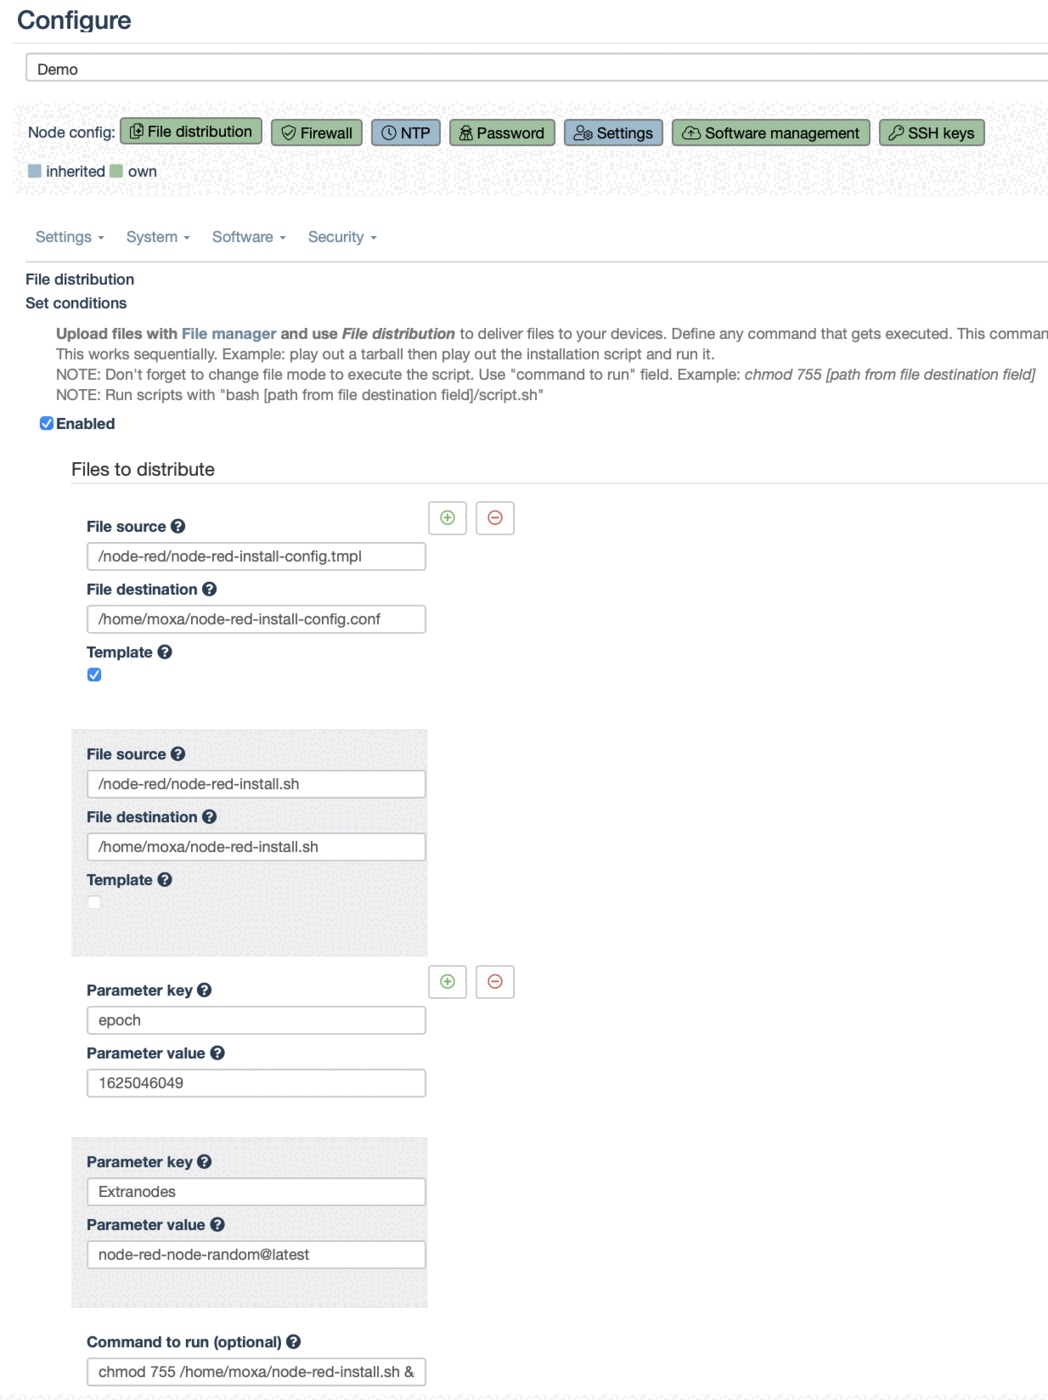
As a last step the command to run needs to be specified. This triggers any time there is a change: chmod 755 /home/moxa/node-red-install.sh && /home/moxa/node-red-install.sh && node-red-start & The qbee agent writes this as root and the file needs to be made executable.
Both files (script and config) need to be in the same file distribution in order to have the "command to run" trigger on template changes. In addition the template file needs to have the template checkbox activated. Then you can add key-value boxes as seen in the image below.
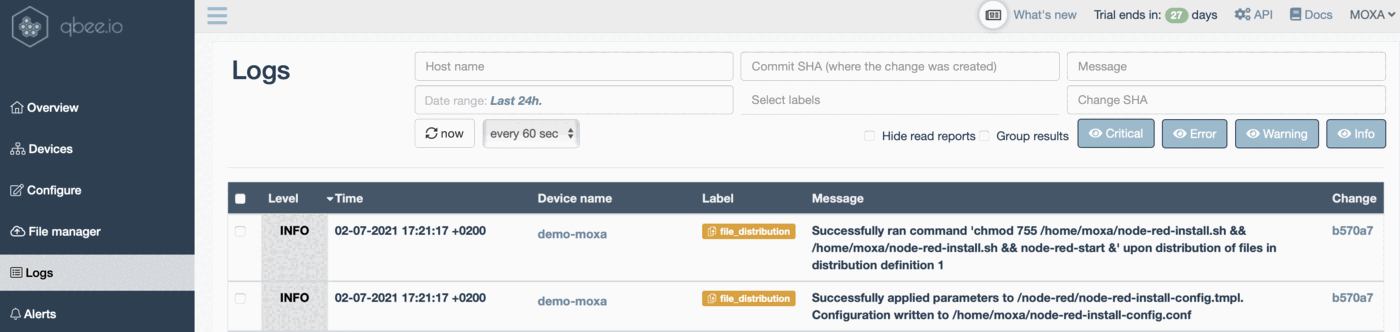
When the device connects during the next run Node-RED will be installed and a log entry is created. Clicking on logs and "show logs" for the specific device shows information from the installation process.
Configuring the Node-RED flows and templating
A powerful qbee option is the templating of files. For this demo we have templated a Node-RED flow and deployed it. Another way is to build a CI/CD (continuous integration / continuous deployment) pipeline with GitHub and GitHub runners as described in the link or even a fully containerized deployment. This demo contains a simulated weather station and the weather can be adjusted individually per device, per group or for all devices through providing new key-value input.
Remote access to the device and to the Node-RED instance
qbee.io has a built-in ssh functionality. Just go to the device and press "connect to console". Alternatively you can download and use qbee-connect on your local machine and get full access to any port. qbee-connect is a very good alternative to Teamviewer. In this case we want to access the Node-RED application on the remote device on port 1880.
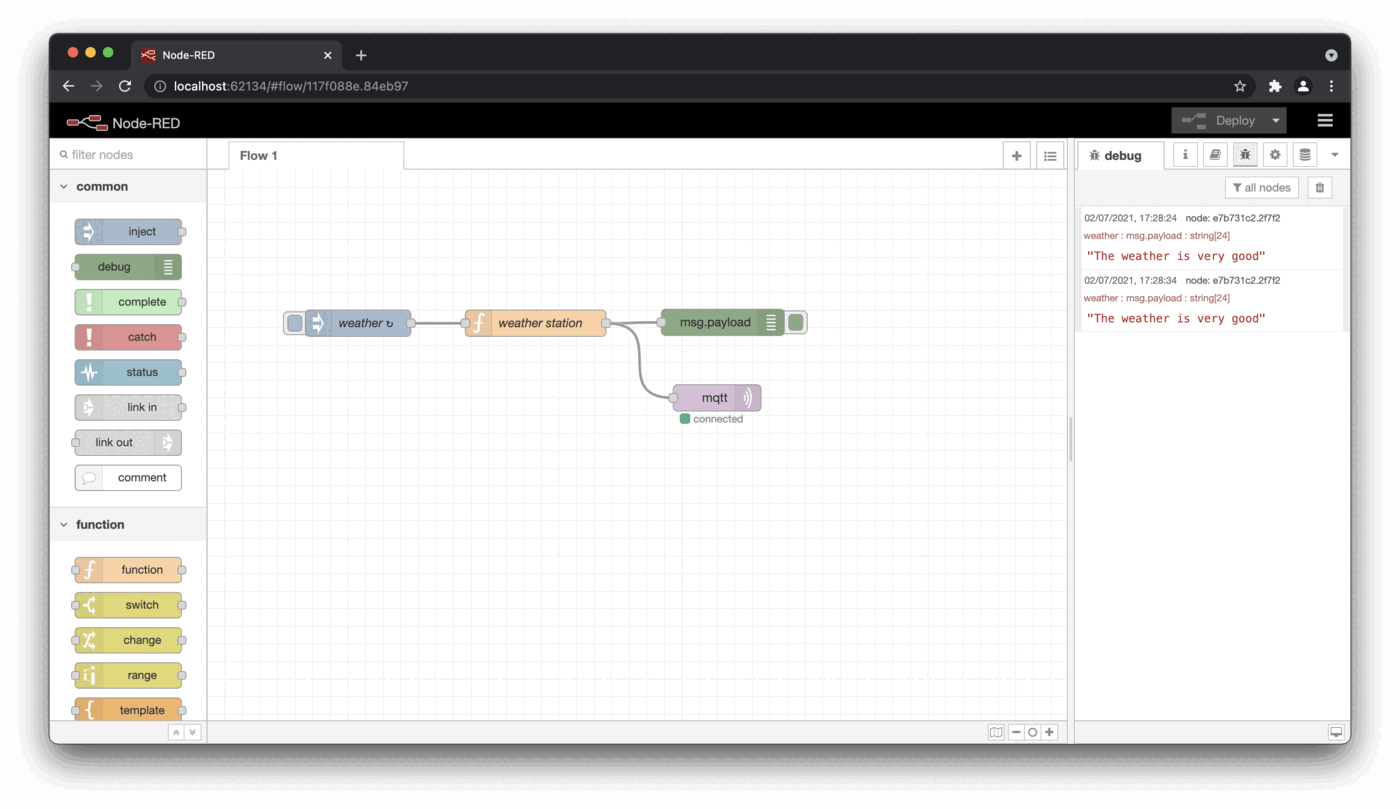
We start qbee-connect and connect to port 1880. Then we use a browser to access the mapped remote port 1880 on the localhost:62134. Now we have full access to the remote device behind any firewall. Please also remember that we closed all inbound ports with the firewall. The same can be done with any web service, VNC or any other application.
| qbee-connect as VPN | remote Node-RED on localhost |
|---|---|
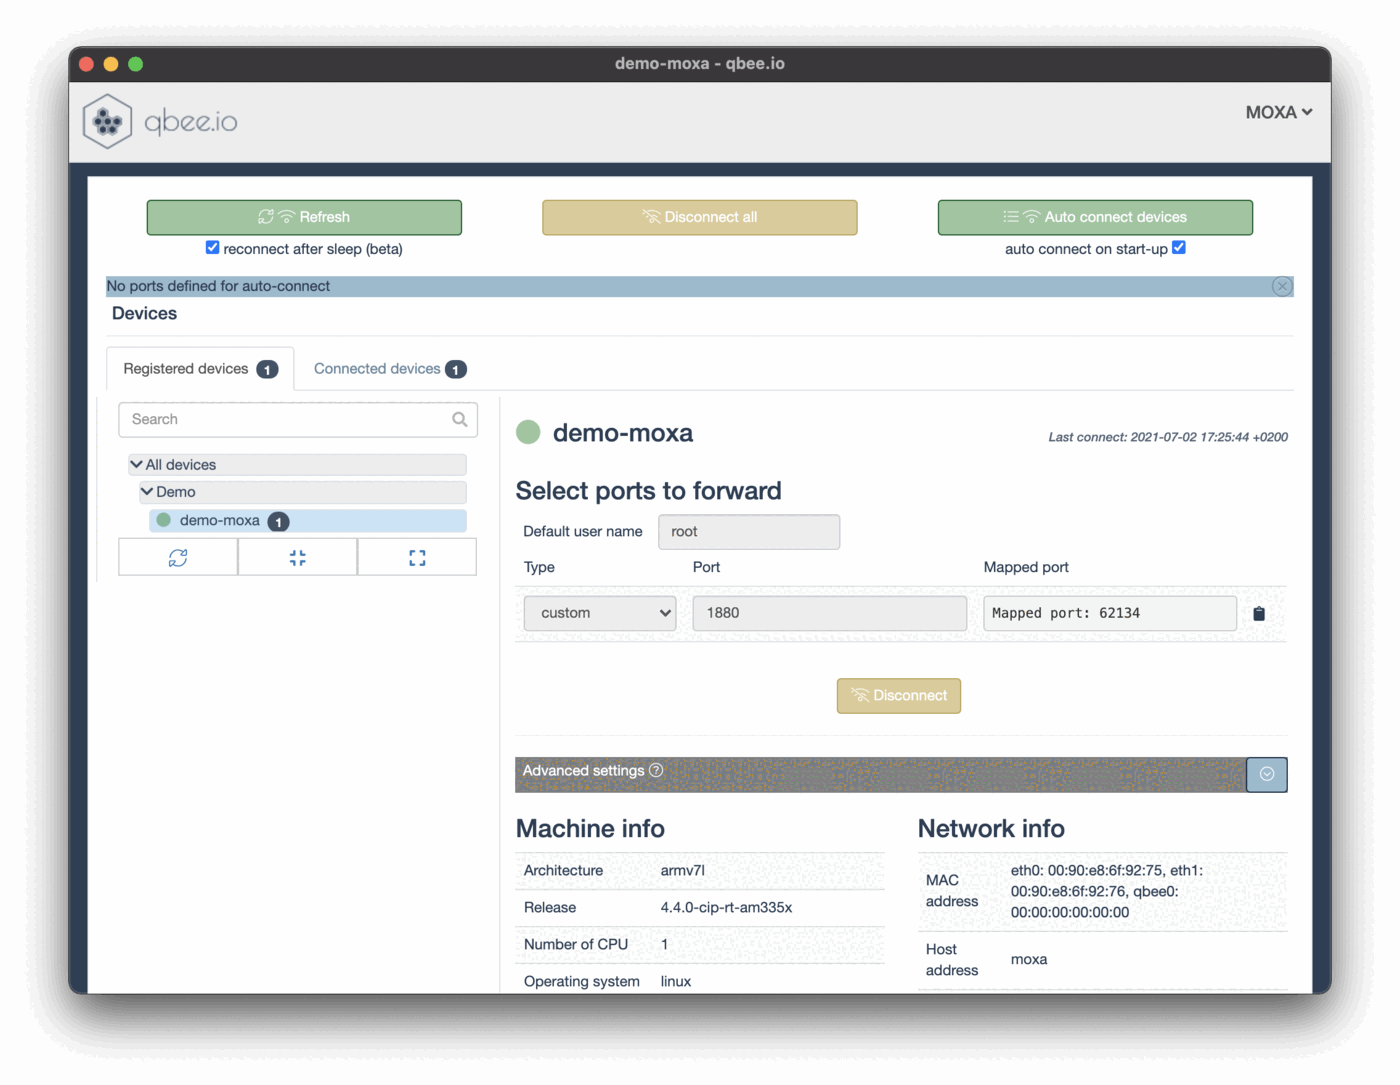 |  |
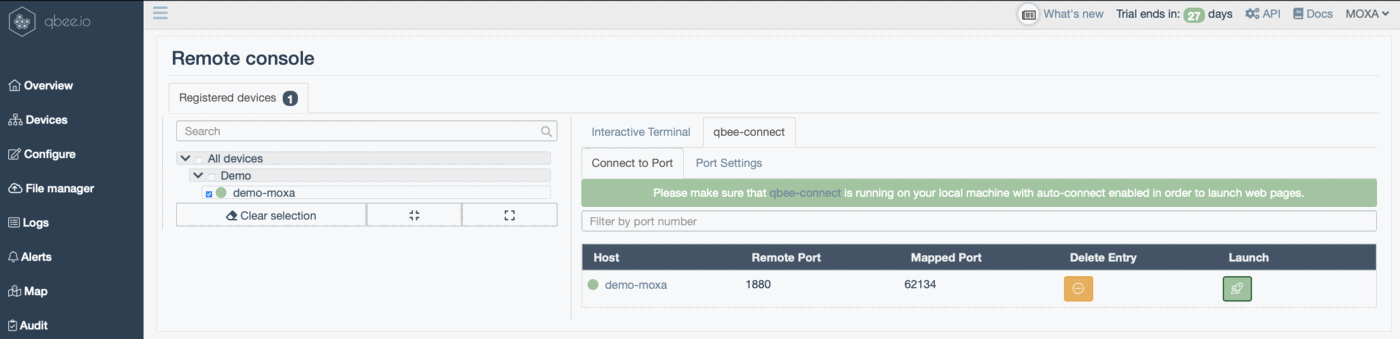
The new qbee.io platform offers another convenience function that allows to automatically connect remote devices on start-up of qbee-connect. This allows to open remote web pages directly from the qbee UI by pressing the spaceship button. Just enable auto-connect for the device and port 1880 and you can launch the Node-RED screen directly in a new browser window by pressing on the button (assuming that qbee-connect with auto-connect is running on the local machine). This function is called launchpad.
A hello world service via file distribution: a simple http server
With this use case we demonstrate how simple or complex services can be set up on your Moxa device via qbee.io's file distribution. We demonstrate a hello world example where we set up a http server. But it is just as possible to distribute python files, applications or anything else. This service can serve single html file. Consider the following example file
index.html
<html>
    <head></head>
    <body>
    <meta http-equiv="refresh" content="5">
        <h1>Hello Moxa!<h1>
        Greetings, qbee.io !
    </body>
</html>
which we are going to make available on port 8008. We use a simple Node.js script to set up a http server. Since we have already installed Node-RED we already have the node package available. Otherwise we can install it via the software management through qbee.io. We use qbee.io's file distribution to get the files onto the device, expand the user parameters into the template files and start the server.
Templating of the http server
We use the following Javascript file to serve the above given html file.
server.js.tmpl
var http = require('http'),
fs = require('fs');

fs.readFile('{{html_path}}', function (err, html) {
    if (err) {
        throw err;
    }
    http.createServer(function(request, response) {
        response.writeHeader(200, {"Content-Type": "text/html"});
        response.write(html);
        response.end();
    }).listen({{port}});
});
Here, we allow the user to specify which file should be served and on which port. That is done via qbee.io's templating mechanism. See below how we specify to serve the index.html file on port 8008.
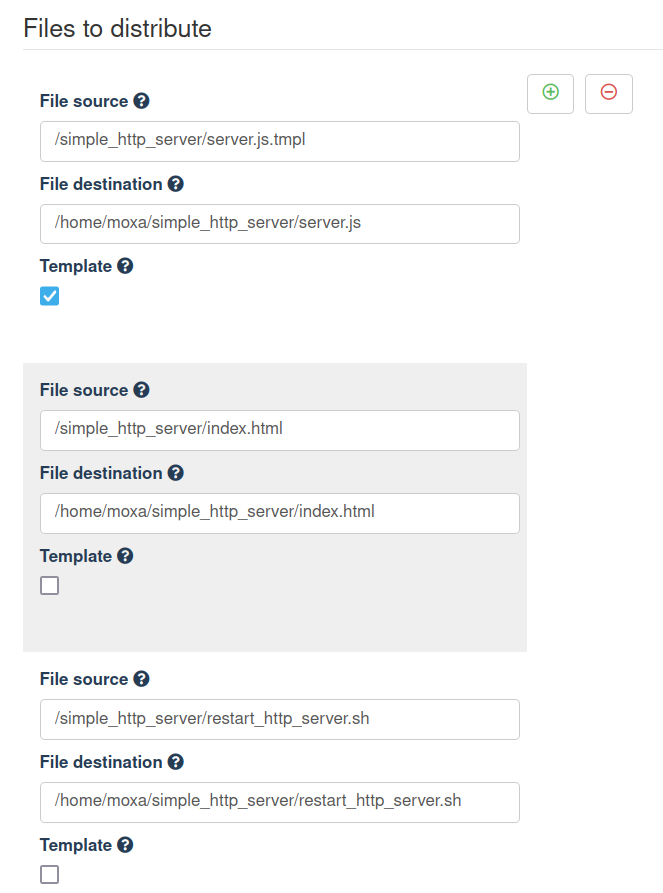 | 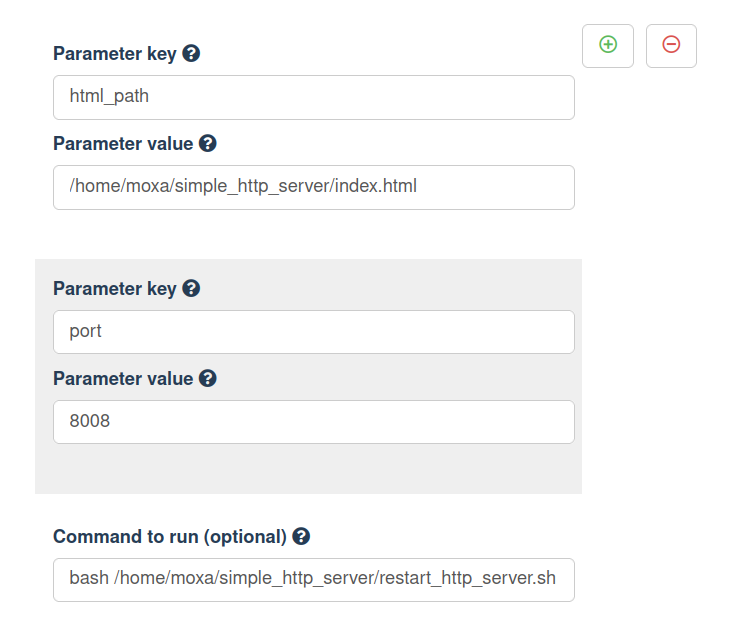 |
As a command to run we have provided the following bash script.
restart_http_server.sh
#!/usr/bin/env bash

PIDFILE="/var/run/$(basename $0).pid"

# Kill any previously running process
if [[ -f $PIDFILE ]]; then
    echo "killing old http server"
    kill $(cat $PIDFILE) 2> /dev/null
fi

PORT=$(grep 'listen' /home/moxa/simple_http_server/server.js | grep -o '[0-9]\+')
echo "starting simple http server on port $PORT"

exec node /home/moxa/simple_http_server/server.js >/dev/null 2>&1 &

echo $! > $PIDFILE
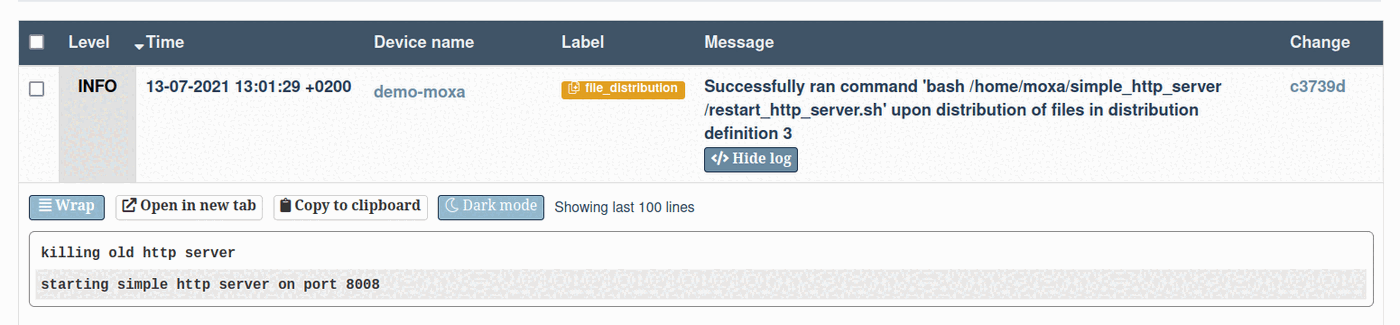
Through qbee.io's feedback mechanism we obtain the output of the script including the port on which the http server runs.
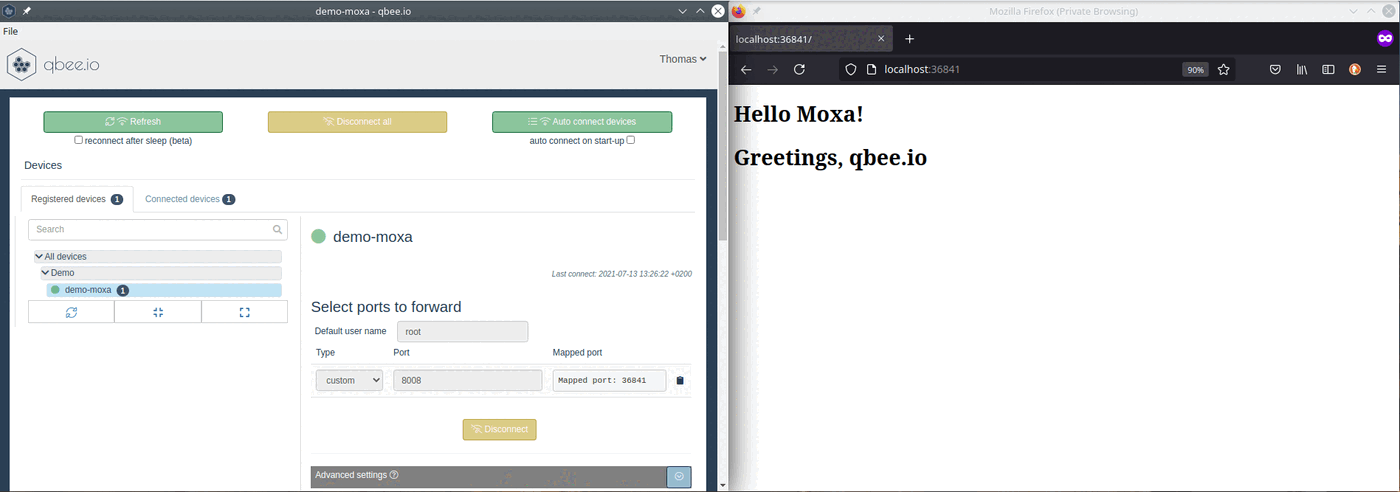
Connection to the http server via qbee-connect
Now, we can use qbee-connect to map the above mentioned port to localhost and view the uploaded web page.
Automated web page update using GitHub (CI/CD)
To keep your web page or application under version control you can use GitHub and set up GitHub actions such that on every push into the main branch the updated file is uploaded into the qbee.io file manager via an API call. This in turn triggers a restart of the http server (or it could restart your application) showing the new page.
Connecting qbee and GitHub through a GitHub runner and qbee API creates a CI/CD pipeline
By using the GitHub runner and the qbee REST API you can create a continuous integration / continuous deployment pipeline for your embedded device fleet. This is a very powerful tool to update Node-RED flows, applications, Python or other code as well as configuration settings.
See, e.g. our GitHub Node-RED example on how to set up an automated flow with GitHub.
Remember to include your API user authentication information into GitHub's secret manager. Here, we used USERNAME_KEY and PASSWORD_KEY which are accessed as {{secrets.USERNAME_KEY}} and {{secrets.PASSWORD_KEY}} in the runner script:
main.yml
name: Automated http server update file distribution

on:
    push:
        branches: [ main ]
    pull_request:
        branches: [ main ]

jobs:
    build:
        runs-on: ubuntu-latest
        steps:
        - uses: actions/checkout@v2

        - name: qbee.io authentication
          uses: qbee-io/authenticate-action@main
          with:
            login: ${{ secrets.USERNAME_KEY }}
            password: ${{ secrets.PASSWORD_KEY }}

        - name: qbee.io file upload
          uses: qbee-io/qbee-io/file-upload-action@main
          with:
            source: 'index.html'
            destination: '/simple_http_server'
Additional convenience functions
qbee is all about automation. Large fleets need to be automated otherwise devices will have deviations and then they are hard to maintain. Therefore, we usually recommend to use file distribution or scripts to fetch log files or other data. However, sometimes manual access to files, logs and other resources is necessary or it is desirable to be able to push files to the device. This could be while debugging a UC-3100 unit or in early development. All this can be solved with qbee-connect as well.
Typical tools that run on top of ssh are scp, sftp, rsync, sshfs and many others can be used for this. The qbee-connect tool allows you to connect securely to port 22 and offers a mapped port in the UI. This mapped port can then be used to work with the tools above. Please see the following examples:
- remote two-way file access through
scp - remote two-way file and folder synchronization with
rsync - remote file browsing capabilities with
sshfs
These are all explained in a discussion aboutuseful remote access tools.
But there are also a lot of very interesting graphical tools available that handle one or many of these services above. For your convenience we list some here, but they are by no means complete:
- WinSCP : Windows (
SCP,SFTP) - FileZilla : ALL (
SFTP) - Cyberduck : MAC (
SFTP) - SSHFS-Win : Windows (
SSHFS) - SSHFS-FUSE : MAC (
SSHFS) - Grsync : ALL (
rsync) - Acrosync : ALL (
rsync), commercial
Use localhost or 127.0.0.1 as server url, the correct mapped port and your standard credentials.
Below you see an SFTP remote access to the remote device allowing all regular SFTP file operations:
| qbee-connect on port 22 | setup SFTP client |
|---|---|
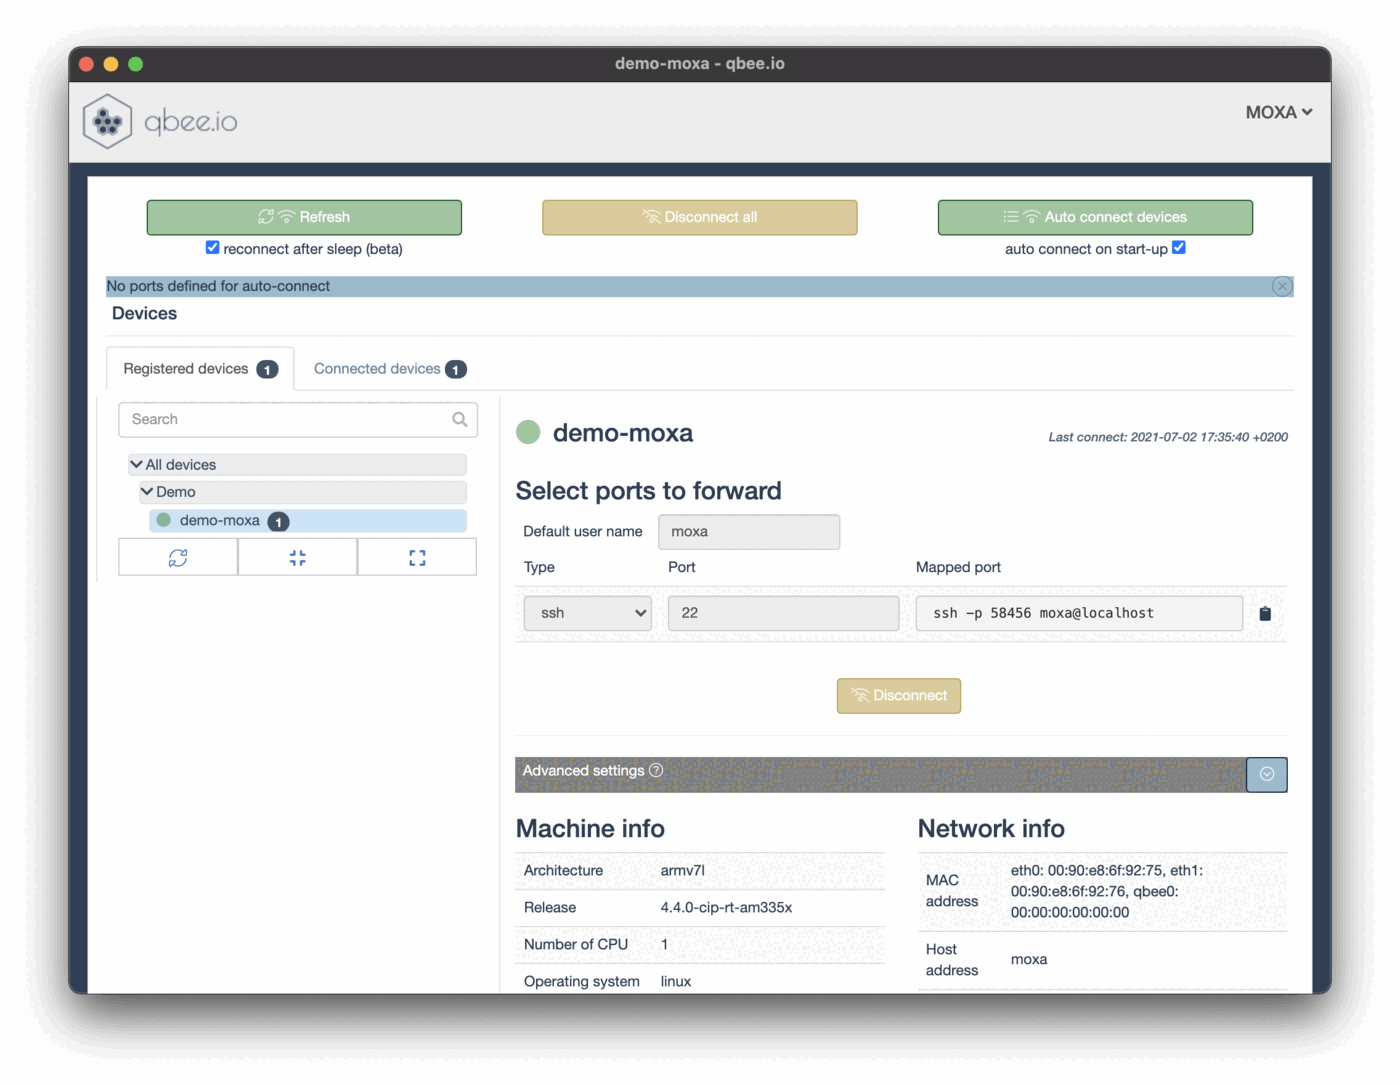 | 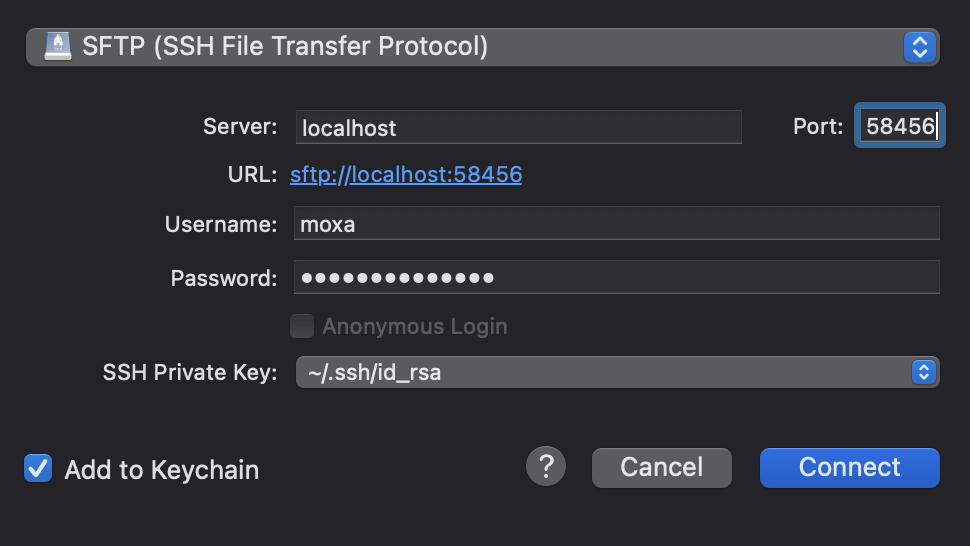 |
| show remote file access | show some SFTP options |
|---|---|
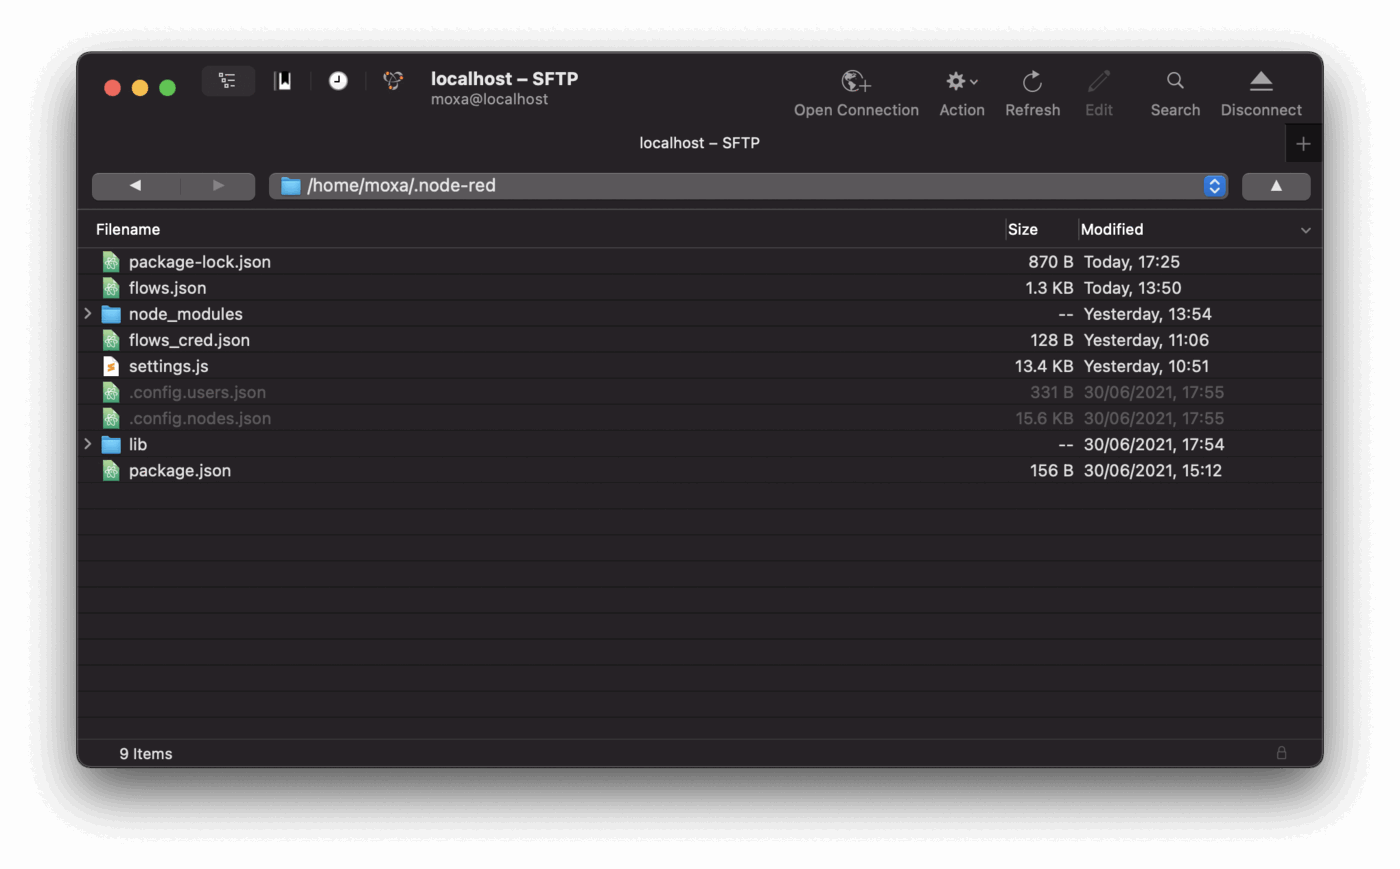 | 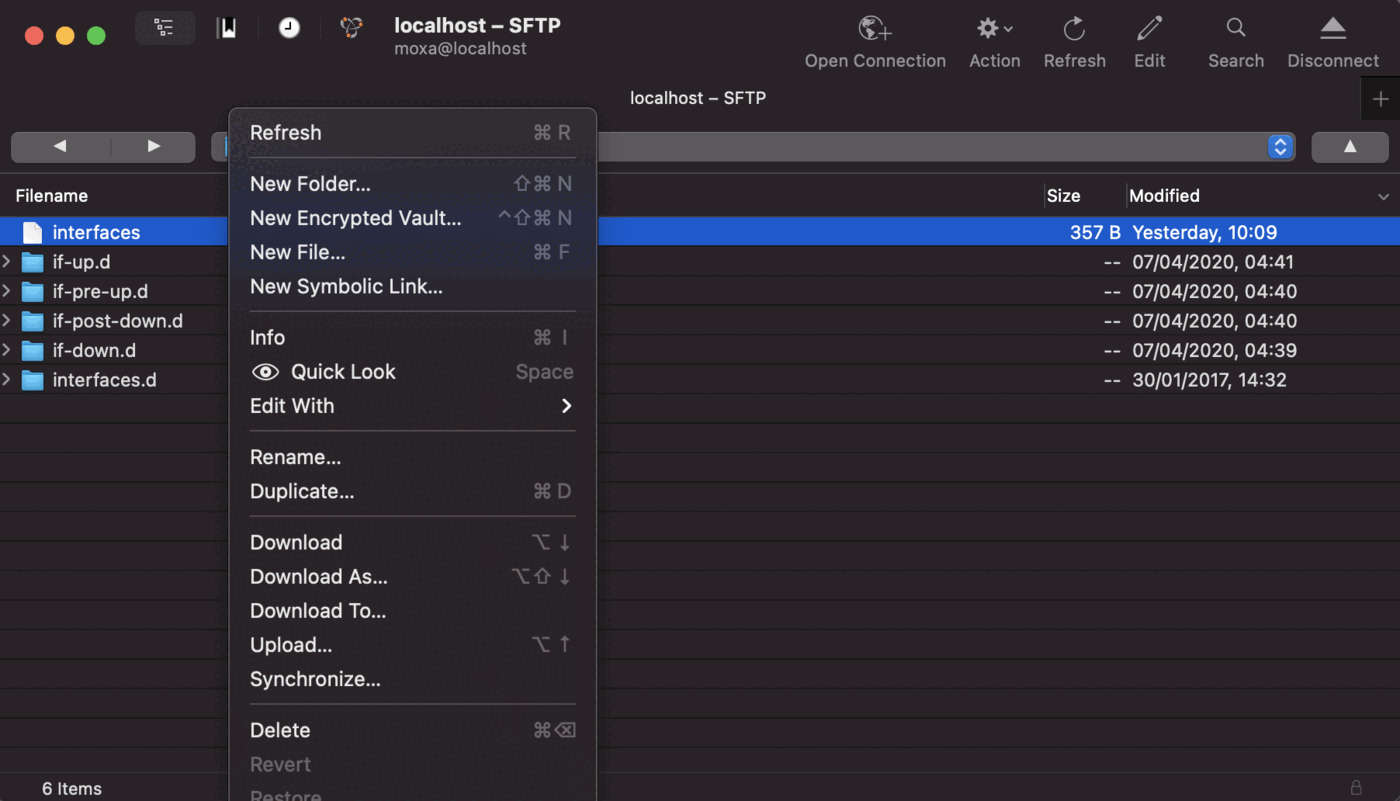 |
This can also be seen in this video:
Accessing other devices on the remote network through the Moxa gateway
Sometimes it is necessary to access other devices within the remote network. We always recommend to run all devices with local firewall and all ports closed. In this case the remote target device needs to open the specific port for the IP address of the remote Moxa gateway that is accessing this. The scenario we want to solve looks like this (but IP addresses are not correct):
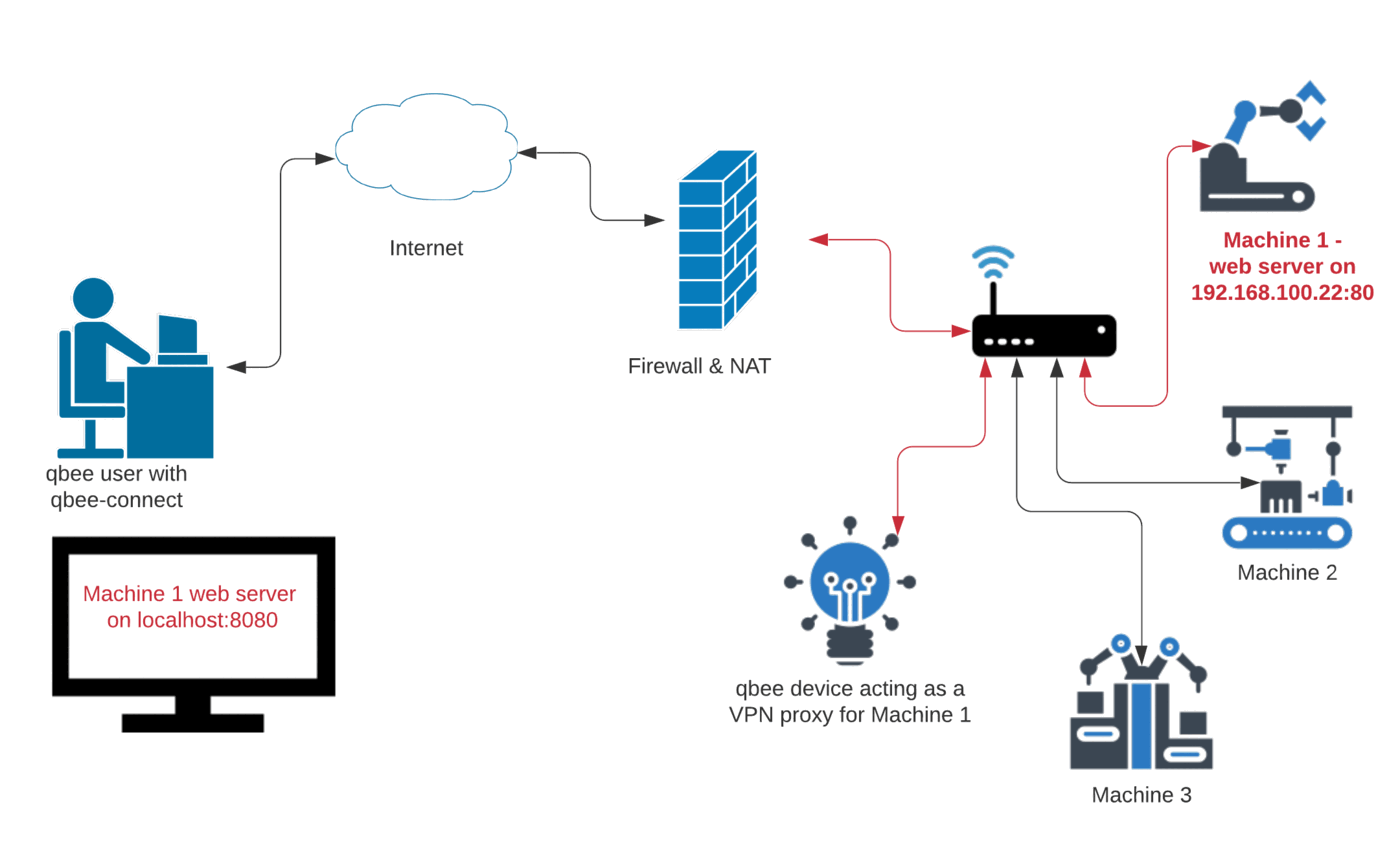
In our case there is another industrial controller accessing a Modbus Schneider Power Tag which monitors an electrical installation. Again Node-RED is used on port 1880. The remote target IP is 192.168.100.8. We will map this to the local port 8080.
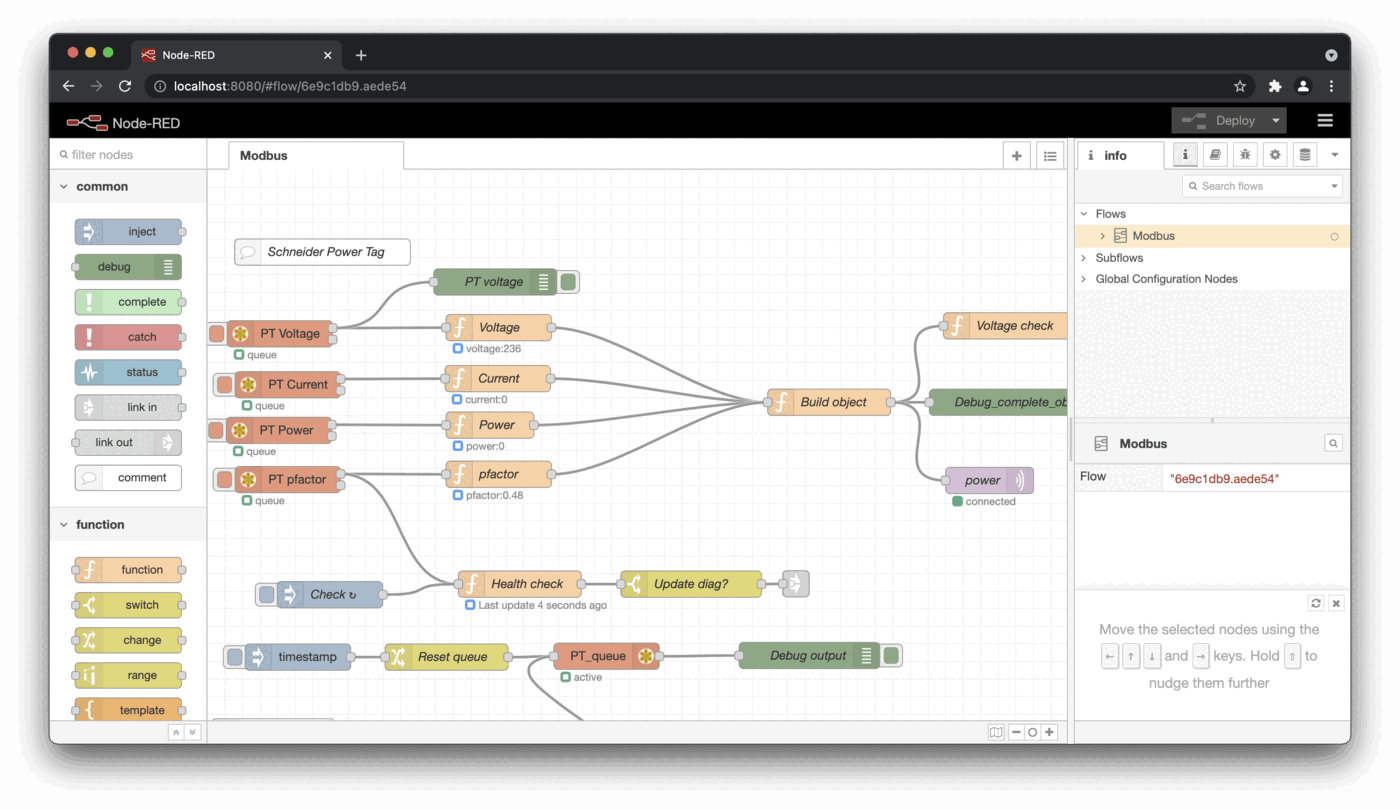
We start qbee-connect and connect to the remote Moxa device via ssh. Then we get an advanced menu in the qbee-connect app. Since we previously uploaded our public ssh key we need to provide access to our private key in the interface:

Then we can access the remote Modbus workflow on localhost:8080.
This is just a small impression of what qbee can do for your fleet management. We can help you from day 1 of your development allowing you to immediately place the device into a remote location. This will accelerate the development process as well as the first field tests. Then you can easily deploy more devices and seamlessly move into production and deploy large numbers of devices. Please let us know if you have any questions. We are here to help.