Learn how to access SDRconnect from SDRplay through a secure remote tunnel and how to autostart it
SDRplay has release SDRconnect, the new software for their multi-band SDR receivers. This software is under constant development and runs on Windows, Linux and macOS. The interesting part is the client server concept. In this tutorial we focus on that the server runs on a Raspberry Pi or any other Linux machine. The remote access will be provided by qbee through the qbee-connect tool which creates a secure tunnel. This is much more secure and qbee-connect also supports all major desktop OS. So this is a good fit.
What we do in this tutorial:
- install qbee on a suitable device (for example a 64bit RPI). See how to do this here.
- install SDRconnect server and client
- explain how to create a secure remote access to the device running SDRconnect server
- explain how you can automate the SDRconnect server service
How to install the SDRconnect server on a Linux system or RaspberryPi?
Assuming you have done step 1 and qbee is running on the device we can start installing SDRconnect. Please go to the SDRplay web page and find the according SDRconnect packages both for your desktop machine and the server.
Installing it on Linux is easy. Originally we wanted to automate this with qbee, but since there is a manual step to confirm the license agreement this needs to be manual. Just use the remote console from the qbee web application or create a full VNC access.
The command to install is simple. Download the file and do a chmod to make it executable
chmod 755 SDRconnect.......
Then cd to the specific location and run it:
cd /opt/sdrconnect
./SDRconnect --server
SDRplay provided the SDRconnect server service with quite a few options to run it. Here is the output of the help SDRconnect help command:
./SDRconnect --server --help
Usage: SDRconnect --server [--help] [--version] [--listdevices]
[--hwser=<serialNumber>] [--port=<portNumber>] [--ip=<ipAddress>]
[--samplerate=<sampleRate>] [--centerfrequency=<centerFrequency>]
[--biast=<biasTenable>] [--antenna=<antennaNumber>]
[--rfnotch=<rfNotchEnable>] [--dabnotch=<dabNotchEnable>]
 [--lnastate=<lnaState>] [--ifgr=<ifGr>] [--ifagc=<ifagcEnable>]
 [--setpoint=<setPoint>] [--agc-attack=<agcAttack>] [--agc-decay=<agcDecay>]
 [--agc-decay-delay=<agcDecayDelay>] [--agc-decay-threshold=<DecayThreshold>]
 [--exclusive] [--max-clients=<maxClients>]

--server           (Required) Starts the server engine
--help             Print this help information
--version          Print the application version number
--listdevices      Print a list of connected devices

--exclusive        Prevent ANY client from accessing the hardware controls
    <serialNumber>     RSP serial number
    <portNumber>       Listen on TCP port number (default is 50000)
    <ipAddress>        Listen on TCP IP Address (default is 0.0.0.0 which is any)
    <sampleRate>       Hardware sample rate in Hz (default is 2000000)
    <centerFrequency>  Hardware center frequency in Hz (default is 100000000)
    <biasTenable>      disable = 0, enable = 1 (default is 0)
    <antennaNumber>    Ant A/Tuner 1 50ohm = 0, Ant B/Tuner 2 = 1, Ant C/HiZ = 2
    <rfNotchEnable>    disable = 0, enable = 1 (default is 0)
    <dabNotchEnable>   disable = 0, enable = 1 (default is 0)
    <lnaState>         Range is dependant on RSP and center frequency 0=max gain
    <ifGr>             Range is 20 to 59 (default is 40)
    <ifagcEnable>      disable = 0, enable = 1 (default is 1)
    <setPoint>         default = -30 dbFS, range is normally -20 to -72
    <agcAttack>        default = 500 ms, range is 0 to 1000
    <agcDecay>         default = 500 ms, range is 0 to 1000
    <agcDecayDelay>    default = 200 ms, range is 0 to 1000
    <DecayThreshold>   default = 5 dB, range is 0 to 20
    <maxClients>       maximum number of allowed clients (default = 8)
```
This is as far as the documentation form SDRplay takes you.
How to securely access a RaspberryPi running SDRconnect from SDRplay over the internet?
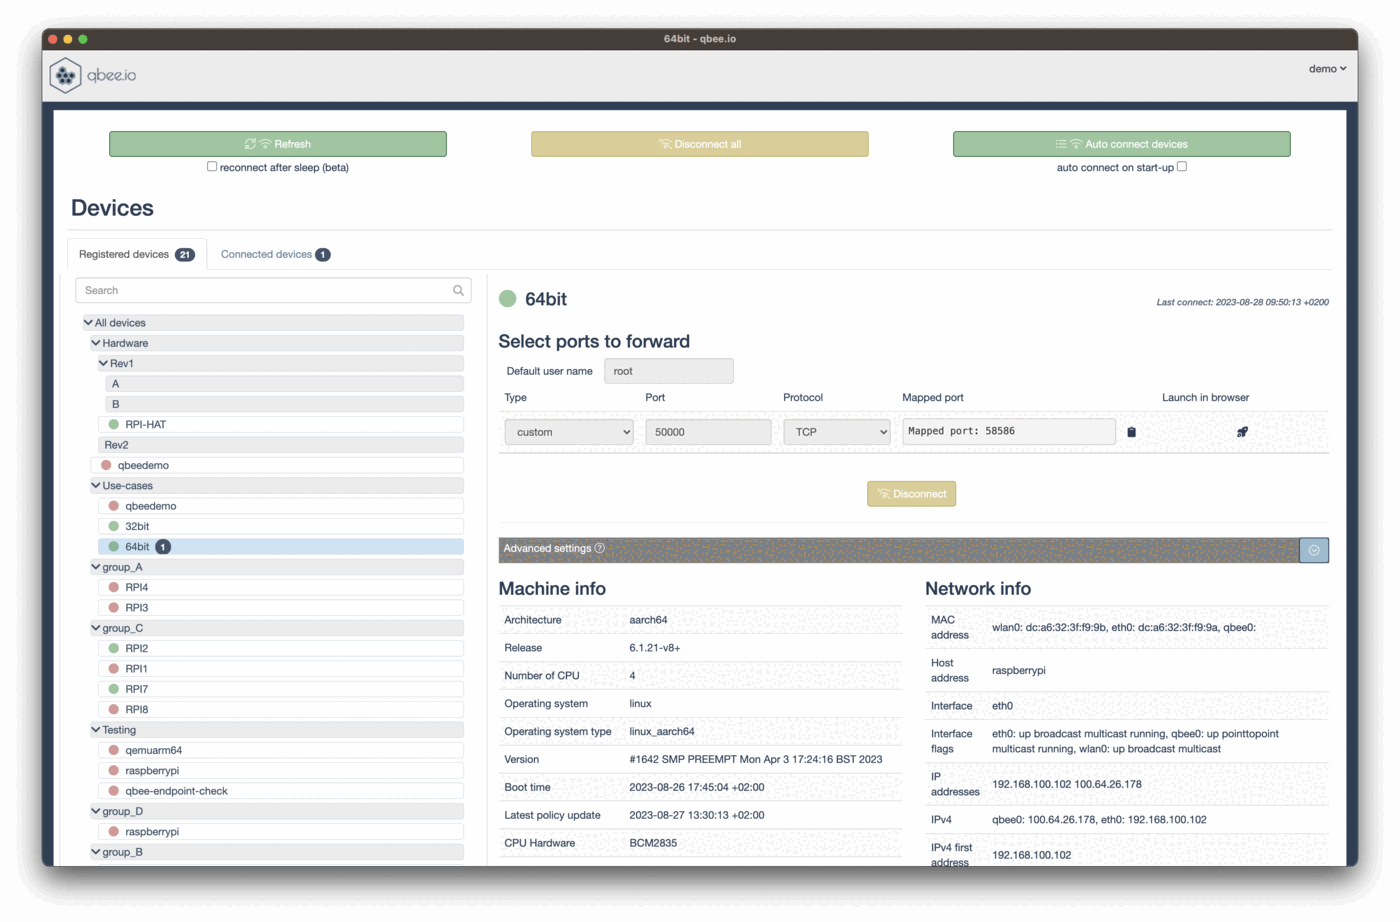
Now we will explain how to create remote access to your RPI. Functionally this is very simple. qbee create a secure tunnel from the RaspberryPi and terminates that on your local machine. It maps the port 50000 from the RPI to a random port to the localhost interface on your machine. THIS MIGHT VARY FROM THE ONE IN THE VIDEO. Please adopt to what you get. This port will be static for your qbee user. So we create a secure end-to-end encrypted tunnel and only the client machine running a qbee-connect application authenticated with your user can access the remote device. You can even close all ports on the RPI, because qbee-connect or the web based console can still provide ssh access remotely.
Please make sure that the server on the remote device is running on port 50000 or adjust accordingly in qbee-connect.
Install qbee-connect from the qbee packages directory in the web application or see here.
Start it on your desktop machine. The client machine that you want to remotely access the SDRconnect server with.
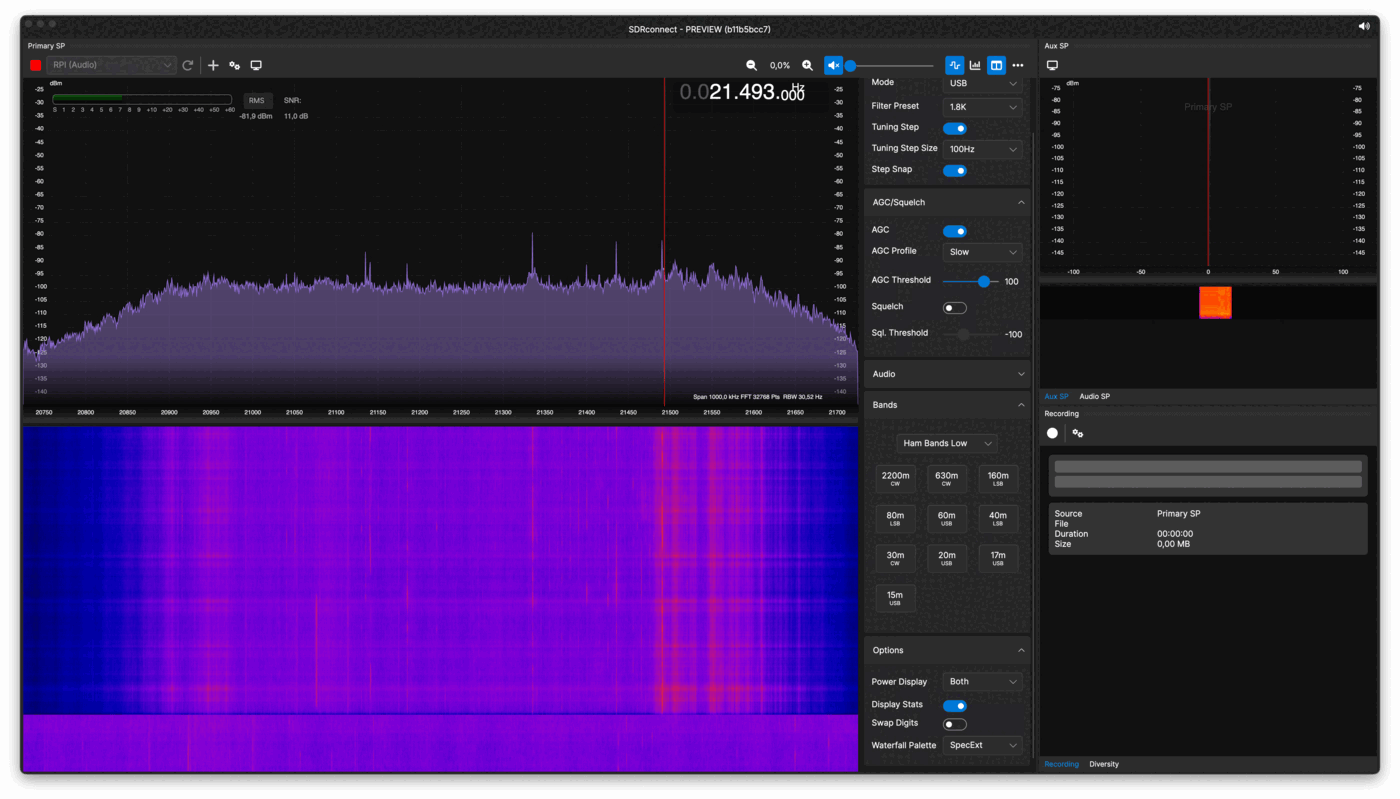
Now you start the SDRconnect client app on your local machine. Define your server according to the port you get from qbee-connect. The IP address 127.0.0.1 is your localhost interface.
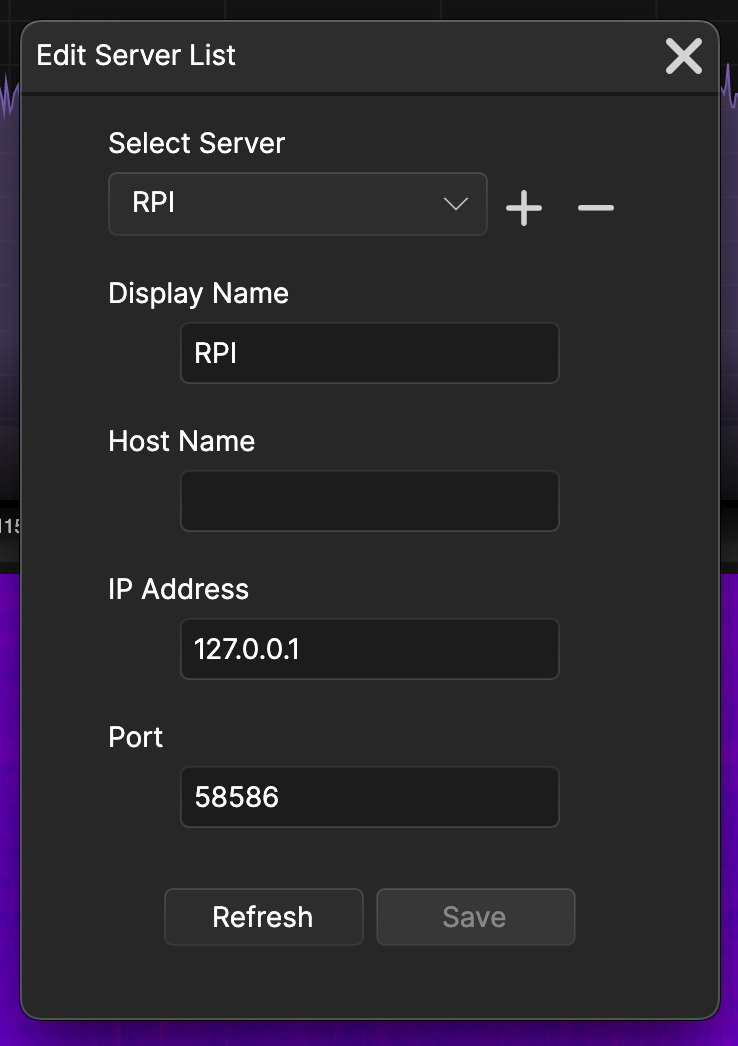
Reload the server list and connect to the audio port. The whole process is shown in this video here:
How to make SDRconnect server autostart and turn it into a systemd service?
Now we get to the more advanced things. You probably want the SDRconnect server to autostart on boot for the RaspberryPi. You can achieve this by registering a service with systemd (this is for debian Linux). Please note that we for simplicity run it as root here. You can also adopt this and run it as a specific user or your "pi" user.
The method to register a systemd service on a RaspberryPi involves registering it as a *.service file in this path `/lib/systemd/system/. The file needs to look like this then:
/lib/systemd/system/SDRconnect.service
[Unit]
Description=
After=network.target

[Service]
Type=simple
ExecStart=/opt/sdrconnect/SDRconnect --server

[Install]
WantedBy=multi-user.target
So we create a file SDRconnect.service with the content from above and upload it to qbee.
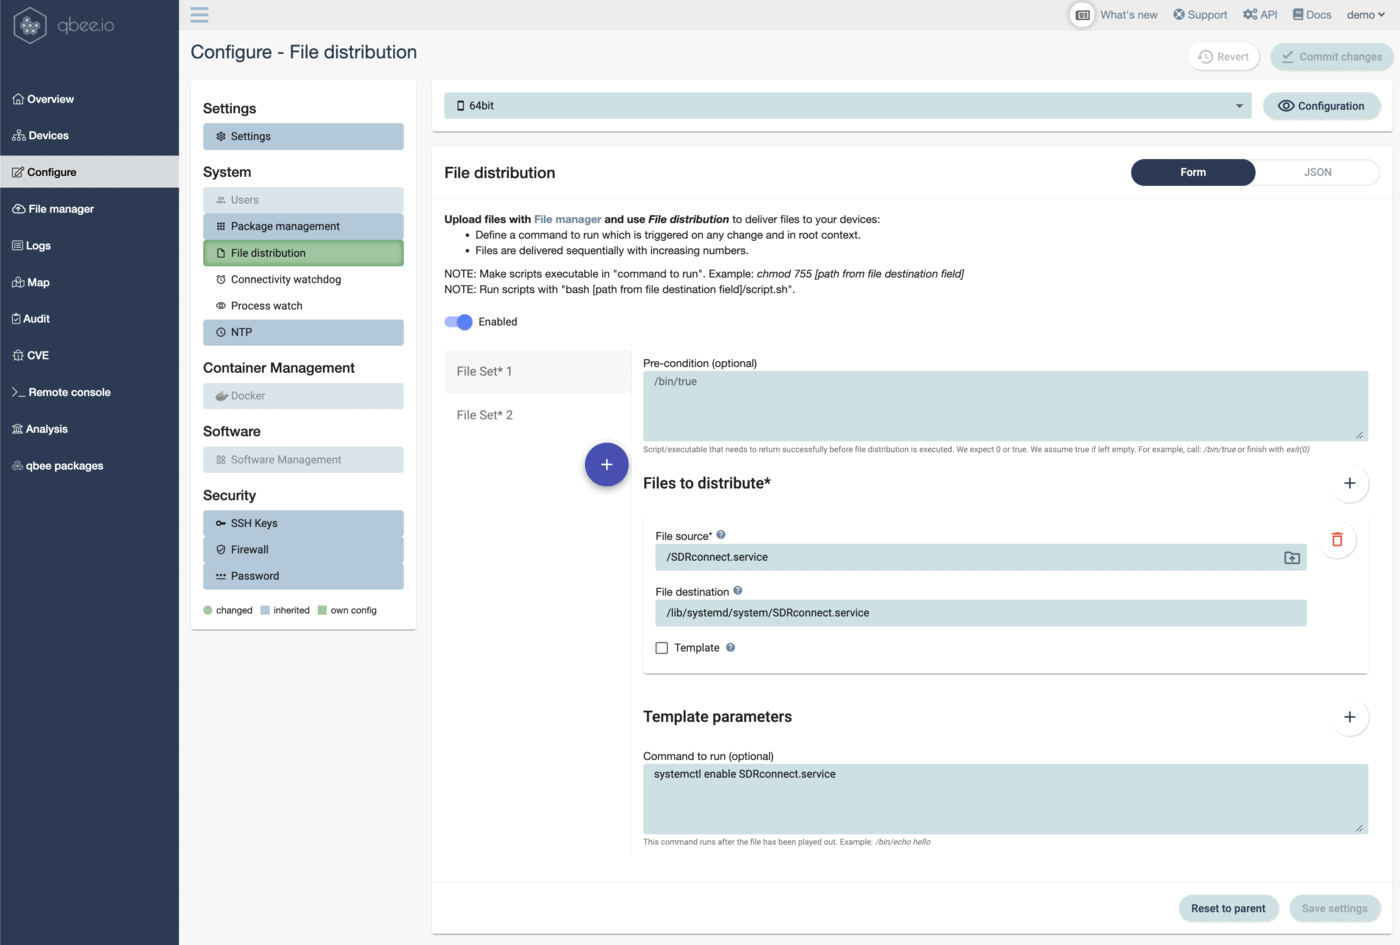
Then we select our device and go into configure. There we create a file distribution using this file and delivering it onto the remote device under the path given above. qbee allows to specify a "command to run". This command is run any time there is a change in the file or when it is distributed the first time. Here we make sure the service is enabled by invoking this command:
systemctl enable SDRconnect.service
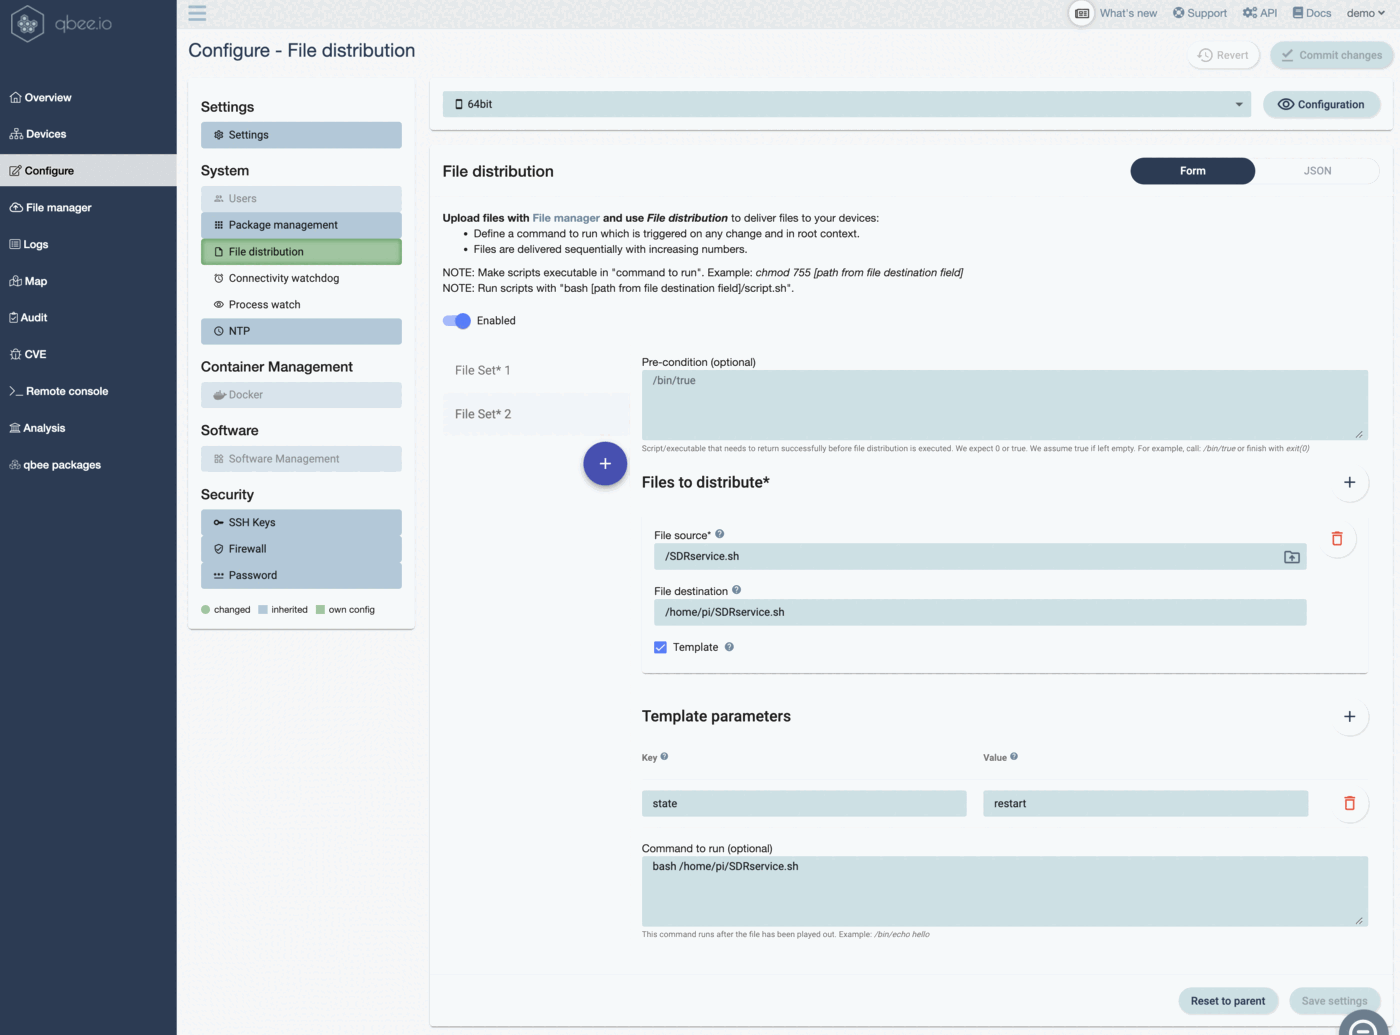
As a next step we create another file distribution in order to help us to control the service. We use qbee's key-value templating to create a script that can start, stop, disable, enable or restart the SDRconnect.service.
This is the shell script file:
SDRservice.sh
sudo systemctl {{state}} SDRconnect.service
In qbee you use the Mustache notation with double curly brackets to define keys for key-value pair operations. These can be used in the templating engine. So any time you change either the script or you change the value to something new the file will be recreated substituting the key with the value. This again triggers a "command to run", in this case this is bash /home/pi/SDRservice.sh just running the script.
This is how the file distribution looks like.
Now you control the SDRconnect server, and you can restart it or do any other operation. If you find out that you frequently need to restart then just use another variable which changes. Please see run once commands. Below is the video showing the whole process of creating the service and controlling it. If SDRplay decided to automate the license confirmation we could automate the whole installation process.