OTA image updates and CI/CD are critical components in modern software development and deployment strategies. OTA updates provide a seamless way to keep devices up-to-date and secure, while CI/CD ensures a continuous and efficient flow of code from development to production, enhancing software quality and delivery speed. Both practices address the demands of rapid innovation and high-quality user experiences in today's technology landscape. This tutorial shows how you can leverage qbee's OTA image update features and Github Actions to achieve continous deployment in a fast, resilient and secure way.
Github Actions and self-hosted runners
Yocto builds require a significant amount of diskspace to store state and binaries between builds. As the hosted Github runners are ephemeral, the disk cache of Yocto will be wiped between every run, causing the Yocto build to potentially take hours to complete on every commit. Although most CI systems have a concept of caching build artifacts, the amount of data needed can quickly exceed 50GB whick will slow down builds in downloading/uploading caches, not to mention packing/unpacking them.
A better option is therefore to use self-hosted runners, meaning non-ephemeral instances under your own control. This can be either a VM in the cloud or simply a laptop/desktop in your office.
The setup of self-hosted runners is pretty straight forward and described here
qbee-agent and Yocto
This example assumes that qbee-agent is already bootstrapped and running on the Yocto-based devices. For more on how to integrate qbee-agent in yocto please checkout the documentation for the meta-qbee layer
Configuring your Github workflow
To set up CI builds in GitHub you would need to create a workflow file in your repository. Below is an example of how this could look like.
main.yml
---
name: CI
on:
  push:
    branches: [ci-cd-rauc]
    tags:
      - '*'
  pull_request:
    branches: [ci-cd-rauc]

jobs:
  build:
    runs-on: [self-hosted, Linux, X64]
    timeout-minutes: 600
    container:
      image: dynamicdevices/yocto-ci-build:latest
      options: --privileged --platform linux/amd64  -v /dev/net/tun:/dev/net/tun -v /dev/kvm:/dev/kvm
    strategy:
      matrix:
        branch: [kirkstone]
        arch: [x86-64]
    env:
      name: build-and-test
      ARCH: ${{ matrix.arch }}
      BRANCH: ${{ matrix.branch }}
    steps:
      - uses: actions/checkout@v3
        with:
          clean: false
          fetch-depth: 0

      - name: Update repo poky
        run: |
          if [ ! -d ${BRANCH}/poky ]; then
            git clone git://git.yoctoproject.org/poky -b ${BRANCH} ${BRANCH}/poky
          else
            cd ${BRANCH}/poky
            git pull origin ${BRANCH}
            cd ../..
          fi
      - name: Update repo meta-openembedded
        run: |
          if [ ! -d ${BRANCH}/meta-openembedded ]; then
            git clone https://github.com/openembedded/meta-openembedded.git -b ${BRANCH} ${BRANCH}/meta-openembedded
          else
            cd ${BRANCH}/meta-openembedded
            git pull origin ${BRANCH}
            cd ../..
          fi
      - name: Update repo meta-qbee
        run: |
          if [ ! -d ${BRANCH}/meta-qbee ]; then
            git clone https://github.com/qbee-io/meta-qbee.git -b ${BRANCH} ${BRANCH}/meta-qbee
          else
            cd ${BRANCH}/meta-qbee
            git pull origin ${BRANCH}
            cd ../..
          fi
      - name: Update repo meta-rauc
        run: |
          if [ ! -d ${BRANCH}/meta-rauc ]; then
            git clone https://github.com/rauc/meta-rauc.git -b ${BRANCH} ${BRANCH}/meta-rauc
          else
            cd ${BRANCH}/meta-rauc
            git pull origin ${BRANCH}
            cd ../..
          fi
      - name: Update repo meta-rauc-community
        run: |
          if [ ! -d ${BRANCH}/meta-rauc-community ]; then
            git clone https://github.com/rauc/meta-rauc-community.git -b ${BRANCH} ${BRANCH}/meta-rauc-community
          else
            cd ${BRANCH}/meta-rauc-community
            git pull origin ${BRANCH}
            cd ../..
          fi
          # custom wks file
          cp ci-cd/rauc/qemux86-grub-efi.wks ${BRANCH}/meta-rauc-community/meta-rauc-qemux86/wic/qemux86-grub-efi.wks

      - name: Extract RAUC keys
        run: |
          mkdir -p $GITHUB_WORKSPACE/rauc-ca
          echo "${{ secrets.RAUC_CA_CERT_BASE64 }}" | base64 -d > $GITHUB_WORKSPACE/rauc-ca/ca.cert.pem
          echo "${{ secrets.RAUC_DEV_CERT_BASE64 }}" | base64 -d > $GITHUB_WORKSPACE/rauc-ca/dev.cert
          echo "${{ secrets.RAUC_DEV_KEY_BASE64 }}" | base64 -d > $GITHUB_WORKSPACE/rauc-ca/dev.key

      - name: Configuring
        run: |

          DEBIAN_FRONTEND=noninteractive sudo -E apt-get install -y gettext-base

          rm -f ${BRANCH}/build/conf/local.conf
          rm -f ${BRANCH}/build/conf/bblayers.conf
          . ./${BRANCH}/poky/oe-init-build-env ${BRANCH}/build

          bitbake-layers add-layer $GITHUB_WORKSPACE/${BRANCH}/poky/meta
          bitbake-layers add-layer $GITHUB_WORKSPACE/${BRANCH}/poky/meta-poky
          bitbake-layers add-layer $GITHUB_WORKSPACE/${BRANCH}/poky/meta-yocto-bsp
          bitbake-layers add-layer $GITHUB_WORKSPACE/${BRANCH}/meta-openembedded/meta-oe
          bitbake-layers add-layer $GITHUB_WORKSPACE/${BRANCH}/meta-qbee/meta-qbee
          bitbake-layers add-layer $GITHUB_WORKSPACE/${BRANCH}//meta-rauc
          bitbake-layers add-layer $GITHUB_WORKSPACE/${BRANCH}//meta-rauc-community/meta-rauc-qemux86
          bitbake-layers add-layer $GITHUB_WORKSPACE/ci-cd/rauc/meta-mylayer

          envsubst < $GITHUB_WORKSPACE/ci-cd/rauc/local.conf.template > conf/local.conf

      - name: Building
        id: build
        run: |
          . ./${BRANCH}/poky/oe-init-build-env ${BRANCH}/build
          bitbake -k core-image-minimal
          bitbake -k qemu-demo-bundle

          image=$(readlink $GITHUB_WORKSPACE/tmp-glibc/deploy/images/qemu${ARCH}/core-image-minimal-qemu${ARCH}.wic)
          bundle=$(readlink $GITHUB_WORKSPACE/tmp-glibc/deploy/images/qemu${ARCH}/qemu-demo-bundle-qemu${ARCH}.raucb)
          echo "rauc_image=tmp-glibc/deploy/images/qemu${ARCH}/$image" >> "$GITHUB_OUTPUT"
          echo "rauc_bundle=tmp-glibc/deploy/images/qemu${ARCH}/$bundle" >> "$GITHUB_OUTPUT"
          echo "rauc_bundle_filename=$bundle" >> "$GITHUB_OUTPUT"

      - name: Autenticate with qbee.io
        uses: qbee-io/authenticate-action@main
        with:
          login: "${{ secrets.QBEE_USER_RAUC }}"
          password: "${{ secrets.QBEE_PASSWORD_RAUC }}"
          api_host: "${{ secrets.QBEE_API_HOST }}"

      - name: Upload bundle to qbee.io
        uses: qbee-io/qbee-io/file-upload-action@main
        with:
          source: ${{ steps.build.outputs.rauc_bundle }}
          destination: /ci-cd-rauc

      - name: Upload and commit qbee.io configuration
        uses: qbee-io/config-apply-action@main
        with:
          file_path: ci-cd/rauc/rauc-config-template.json
          form_type: rauc
          node_id: ${{ secrets.QBEE_RAUC_NODE_ID }}
          commit_message: ${{ github.event.head_commit.message}}
          template_params: rauc_bundle=/ci-cd-rauc/${{ steps.build.outputs.rauc_bundle_filename }}
-
The first section is all about setting up the build with the right runner. In addition we want to use a ready-made docker image with all dependencies for Yocto builds installed.
-
The next steps are checking out the code of the repoistory itself, but also to checkout or update the relevant branch of the Yocto mete-layers. Note that we need to use a custom wks file for the RAUC builds as the default creates too small images to fit all software.
-
After checking out the necessary code, we need to configure the Yocto build environment.
- We start by extracting the necessary certificates and keys used for RAUC updates. See description here how to generate them. The keys are stored in base64 encoded version in Github secrets for the repo.
- The Yocto build environment needs to be configured with which layers to include and build config for those layers (local.conf). Here we are using a template for local.conf which is expanded with environment variables using
envsubstfrom thegettext-basepackage.
-
The build is initiated. The initial build on a clean runner will take hours to complete. However, due to the Yocto state caching, subsequent builds will be relatively fast.
-
Once the build has completed we upload the RAUC bundle to a location in the Qbee file manager and commit a configuration for a device group using Qbee Github Actions. Please note that we are also using repository secrets for the Qbee login details used in
qbee-io/authenticate-action@main.
Deploying new versions of software
As part of the setup we added a custom meta-layer which is part of the repo which contains an example application written in C (meta-mylayer) and the recipe for how to build it.
myapp.c
#include <stdio.h>

int main() {

  printf("Hello world!\n");

  return 0;
}
myapp_1.0.bb
DESCRIPTION = "Myapp recipe"
SECTION = "base"
LICENSE = "GPLv3"
LIC_FILES_CHKSUM = "file://${WORKDIR}/COPYRIGHT;md5=0edab6e76e7da7f1573a394999c7fe8f"

PR = "r0"
TARGET_CC_ARCH += "${LDFLAGS}"

SRC_URI = "file://myapp.c \
          file://COPYRIGHT"

do_compile () {
         ${CC} ${WORKDIR}/myapp.c -o ${WORKDIR}/myapp
}

do_install () {

       install -d ${D}${bindir}
       install -m 0755 ${WORKDIR}/myapp ${D}${bindir}/
}
This will add binary to the image (/usr/bin/myapp) which is a simple "hello world" application.
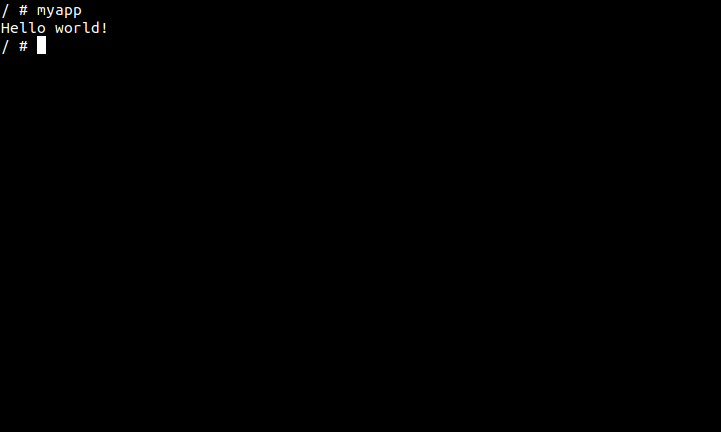
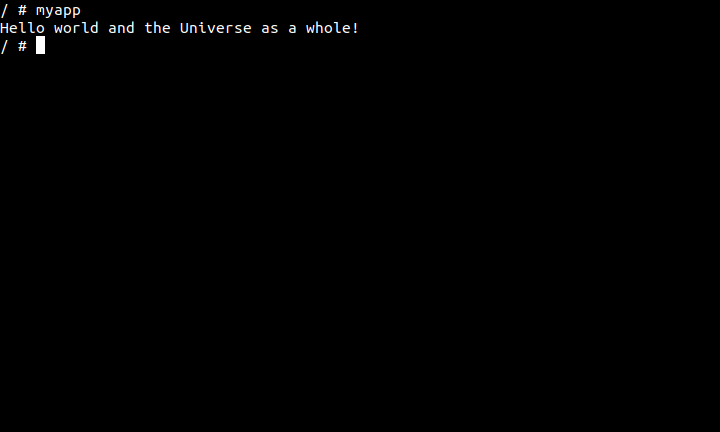
We can make changes to this application and get it to automatically deploy to devices in the device group by doing git commitand git push.
#include <stdio.h>

int main() {

  printf("Hello world and the Universe as a whole!\n");

  return 0;
}
Upon successful run of the CI pipeline, we can either wait for qbee-agent to check in or trigger an agent run immediately using the qbee UI or qbee-cli. A RAUC image update will be triggered during the agent run which will apply the RAUC update bundle to the inactive partition, switch root partition and reboot to boot of the new root filesystem.
Once the device(s) are back online, we can log in and check the application.
Conclusion
Combining CI jobs and Qbee functionality makes CI/CD for image based update mechanisms easy, allowing developers to only work with code and vcs systems (eg. git). If you want to read more about this example, please checkout the Github Workflow file here and the source code here here.