Modify a standard Raspberry Pi image (RaspiOS) and turn it into a golden master.
Summary - what needs to be done to create a universal image for a RPI
This document is a step-by-step guide to create a custom Raspberry Pi image ("golden image" or "master image") from any "official" RaspiOS distribution (light/headless, desktop/full), which can be downloaded from https://raspberrypi.org. This guide is especially useful if you want to set up many devices with the same image, but want to make as few settings manually as possible. At best, you only need to copy the https://qbee.io/ bootstrap key to the /boot partition after writing the image to the SD card. To further reduce the configuration effort, the image file can be mounted on a Raspberry Pi, i.e. to add or remove packages and make other settings. This example shows how to set up a digital signage system, so that the Raspberry Pi displays a blank desktop with a black background, no menus, no desktop icons and no decorations. The device management is handled with qbee but this guide should be useful if you use other tools as well.
Prerequisites & required hardware
- RaspiOS release. Here we start with the "desktop" image, but any other release ("lite/headless", "full") is also possible.
- 1 x 16 GB SD-Card
- 1 x external USB3.0 SSD
- 1 x Raspberry Pi 4, 8 GB RAM, running the raspiOS "full" release (Raspberry Pi 3 is also possible)
Image preparation
-
Preparation of Raspberry Pi 4
To be able to mount the Raspberry Pi image into the system, the following packages must be installed:
sudo apt-get update sudo apt-get -y upgrade sudo apt-get install -y systemd-container zerofree -
Download 2021-01-11-raspios-buster-armhf.zip from https://raspberrypi.org (any other version will do as well)
-
First, check sha256sum of the downloaded original compressed image
sha256sum 2021-01-11-raspios-buster-armhf.zip cb1efa778f3a4effda7bf6f622e8e8e779f5303ac77ac8c558061aece9020fe6 2021-01-11-raspios-buster-armhf.zip -
Extract and mount the image. Then, do a full system upgrade
sudo losetup --show -P -f 2021-01-11-raspios-buster-armhf-full.img sudo mkdir -p /mnt/raspbian sudo mount -v /dev/loop0p2 /mnt/raspbian sudo mount -v /dev/loop0p1 /mnt/raspbian/boot sudo systemd-nspawn --directory=/mnt/raspbian apt-get update apt-get -y upgrade apt-get clean -
Make the image somewhat smaller by removing some large packages not required for digital signage. Depending on the distribution (headless, desktop, full), this step will free up to 1 GB on your SD-card. If you're starting with the "desktop" release, the resulting image is approx. 3.4 GB. It'll take about 5 min writing an image of that size to an SD card.
apt-get -y purge wolfram-engine sonic-pi sonic-pi-samples sonic-pi-server scratch3 minecraft-pi thonny debian-reference-common mu-editor bluej scratch squeak-vm nodered geany greenfoot-unbundled claws-mail dillo python-games code-the-classics galculator gpicview mousepad htop qjackctl realvnc-vnc-viewer rp-bookshelf system-config-printer cups vim-common xarchiver piclone smartsim rp-prefapps qt5ct raspberrypi-ui-mods obconf rc-gui pi-package alacarte arandr lxinput lxhotkey-gtk lxtask lxrandr -
Autoremove packages that are no longer required
apt-get -y autoremove -
Enable ssh on boot
touch /boot/ssh -
Optional: Create /boot/wpa_supplicant.conf, containing your Wi-Fi credentials (in case that you prefer wireless bootstrapping). Wi-Fi can also be set individually on a device or group level with qbee.io later on.
ctrl_interface=DIR=/var/run/wpa_supplicant GROUP=netdev update_config=1 country=NO # <- make sure to insert the correct country code here! network={ ssid="Your network SSID" psk="Your WPA/WPA2 security key" key_mgmt=WPA-PSK } -
Edit /boot/config.txt to disable bluetooth, audio and hardware serial, if desired:
dtparam=i2c_arm=off dtparam=i2s=off dtparam=spi=off dtparam=audio=off enable_uart=0 dtoverlay=vc4-fkms-v3d,audio=off dtoverlay=pi3-disable-bt -
disable bluetooth service, if desired
systemctl disable hciuart.service systemctl disable bluetooth.service -
Create a qbee account
-
Install qbee agent
wget -qO - https://setup.qbee.io | sudo bash -s -- --bootstrap-key <bootstrap_key>
The latest version for your platform (armhf, arm64, amd64) can be found here: https://www.app.qbee.io/agent-latest/armhf
Since we're working on an image, the qbee post-installation scripts may fail to enable some system-services required for bootstrapping. Therefore, we have to do this manually:
-
Enable qbee-agent.service
systemctl enable qbee-agent.service -
In order bootstrap the device on first boot, we create and enable a systemd.service for it:
nano /lib/systemd/system/firstboot.serviceTime needs to be available for later bootstrapping
It seems that some newer RPI images do not sync the time properly before bootstrapping. qbee and other ssl based services need the time to be correct to work. Therefore, we have changed the script below. Thanks to Leroy from CaptureTech for providing this fix.
[Unit] Description=FirstBoot After=time-sync.target Before=rc-local.service ConditionFileNotEmpty=/boot/firstboot.sh [Service] ExecStart=/bin/bash /boot/firstboot.sh ExecStartPost=/bin/mv /boot/firstboot.sh /boot/firstboot.sh.done Type=oneshot RemainAfterExit=no [Install] WantedBy=multi-user.target systemctl enable systemd-time-wait-sync.service -
Enable firstboot.service at boot
systemctl enable firstboot.service -
Create /boot/firstboot.sh
#!/bin/bash ### Configure your hostname here! Uncomment the following lines, if you don't change hostname using qbee #CURRENT_HOSTNAME=`cat /etc/hostname | tr -d " \t\n\r"` #NEW_HOSTNAME=`cat /boot/hostname.txt | tr -d " \t\n\r"` #echo $NEW_HOSTNAME > /etc/hostname #sed -i "s/127.0.1.1.*$CURRENT_HOSTNAME/127.0.1.1\t$NEW_HOSTNAME/g" /etc/hosts ### bootstrap QBEE_KEY=`cat /boot/bootstrapkey.txt | tr -d " \t\n\r"` qbee-agent bootstrap -k $QBEE_KEY systemctl restart qbee-agent rm -rf /boot/bootstrapkey.txt -
Copy/place your qbee bootstrap key into /boot/bootstrapkey.txt (this could be done later, i.e. after dumping the image to the SD card)
touch /boot/bootstrapkey.txt nano /boot/bootstrapkey.txt -
Copy/edit the hostname in /boot/hostname.txt (this could be done later, i.e. after dumping the image to the SD card)
touch /boot/hostname.txt nano /boot/hostname.txt -
Enable "wait for network on boot" (make sure that network/ internet connection is up before running /boot/firstrun.sh)
systemctl enable systemd-networkd-wait-online.service
Configuring the image for digital signage
The following settings switch the desktop into "kiosk" mode, with a blank screen, no desktop menu, no desktop icons and decorations. You can skip these steps, if you only need automatic bootstrapping of your devices.
-
Create configuration directories for user "pi"
mkdir -p /home/pi/.config/lxsession/LXDE-pi mkdir -p /home/pi/.config/pcmanfm/LXDE-pi/ chown -R pi.pi /home/pi/.config -
Remove LXDE-panel from desktop and disable screen blanking:
nano /home/pi/.config/lxsession/LXDE-pi/autostart#@lxpanel --profile LXDE-pi #@pcmanfm --desktop --profile LXDE-pi #@xscreensaver -no-splash @xset s off @xset -dpms @xset s noblank @unclutterchown pi.pi /home/pi/.config/lxsession/LXDE-pi/autostart -
The same settings go into /etc/xdg/lxsession/LXDE-pi/autostart, if the file exists. User settings will override the global config file.
#@lxpanel --profile LXDE-pi #@pcmanfm --desktop --profile LXDE-pi #@xscreensaver -no-splash @xset s off @xset -dpms @xset s noblank @unclutter -
In some cases, the above settings do not stop screen blanking. Therefore, we also change lightdm.conf.
nano /etc/lightdm/lightdm.conf[Seat:*] xserver-command=X -s 0 dpms -
Remove "splash" from /boot/cmdline.txt (only necessary, when starting from "full" raspiOS image) and
add "consoleblank=0" to /boot/cmdline.txt
console=tty1 root=PARTUUID=900d36fa-02 rootfstype=ext4 fsck.repair=yes consoleblank=0 rootwait -
Hide the mouse pointer, if not used. Note, that the mouse pointer is not hidden on the blank desktop, but will disappear as soon as application windows are displayed (such as chromium browser).
apt-get install -y unclutter -
Modify default desktop appearance (black background, no wallpaper, no desktop icons, no trashcan)
nano /home/pi/.config/pcmanfm/LXDE-pi/desktop-items-0.conf[*] desktop_bg=#000000000000 desktop_shadow=#000000000000 desktop_fg=#e8e8e8e8e8e8 desktop_font=PibotoLt 12 wallpaper=/usr/share/rpd-wallpaper/temple.jpg wallpaper_mode=color show_documents=0 show_trash=0 show_mounts=0chown pi.pi /home/pi/.config/pcmanfm/LXDE-pi/desktop-items-0.conf -
Remove some entries of the openbox menu (optional)
rm -rf /usr/share/applications/lxde-x-www.browser.desktop rm -rf /usr/share/applications/pcmanfm-desktop-pref.desktop -
Change to the /etc/xdg/autostart directory and remove the following files:
rm -rf piwiz.desktop rm -rf pprompt.desktop rm -rf xdg-user-dirs.desktop rm -rf pulseaudio.desktop -
In /etc/xdg/user-dirs.conf set. This will stop auto-generation of subfolders in /home/pi, such as Documents, Music, etc.
enabled=False -
Optional: enable VNC remote access (can be useful if you want to check if your content is correctly displayed). Note that the desktop wont start unless a monitor is connected or display-settings entered into /boot/config.txt.
systemctl enable vncserver-x11-serviced.service
Enhance security settings
-
Disable all USB ports. Please note that this will also disable eth0 on Raspberry Pi3. Therefore, you have to enable WiFi (see above) on Pi3 in order to allow bootstrapping.
nano /lib/systemd/system/disable_usb.service[Unit] Description=Turn off USB chip After=basic.target [Service] Type=oneshot RemainAfterExit=yes ExecStart=/bin/bash -c 'echo "1-1" > /sys/bus/usb/drivers/usb/unbind' [Install] WantedBy=basic.target -
Enable disable_usb.service at boot
systemctl enable disable_usb.service -
Disable eth0 on boot (optional)
Create disable_eth0.service in /lib/systemd/system/
[Unit] Description=Disable eth0 After=basic.target [Service] Type=oneshot RemainAfterExit=yes ExecStart=ip link set eth0 down [Install] -
Enable disable_eth0.service Important: disabling eth0 should be done only AFTER bootstrapping and with WiFi enabled. In this case you have to place a wpa_supplicant.conf file containing your WiFi credentials into /boot (see above)
systemctl enable disable_eth0.service -
Disable sudo without password (password can later be set with qbee.io)
sudo visudo /etc/sudoers.d/010_pi-nopasswd pi ALL=(ALL) PASSWD: ALL -
Now, logout from container, unmount and check the filesystem
logout sudo umount -v /mnt/raspbian/{boot,} sudo zerofree -v /dev/loop0p2 sudo e2fsck -f /dev/loop0p2 sudo losetup -d /dev/loop0 sync -
Optional: If you want to make your image smaller, you can shrink it by using the following script: https://github.com/Drewsif/PiShrink
Optional settings
In order to prolong the life-span of your SD card you may want to disable system logging and swap space
-
Disable rsyslog
systemctl disable rsyslog.service -
Disable swap
systemctl disable dphys-swapfile.service -
Edit /etc/dphys-swapfile
CONF_SWAPSIZE=0
Instructions for using the golden master image
-
Check sha256sum of your master image. In our case we called it 2021-02-12-raspios-buster-armhf-qbeeio-rc5.img
0b9396fe7fdae0de02827f6bcbfc36bbc3353e7877b4b0d9f9a3b82fb40400aa -
"Burn" image to SD card. DANGER: make sure to select the correct drive /dev/sd?
dd if=2021-02-12-raspios-buster-desktop-qbeeio-rc5.img of=/dev/sd? bs=4M status=progress -
Mount /boot and edit/copy the following files:
Use custom bootstrap keys to onboard devices to specific groups:
With qbee you can create custom groups and bootstrap keys that associate the devices with a specific group. So if all devices in one location share a Wi-Fi key you could split devices according to Wi-Fi credentials and auto-accept them into the group delivering the specific Wi-Fi credentials through qbee file distribution (see further below).
/boot/bootstrapkey.txt /boot/wpa_supplicant.conf (optional) /boot/hostname.txt, default is: digitalsignage (optional) /boot/firstboot.sh (optional) -
Insert image into Raspberry Pi4 and let it boot.
-
Connect to "raspberrypi" using VNC/ssh Note: All USB ports are disabled! Note: VNC does not show the desktop unless a monitor is connected!
-
Change default password user: pi, password: raspberry -> (can also be done later with qbee password configuration).
-
The hostname will change only after second boot! Default hostname after second boot, if not changed in /boot/hostname.txt, is: digitalsignage
-
If you connect with VNC, a right-click onto desktop allows to open a lxterminal
-
Accept pending device in qbee.io dashboard, if this was not set to "auto"
-
Reboot
qbee file distribution settings
-
Content of raspi-config-script.sh - edit to your needs. Further information about how qbee can help you configure your device can be found in the tutorial
raspi-config-script.sh#!/usr/bin/env bash # Command control strings # receive configuration from raspi-config.conf source /usr/local/bin/raspi-config.conf sudo raspi-config nonint do_hostname $CUSTOM_HOSTNAME # sudo raspi-config nonint do_boot_wait $BOOT_WAIT # sudo raspi-config nonint do_boot_splash $BOOTSPLASH_ENABLE # sudo raspi-config nonint do_overscan $OVERSCAN # sudo raspi-config nonint do_blanking $BLANKING_ENABLE # sudo raspi-config nonint do_boot_splash $BOOT_SPLASH # sudo raspi-config nonint do_camera $CAM_ENABLE # sudo raspi-config nonint do_change_locale $LOCALE sudo raspi-config nonint do_change_timezone $TIMEZONE # sudo raspi-config nonint do_configure_keyboard $KEYBOARD sudo raspi-config nonint do_wifi_ssid_passphrase $SSID $WIFI_PASSPHRASE sudo raspi-config nonint do_ssh $SSH_ENABLE sudo raspi-config nonint do_vnc $VNC_ENABLE # sudo raspi-config nonint do_spi $SPI_ENABLE # sudo raspi-config nonint do_i2c $I2C_ENABLE # sudo raspi-config nonint do_serial $SERIAL_ENABLE # sudo raspi-config nonint do_onewire $ONEWIRE_ENABLE # sudo raspi-config nonint do_rgpio $GPIO_ENABLE # possible overclock options: None|Modest|Medium|High|Turbo # sudo raspi-config nonint do_overclock $OVERCLOCK # sudo raspi-config nonint do_memory_split $MEM_SPLIT # sudo raspi-config nonint do_resolution $RESOLUTION sudo raspi-config nonint do_wifi_country $WIFI_COUNTRY sudo systemctl enable disable_usb.service $REBOOT -
Content of raspi-config.tmpl - edit to your needs
raspi-config.tmpl# config template file for raspi-config-script.sh # deploy to /usr/local/bin/raspi-config.conf # uncomment line and expose parameter through mustache notation {{epoch}} # please remember: 0 is active/enabled and 1 is disabled # %d expects a number, %s expects a string export SSH_ENABLE={{ssh_0_yes_1_no}} export CUSTOM_HOSTNAME="{{custom_hostname}}" export VNC_ENABLE={{vnc_0_yes_1_no}} export SSID="{{ssid}}" export WIFI_PASSPHRASE="{{wifi_passphrase}}" export TIMEZONE="{{timezone}}" # use two letter country short code, example NO export WIFI_COUNTRY="{{wifi_country}}" # define as "shutdown -r now" for reboot export REBOOT="{{reboot_command}}" -
Upload both files to DigitalSignage folder in the qbee file manager in the dashboard. Then, import the following json into a templated File Distribution for the devices in scope:
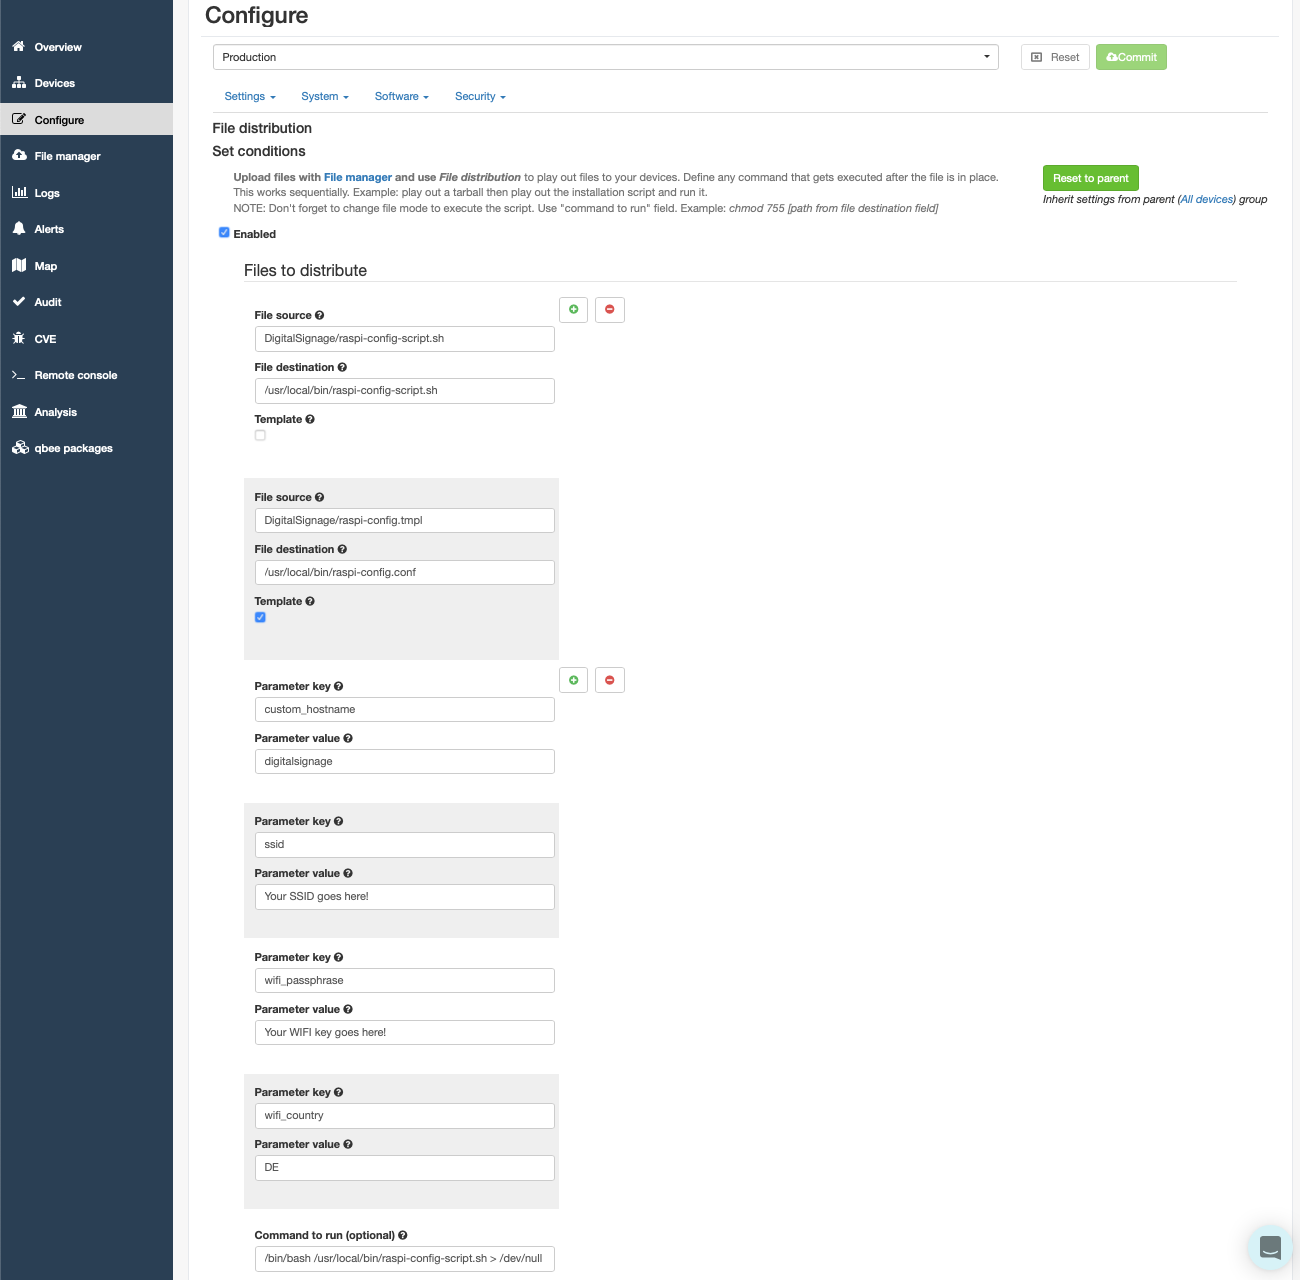
The json for the configuration, simply import with qbee configuration -> file distribution
{
  "enabled": true,
  "files": [
    {
      "label": "DigitalSignage",
      "templates": [
        {
          "source": "DigitalSignage/raspi-config-script.sh",
          "destination": "/usr/local/bin/raspi-config-script.sh",
          "is_template": false
        },
        {
          "source": "DigitalSignage/raspi-config.tmpl",
          "destination": "/usr/local/bin/raspi-config.conf",
          "is_template": true
        }
      ],
      "parameters": [
        {
          "key": "ssh_0_yes_1_no",
          "value": "0"
        },
        {
          "key": "custom_hostname",
          "value": "digitalsignage"
        },
        {
          "key": "vnc_0_yes_1_no",
          "value": "0"
        },
        {
          "key": "ssid",
          "value": "Your SSID goes here!"
        },
        {
          "key": "wifi_passphrase",
          "value": "Your WIFI key goes here!"
        },
        {
          "key": "timezone",
          "value": "Europe/Berlin"
        },
        {
          "key": "wifi_country",
          "value": "DE"
        },
        {
          "key": "reboot_command",
          "value": "shutdown -R now"
        }
      ],
      "command": "/bin/bash /usr/local/bin/raspi-config-script.sh > /dev/null 2>&1 &"
    }
  ],
  "version": "v1",
  "bundle_commit_id": "836e397274f76baf93d7ddaa76f71071c24b0e86a99738abc2a981d4a7d9864d"
}
Below you will see an image how a shortened configuration looks like in file distribution. This specific configuration is applied to the group "Production".
Additional configuration settings
- Further configuration settings, such as display resolution can be changed in /boot/config.txt. For details, check the documentation at raspberrypi.org: https://www.raspberrypi.org/documentation/configuration/config-txt/
Please let us know if you have additional configuration needs or ideas. We have a free 30 day qbee.io trial but the techniques described here can be just as well applied without a device management solution.