


Introduction
In this blog post we demonstrate how to deploy custom built deb packages via CI/CD (continuous integration / continuous delivery ) using qbee.io’s software management configuration. For the sake of simplicity we built a simple Python web server using Flask which displays content that is templatized using qbee.io’s template engine for configuration files. The advantage of using deb packages is that you can run your application as a system service. Therefore, qbee will list it in the software inventory and check constantly whether it is running – and if it is not, qbee will start it. Together with the package you can deploy configuration files used by the service.
The project is publicly available in our GitHub repository.
In the following we will present how to build deb packages using fpm or rather the fpm-action to be used within GitHub actions. Then, we will illustrate how to use qbee.io’s software management to configure and deploy deb packages. Finally, we show how to set up the GitHub CI/CD pipeline to deploy the newly built package to a group of production or test devices depending on whether we make push using a tag or not. Using this distinction we make sure that production devices only receive updates which have been tested and no application crashes. Please note that you can also use our file manager as source for the deb packages if you don’t want to use Github and keep it simple. In addition, through our API you can also upload packages from any other application you might use to build packages such as Jenkins.
The application to deploy
The sample application is a simple Python flask web server that displays content read from a templatized configuration file. The key value templating is defined in qbee.io’s software management configuration.
Below you can see the output of the web server running on port 5000 and being mapped to a localhost port through our remote desktop application qbee-connect.

Building the deb package
To build the deb package within a GitHub runner we make use of the GitHub fpm action with the following settings:
-   name: Package
    uses: bpicode/github-action-fpm@v0.9.2
    with:
        fpm_args: "--version ${{ steps.resolve-package-details.outputs.PKG_VERSION }} --architecture ${{ steps.resolve-package-details.outputs.PKG_ARCH }}"
        fpm_opts: "-s dir -t deb -n ${{ steps.resolve-package-details.outputs.PKG_NAME }} -d python3-flask -d python3-yaml -C ./files/package etc usr"
The arguments provided to fpm are the following
- version: package version being set up in the CI/CD process (either based on a provided tag or generated on the fly)
- architecture: target architecture where the package should run on. E.g. amd64 – defined in the CI/CD process
- type (-t): type of package to build, here deb package
- package name (-n): name of the package – defined in CI/CD process
- dependencies (-d): packages the newly created package depends on. Here we need the Python3 packages flask and yaml (which are available in the package repository)
- target directory (-C): change the directory to where the package files reside
Configuration using qbee's software management
The configuration for qbee.io’s software management is fairly simple. You simply need to provide the path to the deb package in the file manager and the configuration files which are used by the package. Those config files can be templated and you can provide the template key value pair in the parameters section.
Note that the version of the deb package file will be adapted to the current version created within the GitHub action workflow. Therefore, you do not need to modify this configuration file yourself in the CI/CD process.
					{
    "enabled": true,
    "items": [
        {
            "package": "https://d5af23a0.delivery.rocketcdn.me/test/qbee-ci-cd-example_0.0.1_amd64.deb",
            "config_files": [
                {
                    "config_template": "https://d5af23a0.delivery.rocketcdn.me/test/qbee-ci-cd-config.yml.template",
                    "config_location": "https://d5af23a0.delivery.rocketcdn.me/etc/qbee-ci-cd-example/qbee-ci-cd-config.yml"
                }
            ],
            "parameters": [
                {
                    "key": "title",
                    "value": "Welcome to qbee-ci-cd-example."
                }
            ]
        }
    ],
    "version": "v1"
}
In the above code snippet you can see that the templating value is “Welcome to qbee-ci-cd-example.”, which is exactly the text displayed by the web server.
The CI/CD pipeline using GitHub
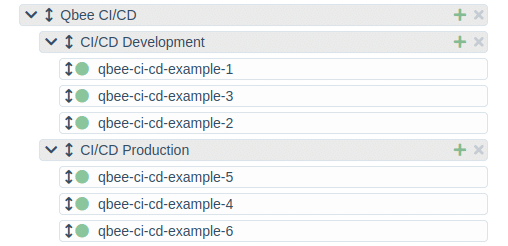
For the CI/CD pipeline we have set up two different groups of devices. One is called development and the other one is called production. Depending on whether we push a tag to GitHub or not the newly built deb package is deployed to the production group (with version number corresponding to the tag) or to the development group (with version number 0.0.ts, where ts is the unix timestamp of the package build time).
Below you can see the device tree structure in the qbee.io platform.
For implementational details of the entire process we refer to our public GitHub repository.